NEOSYS General
General FAQ
Why doesnt NEOSYS support my XYZ browser?
People sometimes expect NEOSYS to be supported transparently on all common browsers like most consumer applications or mass market web based applications - and are disappointed when NEOSYS does not support their favourite browser. Actually many complex and specialised enterprise applications only support a limited range of browsers. This is primarily for cost and efficiency reasons related to the development of user interface software and the long term support of users environment.
What is the NEOSYS backup procedure?
Every morning at a scheduled time, NEOSYS backs up all data and stores it onto a USB drive (if NEOSYS is hosted on client's server), under folders that represent each day of the week. If the folder already exists then it is overwritten.
The USB needs to be interchanged after it completes a cycle of 7 backups with another USB to store the next 7 days of backup. There should be 3 USBs used in rotation. In case the USB is not interchanged on the scheduled day after completion of 7 backups, the next backup on the same USB will be deemed a failure in the backup email alert.
At the end of 3 weeks, typically a client will have backups for the last 21 days which can only be used to restore NEOSYS to any particular point in time in the past (up to 21 days).
The backup files in the USB drive are encrypted and cannot be opened or read by any other program besides NEOSYS. They can only be restored in NEOSYS by support team.
How can I verify that the backup has been successful?
Every night when NEOSYS has been backed-up, an automated email alert is sent to all the designated recipients indicating the success or failure of the backup.
A successful backup indicates that all files required by NEOSYS to restore to an earlier time period have been saved successfully.
The backup process carries on smoothly but it will FAIL if:
- There is no USB connected to the server
- The USB has not been replaced at the end of 7 days
How do I migrate data from my old system to NEOSYS
If you have a manual system in place wherein all your data is on excel and word then the best way to migrate would be to start off using NEOSYS afresh. This is because information in excel and word cannot be computed into a sensible financial document like a Balance sheet.
However if you are already using another finance package or management software system, then there is a guided process of how to migrate to NEOSYS.
For Finance see Migrate Finance data from OLD system to NEOSYS
For Media and/or Jobs see Migrate Media and/or Jobs data from OLD system to NEOSYS
What type of database does NEOSYS use?
NEOSYS is a custom program with a built in database of its own. NEOSYS consists of a “front end” which is implemented entirely in DHTML/Javascript/AJAX and a “back end” which is sealed and protected to ensure integrity of all data and processes.
Any requests for interfacing another program or online service with NEOSYS needs to be sent to the support staff with specifications of desired inputs and outputs.
How to reset the password?
See How to reset the password?
How to handle printing continuation pages of NEOSYS generated documents?
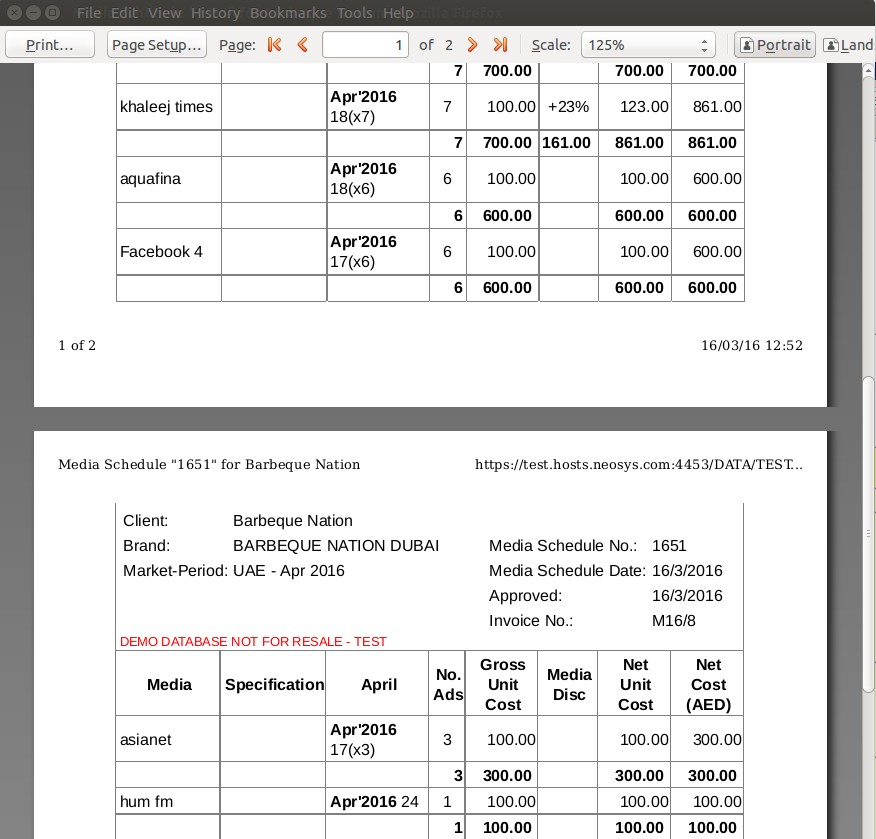
While taking printouts of certain NEOSYS documents like invoice or estimate or schedule printout etc, the content might continue to the next page.
To handle the printing of continuation pages, adjust the scale.
Print Preview > Scale. Also refer here on how to avoid bad page breaks.
The continuation pages always start with the column headings.
Example in Firefox:
Avoiding bad page breaks
Fine tuning the scaling is is particularly useful when only a few lines of the footing go over onto another page.
In this case you can either slightly reduce the scaling so those lines fit on the previous page or even to slightly INCREASE the scaling so the whole of the footing appears on the last page.
How to cut and paste from browsers to Thunderbird
This is about cutting and pasting textually not graphically. Cutting and pasting textually has the advantage that the result will reformat to fit the screen in email apps and the data can be cut and paste into other programs, however the copy is rarely exact and usually loses some formatting. It can copy whole documents not just what is on the screen.
Cutting and pasting graphically provides exact and selective screenshots showing all formatting exactly, however any data cannot be extracted or reformatted. It can only copy what is on the screen, not multi-page reports.
Step 1 - Copy from browser
Firefox and Chrome full copy
- View Source (Ctrl+U)
- Select All (Ctrl+A)
- Copy All (Ctrl+C)
Firefox partial copy
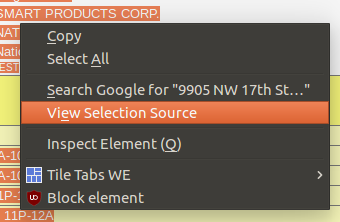
- Select part of the report or document
- Right click
- Select View Selection Source
- Ctrl+C to copy all (source HTML)
Step 2 - Paste into Thunderbird
- Position the cursor where you want to paste
- Open the Insert Menu
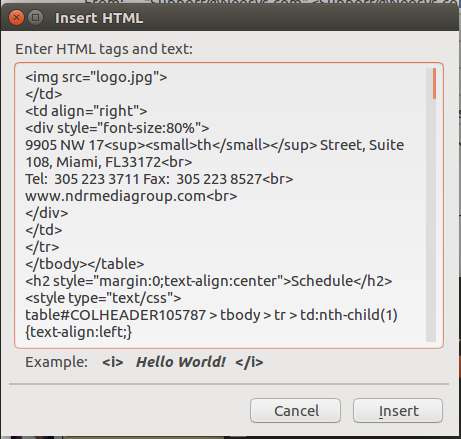
- Select the option "HTML..."
- Paste into the box provided then click Insert
Is it okay to resize images for use in letterhead for NEOSYS documents?
Why cant you resize a nice large graphic of text down to the size required?
All jpg/gif/png files lose quality if you resize them. The problem shows up most clearly in graphics of text because of all the fine lines in the characters. Some corporate logo files suffer less from the problem if they have a simple design, but very few are immune to the problem.
Since it is impossible to simply resize an existing file without losing quality, the only way to get the correctly sized graphic is to have it regenerated from the master image - typically stored in a Photoshop or another image designer file.
There is no escape from this rule. Nobody and no program can simply resize an existing jpg/gif/png file and retain quality. Resizing only slightly is, if anything, even worse than resizing significantly.
Since resizing graphics of text is not a simple matter, generally any text in headings is done in HTML text. Using image files for text is a last resort used only if the required font is unusual as is sometimes the case for non-western scripts.
Why bother with getting the best quality?
NEOSYS clients are in the advertising business so generally they need to show that they can manage their own graphics. The more skilled eyes in the advertising and marketing departments of both NEOSYS clients and their clients will notice poor quality even if the untrained eye does not.
NEOSYS support staff must request properly generated files and refuse to resize larger images down to size or accept poor quality resized files from client staff. The quality of the clients documents reflects on everybody including NEOSYS and client management will expect NEOSYS support to ensure that the best quality work is done and overcome any internal obstacles.
Images that appear to be low but acceptable quality on-screen may be much less acceptable quality when printed therefore before accepting poor quality images, make sure you check actually printouts on paper.
What is the problem technically?
The problem arises because jpg/gif/png graphic files are just a pattern of dots and the original graphic design program has generated some dots with shading to create an illusion of smooth strokes despite the fact that a smooth curves and diagonals cannot be represented exactly on a grid of dots. When you resize the graphic (pattern of dots) the resizing program has no idea of where the strokes of the letters are and it is totally unable to recreate, on a different grid of dots, a new set of half-shaded dots that creates the same illusion of smoothness.
Example of Graphic correctly GENERATED to the desired size
This image is too rather too big for our letter head because it is 200 pixels high. So we need to resize it? Well no, we need to REGENERATE it from the master logo design file. See next image below.
Here is an alternative version of the above text generated to a much smaller size. As long as the graphic is regenerated from the master design and not resized, it is possible to have text quite small in graphics but still to have good quality of appearance.
Example of Graphic crudely RESIZED to the desired size
LET'S LOOK AT A GRAPHIC THAT HAS BEEN CRUDELY RESIZED
Here is an image that has been resized smaller from a large and lovely jpg file originally produced from Photoshop.
It looks kind of okay to the untrained eye at 100%, but not if you had a decent quality image to compare it with, and when printed on paper, the low quality becomes much more apparent.
Take a closer look -150% - not very smooth is it?
At 200% we clearly see that the image could be much better. The letters are lumpy and the bottoms of all the letters are clearly cut off on the 4th line. These problem are typical of what happens when you "resize" a nice large graphic down to the size you want.
Let's go even closer(400%). Here we can see all kinds of grey mess even between the letters.
Closer look at the correct GENERATED image
Now let's look at the graphic that has been properly generated to the exact size desired from the original master design in Photoshop.
It has a crisp and clean look about it.
Zooming in to 200% we see that that the dots are cleverly shaded to create the illusion of smoothness. The image is blurred now that we are viewing it at 200% but that is expected.
At 400%, the nature of shading to create illusion of smoothness is clear. It also becomes clearer that the shading has been generated for a specific grid of dots and resizing could not be done without reference to the original knowledge of strokes and letters to generate a new pattern of shading.
Another example of a CORRECTLY GENERATED logo/image file
This SMALL image file (only 72 pixels high) has been created properly by a programmer from the master design file (eg photoshop) designed by a professional graphic artist.
In this case it is a jpg file but png would be the same. You can see this file at http://vm1.neosys.com/images/neosys.jpg
Despite only 72 pixels vertically this file doesn't look pixelated either on screen or when printed.
Zoom in so you can look at the quality more closely.
Even at this magnification, there is still little or no pixelation visible. This is because the dots are clever dithered to give the IMPRESSION of smoothness.
Moral of the story is that properly created image files do not appear pixelated whereas crudely resized images lose the clever dithering and show as pixelated.
How to delete files or documents in NEOSYS?
NEOSYS allows users to delete some files such as Schedule files, unposted journal batches, Client & Brand files, Vehicle files etc. by clicking the Delete button on the top of the page. Schedule files cannot be deleted once they are either booked, certified or invoiced.
Job files cannot be deleted in NEOSYS, but can be cancelled. Refer: Cancelling a Job.
Any document after creation cannot be deleted in NEOSYS, but you can mark it as cancelled. For example: Cancelling a booking order.
Invoices once generated cannot be cancelled or deleted. To know why, see cancellation or amendment of Invoices after issue
Files that are in use on other documents must never be deleted (e.g. currency files). We do not fully know the implications of doing so but it can cause problems in future.
How to restore deleted files in NEOSYS?
You can restore deleted files like Schedule files, unposted journal batches, Client & Brand files, Vehicle files etc. in NEOSYS by entering the deleted file's code or number and then saving it.
The deleted file's record will remain in the version log of the file, in case it needs to be viewed later.
Why is NEOSYS taking a long time to generate a report?
The amount of time required by NEOSYS to generate a report depends on:
- Options selected while generating the report.
- Total number of records selected to be displayed on the report.
Once you have selected the desired options, click on LIST and wait until the report is generated.
Please wait until the report shows up on screen
OR
Until you get an error message saying "No response in 600 seconds from database server at ....."
In case you get the "No response in 600 seconds from database server at ....." error message then follow the steps mentioned in Media FAQ
What customisation can be done on the format of NEOSYS documents?
NEOSYS provides a range of customisation options for all documents generated out of the system i.e. schedule printouts, booking orders, estimates or purchase orders, financial reports. You can do either or all of these:
- Use any font name and/or size that appeals to you or your corporate image
- Use a background colour that reflects your corporate image
- Use a masthead or logo as the header along with address text
- Customise your own set of terms and conditions for the footers
- Customise the signatories name and designations which should appear
The core information/content (between the header and footer) of each document is generally set to a standard format which has been widely accepted in the advertising industry over many years. NEOSYS has many options when requesting documents to cater for a wide variety of output styles but, apart from these options, the essential format cannot be completely revised from scratch. This is because NEOSYS is a ready-to-use package software solution used by many companies. Maintaining some standardisation of NEOSYS across many clients facilitates better and more efficient customer service by the NEOSYS support team. It also allows ease of upgrading over time. NEOSYS generally will develop the software free of charge but not perform any major one-off customisation, and has rarely been asked to do so.
How can we export data from NEOSYS?
All NEOSYS output is in the form of HTML which can be conveniently and directly saved.
The reports can also be copy pasted into excel or other documents that are acceptable by auditors or other software.
To export Invoices in Excel format, see Export Invoices
Does NEOSYS have any kind of documentation to learn and understand the software
NEOSYS wiki is available to users online. Users can go through the same to understand how to use, setup and troubleshoot NEOSYS.
Users can search for NEOSYS wiki on Google
Using NEOSYS Generally
Getting started with NEOSYS
- Reset your browser to factory settings to ensure all 3rd party toolbars/pop-up blockers are removed and browser cache is cleared. See Reset Browser for instructions.
- Reopen the browser and ensure that the pop-up blocker is disabled. See Disabling Popup Blocker for instructions.
- Enter the NEOSYS URL.
- Add this URL to your favourites.
- You should now see the Login page. If you are a new user or have forgotten your password click on How to reset the password? for instructions on how to get your password
- Enter your Username, Password, select the database and click on login. See http://youtu.be/dS62_eSCm-A to learn how to login to NEOSYS.
- You should now see the user details page.
Using the NEOSYS testing and training database
Standard NEOSYS practice is to setup a "testing and training" database for each operationally live database. This testing and training database is very useful to try out procedures in NEOSYS without having any real live or permanent effect. The testing and training database is virtually a copy of the live data because every night the live database is cloned over (copied) to the test database. This database is generally available to everybody who has access to the live database unless specifically restricted.
- To access the test database, first log out of the live database if you are logged in, then chose the test database from the dropdown on the login screen before logging in.
- Since the test database is a copy of the live database as at last night (around 1am) it contains up to date info for you to play with any time you like.
- Any work you do in the test database has no effect whatever in your live database.
- There is no way to copy any work done in the test database to the live database
- Since any testing work done in the test database will be OVERWRITTEN during the night, if you wish to perform extended testing which extends overnight, you can ask NEOSYS support to suspend the nightly copy.
- Passwords in the test database are a COPY of whatever was in the live database at the time it was copied (usually last night). Resetting the password in LIVE or TEST does not affect the other database.
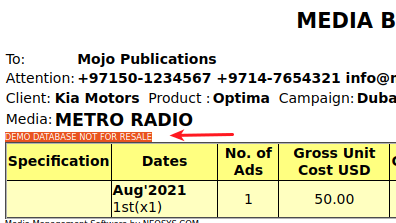
- Documents and reports generated from the test database have a mark (in red) in the heading to indicate that they did not come from the live system. This helps to reduce confusion in case people lose track of which system they are working in.
Screen logging in to test database:
Document showing red warning in heading:
Restricting user access to files
Restricting user’s access to certain records of a file depending on company/division
In the following discussion remember that NEOSYS “companies” are used to implement any kind of corporate division. This includes legal entities and any type of internal division including departments, cost centres and profit centres etc.
Step 1 is to use the NEOSYS Authorisation File to generally restrict users access to certain companies/divisions, then they will also be restricted from viewing any records “belonging” to those companies/divisions. Split the groups in the authorisation file into multiple groups per division. For example, instead of one CLIENT SERVICE group in the Authorisation File you can create CLIENT SERVICE1, CLIENT SERVICE2 etc. The only difference must be a trailing integer so that the actual division name can be determined by NEOSYS.
For example to restrict access to company/division “XYZ” you create locked tasks in the NEOSYS Authorisation File as follows. The quotation marks are required.
COMPANY ACCESS “XYZ”
Invent a suitable lock eg =CFX to lock this company, place that lock on the newly created task and add that lock to the keys of the groups that should have access to that company.
Step 2 - Most of the various files in NEOSYS allow, and sometimes require, the association (i.e. tying) of individual records to specific companies/divisions either directly or indirectly.
Depending on the file, restrict access by entering one or more of the following on the individual records that are to be restricted.
- Company code
- A/c No. of an account which is tied to a specific company/division in its chart of accounts
- ”A/c No , company code” eg 99999,XYZ - in most places that you can enter the A/c No. you may also follow it with a comma then the company code.
- Codes of other records which are themselves tied to a specific company/division.
Important Note: brands are associated with the company of the account at the time that the brand was created and removing the company from the account code didnt free up the brand from the company which also includes removing the company code from the chart. Hence if you do such a change you need to run the following in maintenance mode:
F5
CREATEBRANDS
Yes
Restricting access of users to specific individual records
Insert locked tasks in the Authorisation File similar to the following. For example, the following restricts access to company “XYZ”. The quotation marks are required.
COMPANY ACCESS “XYZ”
Generally, wherever there is a task called ‘filename ACCESS’ then you can add tasks like ‘filename ACCESS “XYZ” ’ to restrict access to individual records.
Other examples are:
ACCOUNT ACCESS “99999”
MARKET ACCESS “INT”
Restricting access to the company and market files is rather special in that it also restricts access to any and all records associated with (ie “belonging” to or tied to) that company or market.
Due to limitations in the size of the authorisation file, this should be limited to no more than a few 10’s of records in total for all files.
Codes in NEOSYS
Inventing codes
In order to speed up data entry, NEOSYS usually allows codes to be entered directly instead of relying on name searches and popups which are slower.
There are three strategies to invent codes:
- Sequential numbers. Easy to generate codes for new records but the codes are difficult to remember and are meaningless
- Meaningful codes. Invent a pretty code so that when you look at the code it reminds you of the name. There are many alternatives though and it is usually difficult later on to re-guess/remember the exact code given only the name.
- Meaningless codes. Use some mechanical rule for generating a code from the name. If the rule is simple, then later on we can re-guess the code from the name easily. Unfortunately looking at the code usually does not remind us of the name.
The real aim of coding, if you think about it for a while, is to be able to know the code to enter it quickly even if all you know is the name. Therefore method three is the most useful.
Surprisingly, the main aim is NOT to know the name on seeing the code which is natural instinct of most people when coding. Meaningful codes are indeed pretty but usually it is difficult to remember the exact code for data entry.
Interestingly, it is common to find NEOSYS clients who have never met each other to be using identical codes for the same clients and suppliers etc.
Using Four letter coding system
This four letter coding system has proven over many years to be easy to use and surprisingly good at avoiding duplicate codes where there are thousands of records.
Follow these steps rigorously:
- If there is a well known abbreviation for something use that regardless of how many letters there are. e.g. IBM or UNESCO
- Remove all standard words from the name to be encoded. Egg The, Company, Al, Incorporated, Ltd etc
- If there is only one word left in the name take the first four letters otherwise take the first two letters of the first two words and ignore any following words.
- ACCIDENTAL DUPLICATIONS: If the code accidentally duplicates with another code, simply add a 2 or 3 or 4 onto the end of the code. DO NOT INVENT YOUR OWN CODES.
- PREDICTABLE DUPLICATIONS: If you know in advance that there are several similar accounts with almost the same name then first use the four letter rules rigorously ... and then add two letters e.g. country, town, currency etc to distinguish the duplicates.
Examples of four letter coding
NESO - NEOSYS Software Ltd. (rule 3: easy to take the first two letters of the first two words)
KHAL - Al Khaleej (rule 2 and 3: Remove the standard word Al and take the first four letters of the only word)
IBM - IBM Corporation (rule 1: Standard abbreviation although in practice would probably have a geographical location appended)
STBU - Stephen Burns (rule 3: Personal names code well in using four letters)
STBU2 - Stephan Butros (Rule 4: An accidental duplication .. simply add 2)
GUOIDU - Gulf Oil Dubai (Rule 5: We know there are many Gulf Oil records so we add two letters for the location)
GIOIJE - Gulf Oil Jeddah (Rule 5:)
What is NEOSYS password policy?
NEOSYS automatically generates short, memorable passwords for users and sends them to their registered corporate email address. Users can request their initial password, or a new password, at any time as long as their account is valid.
A NEOSYS automatically generated password is a four letter "word" in the pattern "CVCV" - consonant, vowel, consonant, vowel. These are short and memorable like "KILA". This reduces the occurrence of users noting down their passwords in insecure locations and therefore tends to increase overall security. Also, since users cannot pick their own passwords, weak passwords are avoided thereby tending to increase overall security.
Three failures to login, for whatever reason, causes a user account to become locked until a new password is requested. Automatic lockout makes password guessing attacks infeasible despite the shortness of the NEOSYS password. Users can unlock their own account by simply requesting a new password.
When a login is refused, no specific reason is given, only a message that lists all the possible reasons for login failures. Either the username or password is incorrect or the account has been locked and a password reset should be done. Not being told the specific reason for failure to login is rather unhelpful for legitimate users but it is considered to be a standard security practice to avoid providing any information that might facilitate unauthorised access attempts.
Users can update their own email address, but only after logging in successfully, and only to the companies corporate email servers. The email address part after the @ sign is restricted. This prevents password resets being sent to third party email systems which are outside the control of the company (like gmail.com etc.) unless specifically allowed.
Forcing users to change password regularly
Enforcing periodic change of user passwords is an optional policy set per database in NEOSYS. The maximum number of days between password changes can be set and applies to all users. If a user does not change their password within the maximum period then their account is locked and they cannot login until they request a new password in the usual way from the login screen.
Enforcing periodic change of user password is often considered an essential component (but only a component) of overall computer security. The concept is that people who improperly gain, or retain, access to the system, but do not have access to corporate email and therefore are unable to avoid password expiry, will not have access permanently.
For example: Someone leaves the company and a) has been been granted partial or unrestricted access to NEOSYS from outside the office and therefore continues to have physical access to NEOSYS despite having left the company and b) has not been removed or expired from the NEOSYS authorisation table due to administrative oversight. In this case, the person will *not* have permanent access to the system because they will not be able to renew their NEOSYS password because, having left the company, they no longer have access to their corporate email account. Note however that THEY WILL HAVE ACCESS although for a limited period of time. In the worst case, if they renew their password just before leaving, either by accident or design, they could have unauthorised access after leaving the company for a maximum period of the number of days specified for password renewal.
Potential disadvantages of enforcing periodic password renewal:
- May DECREASE security if it results in people writing down their password in insecure locations even though the passwords are memorable four letter word
- Inconvenient for infrequent users like management - although management level access should really have greater security not less
- Unpopular with users
Giving access to users using Authorisation file
Only NEOSYS Support are authorised to make changes to the Authorisation File.
A designated person within the client company must approve of requests to make changes.
Find more information: Authorisation File
Splitting single NEOSYS report columns like 1000.00USD into two columns in Excel
Many NEOSYS reports put currency amounts in a single column like 1000.00USD, ie as a single number followed by a currency code. It does this to keep reports compact and to provide multi-currency totals in a single column.
In order to support pivot table or export into other systems it is sometimes necessary in spreadsheets like Excel to split the number and currency code into separate columns.
In Excel, strangely there is no built-in way to split numbers from letters but the following steps will achieve the same or better.
- Select the column that you want to split, and duplicate it to get two identical columns by inserting a column and copying the original column into it.
- Remove the currency codes from the first column by selecting it and doing Edit, Find and Replace (Ctrl+H), select "Regular expressions" under "Other options". Search For [A-Z] and Replace With nothing.
- Do the same on the 2nd column and Search for \d and Replace With nothing.
Using Macros
These steps can trivially be recorded as a macro, maybe called Split Currency Amount, and re-performed on request on any future sheets. This makes splitting even easier than any built-in function.
In order to record the macro, select the column then perform the steps, then stop recording and save the macro maybe as "Split Amounts". Assign a hot key like Ctrl+Shift+S to be able to repeat it easily in future.
In order to redo the work on another column, select the column then replay the macro, or if you assigned a hot key, press that combination.
Showing signatures for people who are not users of NEOSYS
You can issue documents on behalf of anybody by typing in their name as the executive when creating the document, however this does provide a signature.
Solution:
- Create NEOSYS user to represent the “issuing” users. Email address: support@neosys.com. (Do not give password to client)
- Upload signatures onto the User File for the issuing users. To update users other than yourself, you need to be authorised to do “USER UPDATE”
- When creating documents on behalf of issuing users, enter the user code of the issuing user as the Executive. The default executive/issuing user can be setup per client and/or brand in the Client/Brand File if desired.
Using Google to search NEOSYS wikis
Mediawiki's built in search is nowhere near as smart as Google's but Googles search often lists non-NEOSYS pages.
Search like this:
neosys wiki "exchange rate"
Putting Exchange Rate in "" quotes searches for the exact phrase instead anywhere either word appears
Setting up and Configuring NEOSYS Generally
Configuring letterhead
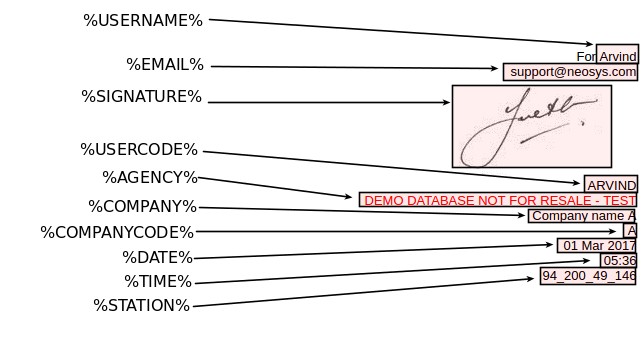
List of macro variables available
The following codes are available:
- %USERNAME% - of the user who created the document
- %EMAIL% - of the user
- %SIGNATURE% - shows the image file uploaded for the users signature if any
- %USERCODE% - of the user who created the document
- %AGENCY% - the "client mark" usually an abbreviated version of the NEOSYS licenced company name. Not client configurable. Refer Configuring Client Security mark. The client security mark shouldn't be used as company name as %AGENCY% may be present in many other configurations.
- %COMPANY% - company name taken from the Company File. While configuring footer for invoices of a company, use %COMPANY% instead of %AGENCY%, since %AGENCY% is the client security mark which is common to all or most companies in an installation.
- %COMPANYCODE% - from the Company File. Useful for configuring logo per company/division (e.g. src=%COMPANYCODE%logo.jpg)
- %DATE% - normally the date the document was actually created (user's local date)
- %TIME% - similar to date
- %STATION% - usually IP number.
The following obsolete codes are also supported for backward compatibility but should be replaced by the newer forms above where-ever possible.
- %USER
- %USERNAME
- %AGENCY
Below screenshots show an example of how the available macros can be used in the invoice footer in System Configuration File and how they appear on the invoice output.
Location of JPEG Images for Company Stamp/Signature
Make sure the JPEG image is located in the neosys/data/xxx folder (where "xxx" is the database code)
Single Company Installation
In the Media / Job Configuration File, Scroll down to the Invoice Footer field under the Invoicing section and add the script
<img src = imagename.jpg></img>
where "imagename.jpg" is the name of the JPEG image.
Note: While reprinting invoices, footers remain as they were when the invoice was created.
Booking Orders
In the "Media Types File", add a new line in the "Order Footer" and add the script
<img src = imagename.jpg></img>
where "imagename.jpg" is the name of the JPEG image.
Multiple Company Installation
In the Media / Job Configuration File, Scroll down to the Invoice Footer field under the Invoicing section and add the script
<img src = imagename%COMPANYCODE%.jpg></img>
and "imagename%COMPANYCODE%" will be converted to "imagenameXYZ" where "XYZ" stands for the company code in capitals.
Booking Orders
In the "Media Types File", add a new line in the "Order Footer" and add the script
<img src = imagename%COMPANYCODE%.jpg></img>
and "imagename%COMPANYCODE%" will be converted to "imagenameXYZ" where "XYZ" stands for the company code in capitals.
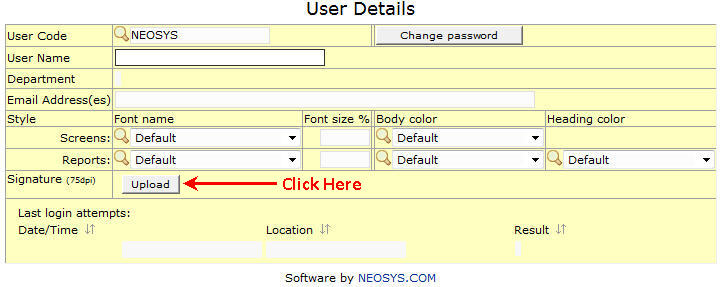
Users can configure their personal signatures on the USER FILE by uploading a JPEG image of their signature.
Such signatures will be inserted below any "%USERNAME%" or "%USER" code configured in document footings unless %SIGNATURE%, %NOSIGNATURE% or another image is configured in the footing. This feature can be suppressed and controlled in the System Configuration File.
See System_Configuration_File#Style Signature setting in System Configuration File
- Browse for the required file and click on upload:

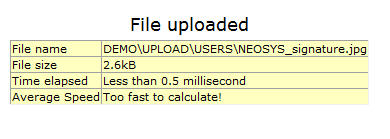
- Once the desired file is uploaded successfully, a file upload summary would be displayed as follows :
- Once you close the file upload summary, you would see a preview of the uploaded JPEG image.
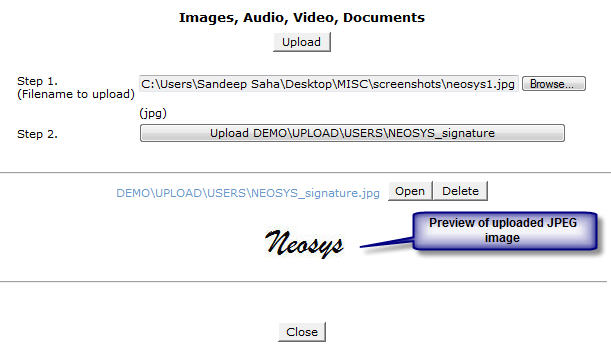
- If you would like to delete the uploaded image, click the "Delete" button to do so.
- To replace the uploaded image with a new one, you may simply click "Upload" and upload a new image which would overwrite the previous one.
General Guidelines for uploading Signature Image Files
To ensure that the signature appears correctly on NEOSYS documents, the following guidelines must be followed:
- Signature image files should be scanned at 96 dpi for proper alignment on documents
- Avoid margins / white spaces around the image i.e. the free blank space around the signature should be cropped out using MS Paint or similar software
- Signatures do not have to be top quality like logos so if you can get an acceptable quality by any means then you could go ahead. e.g if the Client sends it as a pdf file, take its screenshot and save as JPEG file making sure it does not hamper the quality of the image.
Procedure for cropping signature image files in Microsoft Paint
- Open the Signature image file in Paint.
( Right click on the image file -> Open with -> Paint )
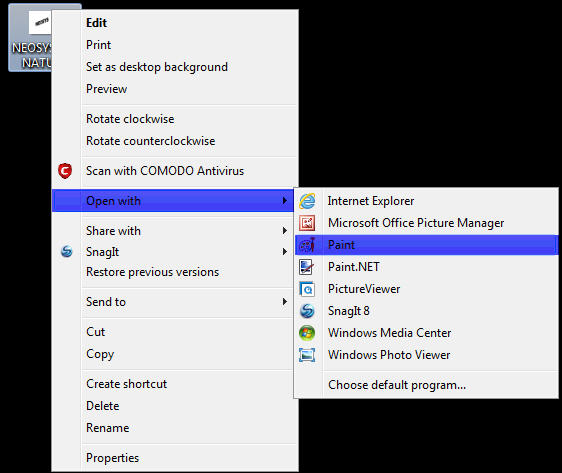
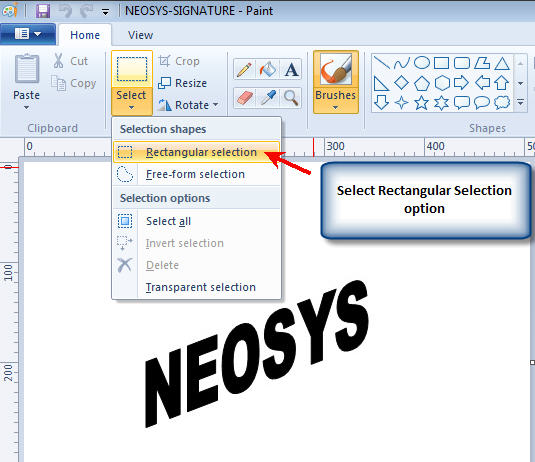
- Click on the Select Button and select the "Rectangular Selection" option
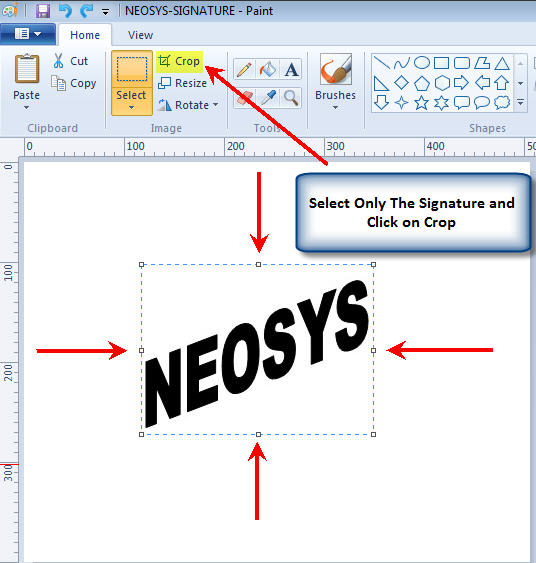
- Using the mouse pointer, select only the signature part of the image avoiding unnecessary white spaces and click on CROP
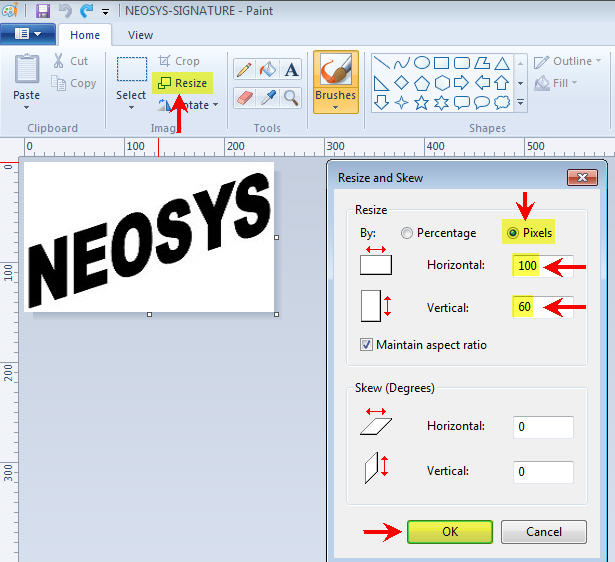
- Now, click on Resize -> Pixels and enter the appropriate dimensions and click on OK
- Save the image (Control + S)
- Exit Paint application
- Open/View the image. It should be cropped now :

Cropped Signature Image File
Configuring Client Security mark
A "client security mark" which represents the client's general public identity or trading name is printed on all documents generated out of NEOSYS. This client mark is a mandatory contractual feature and cannot be removed.
The objective of the client mark is that anyone can easily identify the general source of a document or report produced by NEOSYS. It, therefore, MUST clearly indicate the public identity of the client and CANNOT be brief or anonymous.
The client mark must be something simple like a brand word or phrase that is common to all companies in a client installation. It should NOT be the precise legal name of the company or the website name or the email domain name because that is not required to achieve the objective and requires more maintenance
Any new companies added later on will use the same mark SO KEEP IT SIMPLE.
The corporate group name and possibly geographical location is a good concept to follow for example:
Adline Kuwait
Setting a default security mark
For all companies that do not have a specific mark
AREV
SETMARK * "<clientmark>"
Exodus
Run below command to start a live process in debugger mode,
./run <database>
Press 'x' to open the command line interface, then type
setmark * "<clientmark>"
Setting a security mark per company
In addition to the above initial general default client mark per database, in case certain companies within the same NEOSYS database cannot use the same mark at all, for example due to different branding, additional client security marks can be assigned to specific companies. This will not be allowed where a simpler client mark could cater for all companies.
AREV
SETMARK <companycode> "<clientmark>"
Exodus
./run <database>
Press 'x', then type
setmark <companycode> "<clientmark>"
Removing a security mark
AREV
SETMARK <companycode>
Exodus
./run <database>
Press 'x', then type
setmark <companycode>
Configuring fonts and colors for all users
The default font and color for all users is set up in the System Configuration File.
It can also be set up per department by setting the same on the department user record in the User Details page.
Users can override the above colors and fonts in their User Details page after login.
Changing the signatory
In Maintenance mode, press F5 and the following command:
ED DEFINITIONS AGENCY.PARAMS
Be careful not to insert lines except at the end. Moving other lines down will totally screw NEOSYS!
Then go to the bottom of the page (Ctrl+Page down). Once you reach at the bottom, ENTER enough times to add additional lines if required, then search for line 61 (Ctrl+G) and edit the document / add this code:
<br><br><br>Name of General Manager<br>General Manager<br>
Configuring backup procedures
See the System Configuration File on the NEOSYS Support Menu.
Note that this configuration file is missing the option to email a NEOSYS backup.zip file daily after the backup has been completed. To configure this go to the Maintenance mode and hit the F5 key and type:
ED DOS BACKUP.CFG
In line number 10, set the email address of the recipient/s who should receive a backup.zip file. This method is extremely useful as an offsite backup procedure in case of any server or USB failures.
Configuring automated emails in NEOSYS
See the System Configuration File on the NEOSYS Support Menu.
The default configuration will send email via mailout.neosys.com on port 2500.
Note that neosys mail server will accept email from anywhere as long as the sender email is @neosys.com
Authorising Users
Preventing users from assigning their own passwords
The task AUTHORISATION INVENT OWN PASSWORDS should always have the lock NEOSYS to prevent users from creating their own passwords. Most users create unsafe passwords given the choice.
People nearly always ask to give their own passwords but you should tell them that NEOSYS always assigns random passwords for security reasons. It is not worth arguing and discussing the point with most people since they don't usually grasp the importance and soon learn their NEOSYS password anyway.
NEOSYS support staff who login as NEOSYS are still authorised to create their own passwords but it is better not to leak this information to clients immediately since people will grasp on to it and be disappointed or even offended that you are not granting this privilege to them.
Unfortunately there is no general way for people to change their own passwords at the moment. Only the few people who have access to the Support Menu and Authorisation File can do it. Changing your own passwords should be on the NEOSYS Help menu so everybody can do it.
Authorising access from outside the LAN
From 15/2/2008 access to NEOSYS is by default restricted to users from the standard local area network ip numbers starting 192.168, 10 and 127 so you might get clients complaining that they cannot login.
In order to allow access from outside you will have to update the Authorisation File and put a list of valid ip numbers that they are authorised to login from.
You dont have to put ip numbers on every single user. If the user ip numbers are blank for a user then the system will look for and use the nearest ip numbers on the following users below within the same department. Therefore you only have to put the ip numbers on the bottom "department user".
Examples
To allow someone to login from a) anywhere in the office and b) from another office with a static ip number of say 80.11.22.33 put something like 192.168.*,10.*,127.*,80.11.22.33
To allow someone to login from anywhere put * This is not recommended but necessary if someone absolutely has to login from anywhere in the world.
Authorising users to access from dynamic IP when previously only authorized to access from known static IP
In situations when users who are authorised to access from known static IP till date but now have access to dynamic IPs only , Support must get permission from management before configuring NEOSYS to allow them access from any IP and informing them the risks of allowing users access from any IP.
Support must not agree to do serial work of adding the IP to list of allowed IPs in NEOSYS each time the client gets an IP from the ISP.
Sample Email:
 Dear XXX,

  We need your agreement to allow XXXX users to access NEOSYS from any location/IP address. Until now XXXX users were
  restricted to office/authorised location only but your IT team is no longer able to provide a static IP.

  Users will get frustrated when they are unable to log in and will lose valuable time because NEOSYS cannot grant
  users permission to access from arbitrary dynamic IPs given by the ISP each time.

  Your IT person should provide us with the fixed static address urgently as it is not recommended to enable access
  from any IP due to risks like access of data by unauthorised persons , malicious hacking attempts etc.

  Please confirm that you understand the risks and permit authorization of access from any IP temporarily and agree
  to provide our Support Team with a static IP urgently.
Enabling Minimal Access to Certificate File for Monitoring Department Staff
Giving users access to the Support Menu
The Support Menu in NEOSYS enables users to access the following:
- List of Database processes
- List of Documents in use
- Stop/Restart NEOSYS service
- Backup
- Log
- Authorisation file
This menu is locked with the task SUPPORT MENU ACCESS and has the LS key. To give any user/I.T. administrator access to this menu, you have to give him the LS key.
Configuring Payment Instructions
Support MUST strictly economise on number of lines used for payment instruction to avoid more lines taking up more space on the printout. This is because sometimes more lines could cause the printout to creep into two pages instead of one.
Support MUST strictly avoid duplication of payment instructions by copying and pasting it into all company files. It is a blunder to copy and paste the same data into all companies when it can instead be entered just once in the Media/Job Configuration File. This is because anyone maintaining this data in future is likely to fail to notice that the data has to be maintained in multiple places, which will in turn lead to data inconsistency. It is also a waste of time to mindlessly do easy cutting and pasting instead of thinking what is correct.
Payment instructions must be entered in the company file ONLY if the payment instructions are different per company.
NEOSYS picks up the first available payment instructions from the following locations and ignores any instructions in the later files.
- Client file
- Company file with currency code
- Currency file
- Company file with currency code left blank
- Configuration File
If, following the above rules, no payment instructions can be found, or the payment instructions are "NONE" or a single dot (.), then no payment instruction are displayed.
Tip: Leave the currency code field blank in Company file to configure the default payment instructions for all currencies without having to tediously enter them in the Currency file for each and every currency.
There is a manually edited flag in the company file on one NEOSYS client which makes the company file payment instructions take precedence over any currency file payment instructions. This may be added to the Client File user interface as "For all currencies"
The usual way of configuring payment instructions is to put it in the Company file under Finance. This configuration allows different payment instructions per currency. If you put the payment instructions in the currency file, then these instructions apply to all companies, unless the manual flag in the company record is manually edited in the maintenance mode by NEOSYS programmers to say that the company file instructions take precedence.
Tip: Since the rules of getting payment instruction are not simple, if you are *changing* payment instructions, locate where the old instructions are and simply change them without worrying about the rules.
Also refer to: Difference between terms of payment and payment instructions
Entering Payment Instructions in NEOSYS
Lines that have no tags in them (no <> characters) and have up to 10 "words" in them will be chunked, i.e. placed continuously one after the other on the same line, if there is room for the whole chunk.
Commas are automatically added at the end of chunks that do not already end in commas, except for the last line.
You can add break tags when you want instructions to start on a new line, as shown below.
Sample Payment instructions:
 If no written objection is received within 10 days, this invoice will be considered as accepted unconditionally for payment.<br>
 Cheques/Demand/Drafts/Bank Transfers to be in favour of NEOSYS.<br>
 Bank Name : Commercial Bank of Dubai
 Account Number : 0XX 00X0XX 00X
 IBAN Number : AEX00X0000XX00X
 Swift Code : BBMEAXAD
The above sample appears as below, in NEOSYS:

Configure Currency File
NEOSYS allows clients to change how invoice amounts are presented on their invoices.
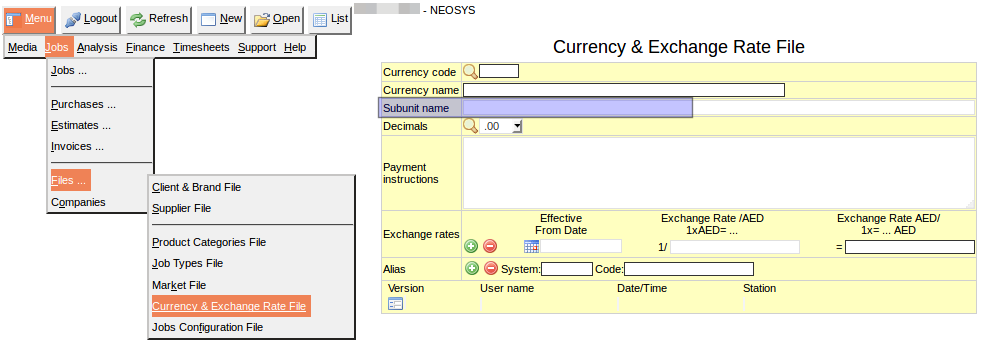
Clients or NEOSYS Support need to edit the subunit field in the Currency & Exchange Rate File:
To change this setting, depending on which NEOSYS modules you use, follow the appropriate path:
NEOSYS Menu -> "Jobs" OR "Media" OR "Finance" -> Files -> Currency & Exchange Rate File.
Invoices amounts can be displayed in two ways:
a) "Five thousand, three hundred and forty five .25"
Do: Leave subunit field blank, this is the default.
OR
b) "Five thousand, three hundred and forty five and 25 fils"
Do: Edit subunit field to "fils" and edit the
Specifying Payment Terms on Invoices
Different payment terms can be concurrently specified at various levels. Any payment terms specified at a more detailed level take precedence over payment terms specified at a more general level
In order of preference, when creating an invoice or estimate/quotation, payment terms are looked up in the following order. The first payment terms found are used.
- New Invoices screen - per invoice
- Chart of Accounts if not suppressed in configuration file
- Client File - per client
- Company File - per company
- Configuration File - per database
Entering a full stop (.) or the word NONE in Client or Company File payment terms suppresses any terms found in Company or Configuration File allowing you to suppress, per client or company, any default payment terms specified in the Company or Configuration Files.
Also refer to: Difference between terms of payment and payment instructions
Creating Email Alerts in NEOSYS
Currently this is a manual process done in maintenance mode using F5. It will be replaced by a web interface.
See Configuring Media Module Email Alerts
To find existing alerts
EXO_DATA=<DBCODE> list documents alerts
Syntax
CREATEALERT alertid module alerttype runhours,... runasusercode {targetusercode,...} testemail} (options)
The command must be followed by five parameters in a fixed order and separated by spaces. Two additional parameters and options in "()" may follow in a fixed order. To replace an existing alert use the overwrite option.
Alertid
Required. Invent some short identifying alphanumeric code for your alert e.g. XYZ001. It will show in the email subject and is required if you want to change or remove the alert.
Module
Required. One of the following.
- GENERAL
- FINANCE
- AGENCY
- MEDIA
- JOB
Alerttype
Required. Various alert types are available depending on the module.
See Alert Types
Runhours
Configure hours as per server timezone.
Required. Syntax: {minutes,,,}:{hours,,,}:{dayofmonth,,,}:{monthNo,,,}:{weekday,,,}
Examples:
Run at 9am every day
9
Run at 9am on the 15th of every month
9:15
Run at 9am on the 15th of months January and July
9:15:1,7
Run at 15mins & 30mins past hours 9am and 5pm, on the 15th of every month
15,30:9,17:15
Runasuser
Required. Determines the authorisation level during processing
Targetuser(s)
Optional commas separated list of user codes (no spaces!) to receive any output from the alert. Note that some alerts may not have any output and that some alerts may automatically direct their output to various users.
Test email
Optional. An email address or addresses separated by ;. All emails generated by the process will be redirected here regardless of who they are normally directed at.
Options
Optional. One or more of the following letters must be in "()"
- R=Remove - remove an existing alert (only the alertid parameter is required)
- O=Overwrite - required to overwrite an existing document.
- S=Silent
- ROS=forget last run time
Enable/Disable Existing Alerts
- Identify alert key, in maintenance mode: "SORT DOCUMENTS ALERTS"
- Edit 12th field of the alert record (ENABLED), e.g "ed documents COLL01". 1 - enabled or 0 - disabled.
Alert emails to some executives are being received by their managers
You can put whatever you like in the executive name but NEOSYS must be able to find their email somehow.
For example if the executive is entered as “Steve Burns” and there is no user called Steve Burns in the Authorisation File.
- Does the executive name contains an “@” character? then it is the email address
- Is there a user in Authorisation matching either the executive name (Steve Burns) … or the first word of the executive name (Steve)?
- If none of the above then the email of the user running (usually a manager) the process is used
To solve this problem create users matching the executive names.
Note that creating users with email addresses enables them to login to NEOSYS by requesting password reminders to their email address so like all users you must ensure that their authorisation level is appropriately limited.
Automatically Running and Emailing Saved Documents
Saved documents in NEOSYS (Menu -> Media -> Diary -> Saved Reports) can be configured to run automatically and be emailed to users. This can only be done in maintenance mode, by doing
ED DOCUMENTS <document no.>
Line 12 should be 1 to mean run automatically.
Line 14 should be the user code to email to. If emailing to multiple users, press Ctrl + E on this line and enter the user codes to email to.
Line 22 should be the scheduled hour e.g. 7 for 7am server time. Use commas for more than one scheduled hour.
Line 25 should be the day of week to run on. e.g. Mon=1, Sun=7. Use commas for more than one.
To force the document to run again on the same hour or day for testing changes, you have to clear line 13.
For more information about the DOCUMENTS file format, do
LD DOCUMENTS
Configuring Safari for MAC OS
Configuring Chrome
Configuring Edge
Configuring Firefox
Troubleshooting NEOSYS Generally
Fixing the "Cannot display the webpage" or "Site can't be reached" error message when accessing NEOSYS
Within a local area network (LAN)
Users may get the "cannot display the webpage" or "site can't be reached" error message when they try to access the NEOSYS login page when they are in the office and are using a local IP address (eg. http://192.168.1.100/neosys). In this case, check the following:
- Are other users able to access NEOSYS within the same office? If all users get the same error message, then it is likely that the NEOSYS server is off or has stuck at reboot due to a boot sequence error. In this case, you need to start the NEOSYS server and double click on the start databasename file. If the NEOSYS server does not start then you need to call in the IT support.
- If everyone else is able to access NEOSYS and it is only someone specific who isn't able to access: If all users are working normally, and only a specific user complains of this message then check the following:
- Is the user connected to a network? - verify this by opening up a website (www.google.com)
- If the user is connected to a network - verify if the user has the same IP address range as the NEOSYS server. For example the user might have IP address 192.168.2.1 and the NEOSYS IP is 192.168.1.100; which is a clear indication that this user is connected to another network and mostly happens if the user is using a WiFi connection (on a notebook) and is using an available unsecured connection of a neighbouring office. If this is the case, then disconnect and connect to the correct connection.
- The user is connected to the network and is on the same network - verify if the user any has proxy settings in the browser. In UAE for example Etisalat internet users have to sometimes enter the proxy address in the Options or internet will not work properly. In this case you need to configure the NEOSYS IP address as an exception under Tools > Internet Options > LAN Settings > Advanced.
From the internet
The connection to the NEOSYS server from outside office is via the public IP address over SSL (i.e. https://clientname.hosts.neosys.com:4430). Users may not be able to access this link and it may give the "cannot display the webpage" or "site can't be reached" error message. If only one user faces this problem, and other users can access the NEOSYS server from the internet, then the problem can only be solved by client IT staff. This could be due to various reasons and could be one or a combination of the following:
- The users internet connection is not working or a firewall on the computer/router is blocking port 4430 (or whichever port is being used for HTTPS): in this case client IT must fix the internet connection and open up the outgoing port for HTTPS
- Corporate firewall is blocking access to the NEOSYS server
- The internet connection at the office which hosts the server is not working: consult with the IT person at the host office
- The server is off: consult with the IT person at the host office
- NEOSYS firewall is blocking the IP address of the user (probably due to unusual activity from the IP address): This is a very rare situation that happens with clients hosted by NEOSYS. First, confirm that the user's internet connection is working fine. Then to check whether their IP is blocked, ask the user to access www.neosys.com or http://userwiki.neosys.com/index.php/Main_Page .
- If they can access these websites, the firewall is NOT blocking them.
- If they cannot access these websites, ask the user to provide their public IP address by accessing www.whatismyip.com and then check whether their public IP is being blocked by NEOSYS firewall.
- The client's ISP is not able to resolve the domain name in the URL to the IP number. If this is the case you should be able to access NEOSYS by replacing the domain name with the IP number in the URL.
If the above steps do not fix/identify the issue, refer to Troubleshooting Cannot Connect for more information on fixing the "Cannot display the webpage" error.
Regardless of what the problem is, if other users can access the NEOSYS server from the internet then the problem can only be solved by client IT staff
Solving error during file upload: "Page cannot be displayed" HTTP Error 405
Fixing the network/server failure/.send/no lock period error messages
Error Message
The following error messages may appear:
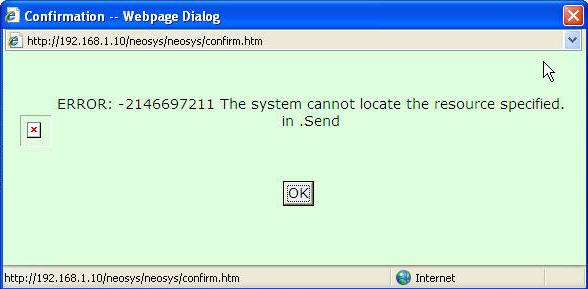
Cannot Find Specified Resource
ERROR: -2146697211 The system cannot locate the resource specified.
in .Send
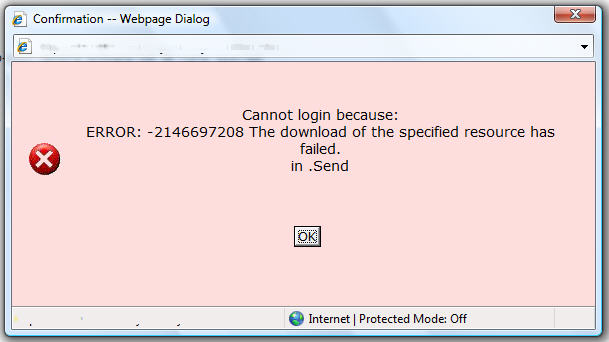
Download of Specified Resource Failed
ERROR: -2146697208 The download of the specified resource has failed.
in .Send
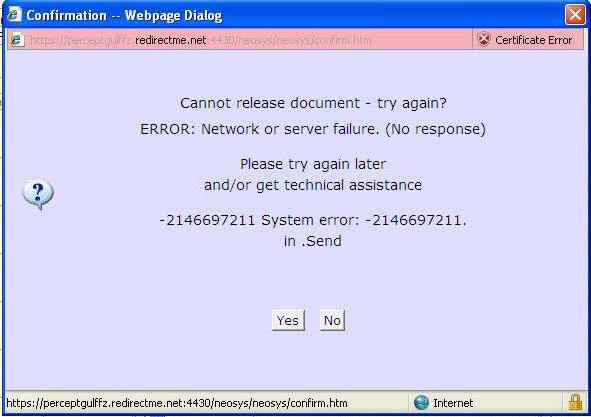
Cannot Release Document
Cannot release document. Try again ?
Error: Network or Server Failure. (No response)
Please try again later
and/or get technical assistance
-2146697211 System error: -2146697211.
in .Send
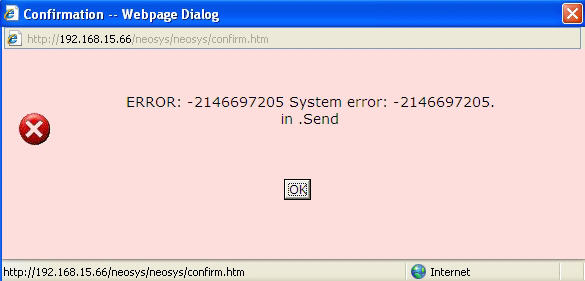
Error in .Send
ERROR: -2146697205 System Error: 2146697205
in .Send
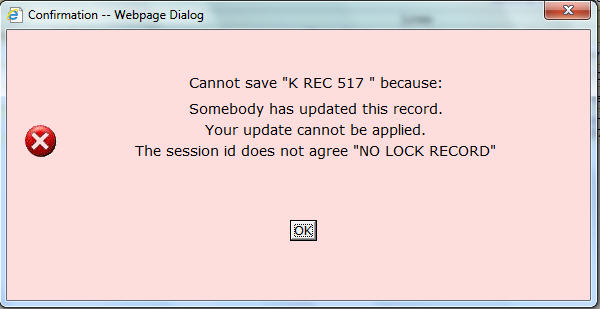
Cannot Save Document: NO LOCK RECORD
Cannot save "DOCUMENT NAME" because:
Somebody has updated this record.
Your update cannot be applied.
This session id does not agree "NO LOCK RECORD"
Client disconnected after xxx seconds
Client disconnected after xx seconds in NEOSYS xhttp.asp D:\NEOSYS\DATA\xxxx
Possible Causes
The above error messages pop up when network failures occur, especially when NEOSYS is being accessed over the internet when there are temporary problems in the internet connectivity or overload on the ISP.
Sometimes IE configurations in tools e.g.:- toolbar might be messing up the connectivity.
This could also happen within an office, when NEOSYS is accessed over the LAN, if there is a bad Ethernet switch/hub that cause the connection to break or just bad cabling.
The error occurs more frequently in cases where NEOSYS is accessed over the internet as compared to when NEOSYS is accessed using office LAN.
Sometimes the error, especially "no lock period" could occur due to third party tool bars installed which install additional DNS addresses or mess around with the browser settings.
Solution
Identify if NEOSYS is being accessed over LAN or using the Internet. You can do so by checking the link being used to access NEOSYS.
- In case NEOSYS is being accessed using LAN, the link would look something like:
http://127.0.0.1/neosys/
or
http://192.168.0.55/neosys/
- In case NEOSYS is being accessed over the Internet, the link would look something like:
https://hostname.neosys.com:4430/neosys
There isn't a clear solution to this especially if NEOSYS is accessed via the Internet as the external network is out of our control.
Try to do a reset factory settings first, although it could be a faulty network connection.
Mostly the problem is due to a temporary loss of connection to the server and there is no alternative but to abandon the data you are entering, logout from NEOSYS and try again.
In the case of users who are connected via WIFI, check the WIFI connectivity of the workstation to identify any possible technical problem with its network connection.
In the case of "no lock period" it would be advisable to do a browser reset in addition to the solutions listed above.
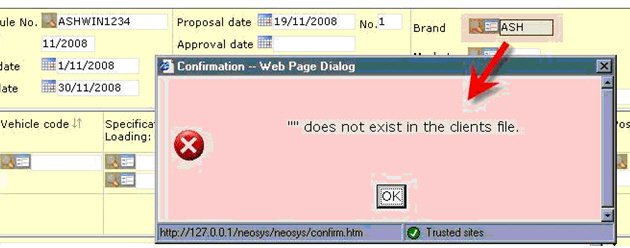
Fixing "" does not exist in the clients file Error Message
Problem explained
After creating new brands in the client file or after creating a new client record and brands under it, whenever you key in the brand in the schedule file, you would get this message.
Error Message: "" does not exist in the clients file.
Solution
All processes stopped
F5
REINDEXCLIENTS
REINDEXBRANDS
Troubleshooting the "Database not available" error message
Problem explained
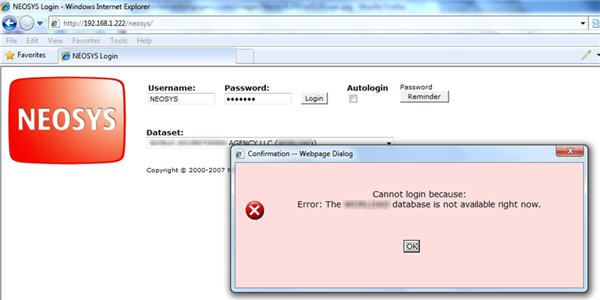
This error appears when you try to login to NEOSYS after you enter your username and password and click the Login button.
Error message :
Cannot login because :
Error :  The (database code) database is not available right now.
Solution explained
This is probably because the processes (gray colour windows)on the server are not running. Login to the server and start these processes from the respective desktop icons and login again from the users computer.
If the processes are running but you are still unable to login, please refer Techwiki.
Troubleshooting login failure (invalid username and/or password)
Entering an incorrect password on the NEOSYS login page would lead to the following error :
Login failed!

Wrong username, password or database
→Check details and try again

Reset password if:
→3 or more failed attempts
→Forgot password
→Password expired
The login failure message intentionally avoids specifying which detail is incorrect, to help prevent unauthorised access or hacking attempts.
Three consecutive login failures, for any reason, over any time period, will result in an automatic lockout until the account password is changed using any of the usual methods:
1. Password reset on login page - if the user has a registered and accessible email account Reset Password,
or
2. By an administrator using the Authorisation File.
If the Password Reset procedure does not solve the login failure issue, check the authorisation file or the "Status" field on the user's User Details page to know if the user is expired.
There have been instances where you cannot see an expiry date in the authorisation file, but in the back-end the expiry date exists.
Do:
EXO_DATA=<database> list users expiry_date
In such cases, set an expiry date for this user in the authorisation file, save the file, reopen and remove the expiry date and save it again. This should clear any expiry date in the back-end. Verify it has indeed cleared it by running the list command again.
Troubleshooting B10 & B12 Errors
Error Message
NEOSYS
An internal error has occurred. Please press
Shift+PrintScreen to copy this screen then
paste it into an email to support@neosys.com

ERROR NO: B10 IN DAYBOOK.SUBSX AT 135
Variable has not been assigned a value. Zero used.
Solution
These are software errors and should be immediately escalated to the programmer.
Also Refer to : Finance B10 & B12 errors
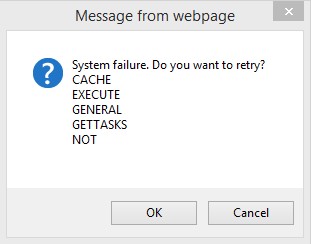
Troubleshooting the "System failure. Do you want to retry?" error message
For troubleshooting this error, refer to Troubleshooting Web Browsers
For more information on this, refer to Addressing Browser Related Issues
Troubleshooting Web Browsers
Clearing Internet Cache (Deleting Contents of Temporary Internet Files Folder)
Failures in browser caching can cause a variety of somewhat unpredictable errors after NEOSYS software is upgraded.
- A variety of undocumented error messages
- "Error on Page" in the bottom left corner in the browser status bar
- Screens don't appear correctly
- Older versions of the program still appear
- NEOSYS repeatedly asks for login
Solution
Click on Clear Browser Cache to see instructions.
Resetting Browser to Factory Settings
Resetting Internet Explore to factory settings is required if clearing temporary internet files has not worked to fix:
- A variety of undocumented error messages
- Older versions of the program still appear
- Tool-bars are installed
Solution
Click on Reset Browser to see instructions.
Disabling Popup Blocker
Refer to Disabling Popup Blocker
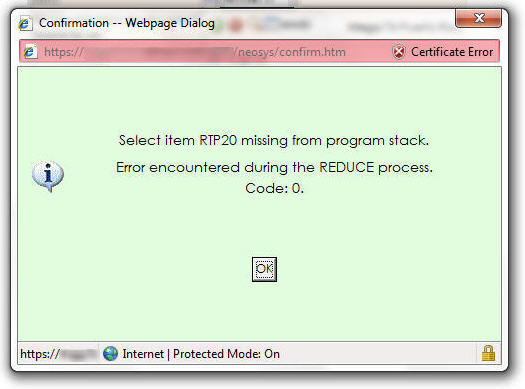
Troubleshooting the "Select item RTP20 missing from program stack. Error encountered during the REDUCE process. Code:0" message
Problem explained
This is a rare general problem in NEOSYS not related to this particular report (shown below)
It is caused due to a process memory corruption when processing large datasets.
Error message :
Select item RTP20 missing from program stack. Error encountered during the REDUCE process. Code:0
Solution explained
Restart all the processes for the dataset in question. This will solve the problem.
Please see Restarting NEOSYS Processes
In the latest version of NEOSYS, the current NEOSYS server process closes itself.
Problem Explained
This situation is especially encountered while moving a user from one group/department to another in the Authorisation File. The menu is visible to the rest of the users in the new group but not visible to the new User. It appears as if the new User is not picking up the authorisation access of the new group.
Cause and Solution
See Menu Locks.
Logo does not appear when a NEOSYS html document eg: Invoice, Estimate, etc is sent via email
There are 2 scenarios :
- The html file is sent by email by using the File > Send > Page by email… option on IE
- The html file is saved on the user’s desktop using the File > Save as > html … option on IE and then sent as an attachment via email.
Scenario 1: In this case, the "logo" does not appear if the server certificate has not been installed correctly in the browser. To resolve this issue, ensure that the certificate is correctly installed and that the URL used for accessing NEOSYS contains the same domain name as mentioned in the certificate.
Scenario2: The “logo” doesn’t appear, as the directory in which the “logo” actually resides, is the NEOSYS server, and not the user’s PC. Saving the html file on the users desktop results in the image properties to look for the logo on the users desktop (where it doesn’t exist) and hence the logo does not appear.
Many clients prefer that these documents be sent in “pdf” format as “html” files often end up in their spam msgs.
If these documents really need to be saved on the user's desktop prior to being mailed as an attachment, it would be a better idea to save them as “pdf” instead of “html”. This could be done using softwares like “CutePDF Writer” that are freely available on the internet. This software would allow the user to save the “html” document as “pdf” by clicking : File > Print > CutePDF Writer … following which the "pdf" document could be saved to the desired destination.
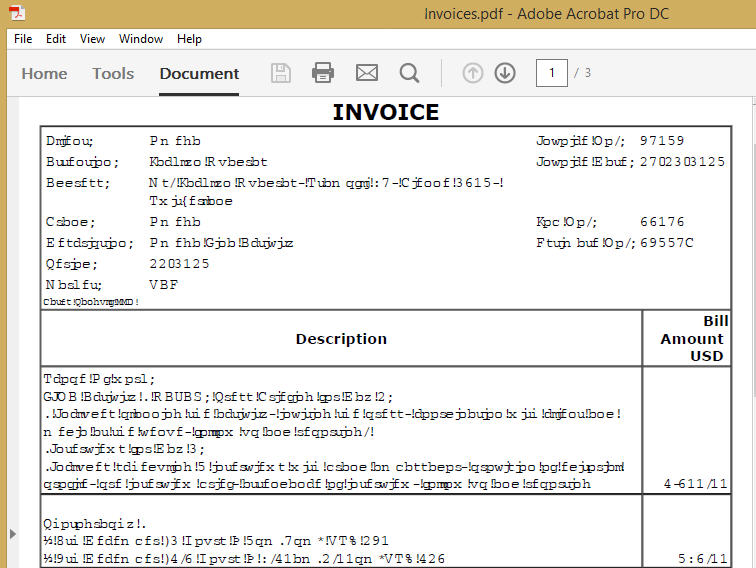
Strange Characters appear after saving an HTML document as pdf file using Adobe Acrobat PDF converter
Strange Characters may appear after saving an html document because you might be restricting the PDF converter to use System fonts only.
Follow instructions below to prevent strange characters from appearing after converting any NEOSYS html document to pdf.
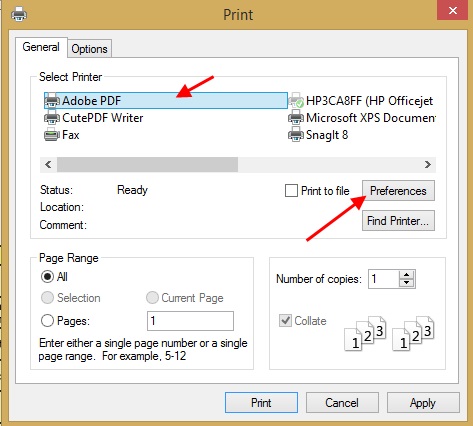
- Go to Print option in the File menu of your browser
- Select AdobePDF and Click "Preferences"
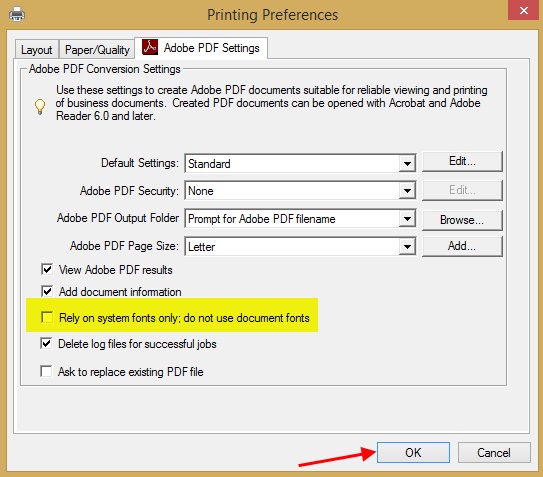
- Uncheck the "Rely on System fonts only" option and click ok
Follow the instructions given below to remove header and footer from the pdf version of a NEOSYS report while using Adobe Acrobat Converter:
- In the converter Menu, Click on Down Arrow > Preferences.

- Under General Tab, Select HTML in the conversion settings and click on OK.
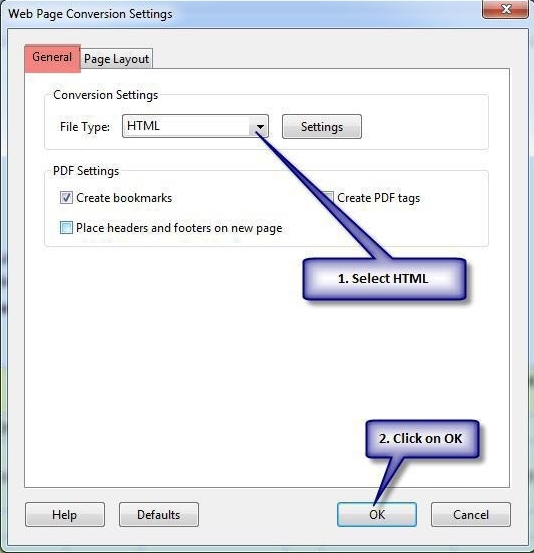
The PDF converted files should now be created without headers or footers.
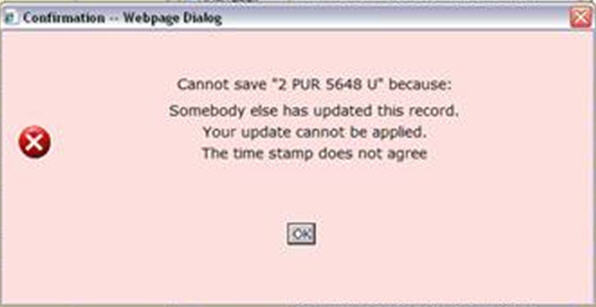
Troubleshooting the "Cannot Save Document Because Time Stamp Does Not Agree" error message
Cannot save "2 PUR 5648 U" because:
somebody else updated this record.
Your update cannot be applied.
The time stamp does not agree.
Possible Causes
The time stamp error message indicates that the user is trying to save the document for a second time after there was some other error during the initial attempt to save. Fortunately, it indicates that the first save was in fact successful and that no data has been lost.
Solution
The only course of action is to close the current on-screen document (discarding changes) and to reopen the document to confirm that it was in fact saved. The initial primary error can be anything (IT equipment or software) but, if the connection involves internet or wireless, then it is most likely to be a failure of the network connection.
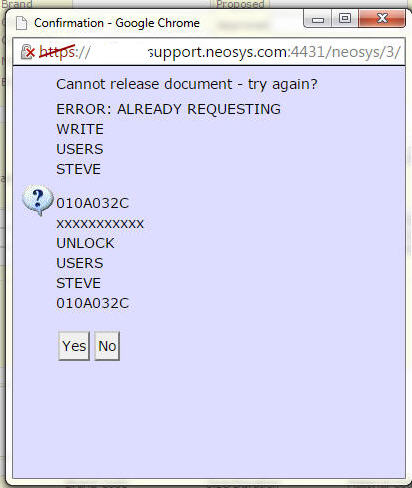
Troubleshooting the " Cannot release document- try again"
Cannot release document - try again
ERROR: ALREADY REQUESTING
WRITE
USERS
Possible cause and solution same as Time Stamp error
Solving error message about "Error while writing data .... read-only file."
 Error while writing data.
 You have attempted to write to a read-only file.
                     - or -
 access to the file has been denied by the operating system.
 (operating system file name: "XXXXXXXX")
Solution
Stop whatever it is that you are doing, inform NEOSYS support about the issue with screenshots and necessary information and do not proceed until informed that it is safe to do so.
Cause
Some external application was accessing the NEOSYS database files and this prevented NEOSYS from accessing them.
Copying live data to test data can cause this since the copy program is an external application. Technical staff MUST avoid copying live to test database while live database is operational, especially at large or active installations.
Recovery
NEOSYS technical support MUST run a check for damaged files.
If there is damage
Follow standard NEOSYS technical procedure to resolve any damage.
If there is no damage and user was running a report or document reprint
Despite the body of the message saying "attempted to write" the message can come even when only reading NEOSYS database files for a report or printing a document. In this case there are no consequences and the user can repeat their attempt as long as the permanent solution below is performed.
If there is no damage and user was saving a transaction and files were being updated
Some files may have been updated and others not. This means the database is inaccurate and the issue may only be discovered much later even days, weeks or months later. Therefore NEOSYS programmers must assess the damage.
Permanent Solution
Locate the external application using intelligent sleuthing and prevent it from accessing the NEOSYS database files again while NEOSYS processes are operational.
Fixing the Find Button not working Issue
Problem Explained
No action when you click on the find button while trying to search.
Solution
The solution is to add NEOSYS to the trusted sites in IE settings. This solution is applicable to all instances where the 'Find' button is not working in NEOSYS.
Please see Adding NEOSYS to Trusted Sites.
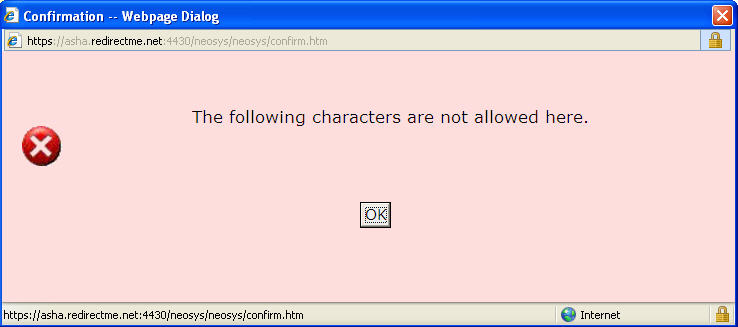
Fixing error "The following Characters are not allowed here" while creating a new Document
Problem Explained
While trying to save a document we get the above error message in NEOSYS. The most common reason for this error is that there are some symbols present in a field in the current document, as follows:
Solution
The solution is to remove these characters and save the document.
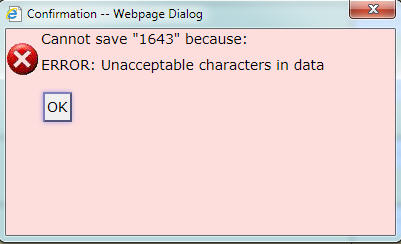
Fixing error "Unacceptable characters in data" while saving a document
Problem Explained
This problem is usually caused by unusual characters present in some data cut and pasted into the data entry screen.
Solution
Look for unusual (foreign) characters especially in text areas and where cut and paste is likely to have been done and remove these characters.
NEOSYS currently allows only one non-Latin character set to be operational in a server at one time. If any of the characters entered by the user are not in the currently configured server character set, the user will get the "Unacceptable characters" error message. Refer to this link for more details about Configuring NEOSYS for various language character sets.
Handling Error "Following Characters are not Allowed here" while opening a document in NEOSYS
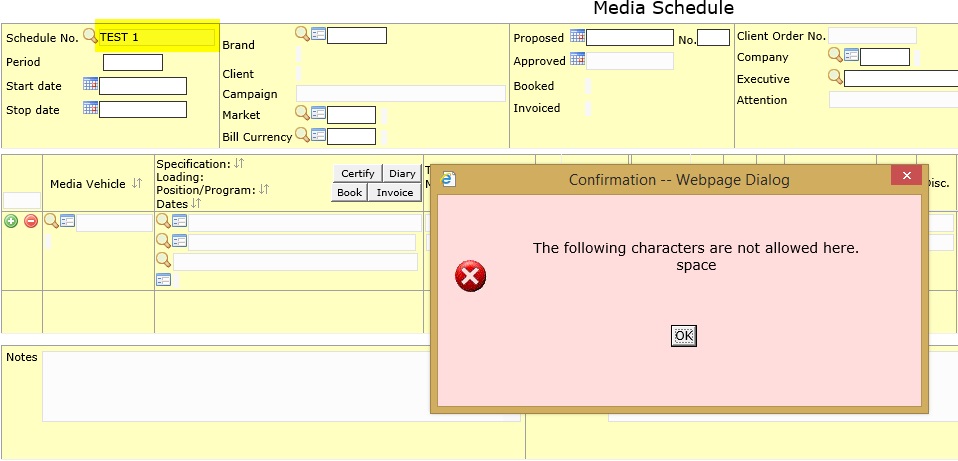
While trying to open a document in NEOSYS e.g. a Schedule file, user may get an error as below:
Reason
This error comes up because some strange character is present in the field (See schedule No. above). Some characters are not always what they appear to be e.g character " á " which is a non-breaking space appears as an ordinary space on the screen. Good thing is that every character no matter how similar it is to other characters is identified by an ASCII code in all systems.
Let us take a scenario where a user while creating a schedule, unknowingly copied a schedule No. containing a strange character " á " (which appears exactly as a space) from another system into NEOSYS. He saved it and then while trying to open the same schedule he puts a space in the schedule no. not knowing that in the saved schedule " á " is present in place of what he thinks is a space. The system will give the above error message because Neosys does not allow spaces in document numbers.
Solution
- Check NEOSYS Logs and find the text entered in the field of the document.
- Copy the text and get its ASCII code.
( For above example ASCII code for " á " = 160 )
- The ASCII code has a corresponding HTML Code, type in the HTML Code in any HTML Text editor, preview Text and copy paste it in a Text editor e.g. MS Excel. Finally copy it in NEOSYS where that Document needs to be accessed.
( For above example HTML code for " á " = "&NBSP;" with all letters in lowercase )
- NEOSYS will now open the document.
- Since it is always best not to use any strange characters, remove the strange character and rename the document. You must Inform the users about this change.
- The document can also be opened in Maintenance Window in NEOSYS by directly typing the ASCII code.
( For above example type "alt+160" to enter " á " in the document number )
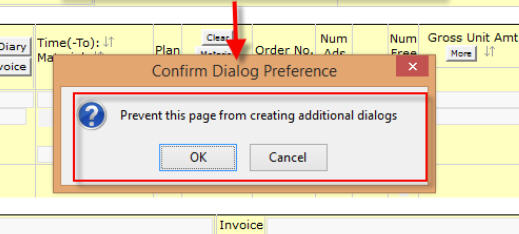
Fixing Firefox popup " Prevent this page from creating additional dialogs"
To suppress this message follow the instructions as given below in Firefox :-
- web address: about:config
- right click on list
- new
- integer
- dom.successive_dialog_time_limit
- 0
Archiving Historical Data
Generally NEOSYS keeps decades of data online without any issue however in some cases you might want to reduce the database size of NEOSYS primarily to make it easier to manage but also in some cases slightly faster to operate.
To do this one can take PERMANENT backups (more than one) of the current live system and then remove or archive data from the current database. The PERMANENT backups must be held in safe storage by the owner of the data which is the NEOSYS client. NEOSYS standard terms does not provide for storage of PERMANENT backups. Permanent backups are physical copies of BACKUP.ZIP files from NEOSYS backup process that will never be overwritten or destroyed. They should exist in multiple copies ensuring that further copies are made within the lifespan of the media on which they are kept to avoid the effects of media aging which may include total loss of data.
Client must confirm they can open the BACKUP.ZIP file and see the file names but they will not be able to open the files because they are encrypted and being binary database files cannot be used without the NEOSYS program.
Note that any data which is removed from the current database and cannot be recreated by some process like CREATEADS will only exist in the permanent backups held by the client because the historical database kept online for reference in the NEOSYS installation will NOT BE BACKED UP BY THE NEOSYS EVER.
This process does not backup the historical database therefore prior to creation of the historical database and deletion of historical data from the live database a physical copy of the backup of the live database must be delivered to the client with a warning that this is the only copy of their data and THEY MUST AGREE TO DUPLICATE AND KEEP IT SAFE BECAUSE NEOSYS DOES NOT KEEP ANY BACKUP COPY OF THEIR HISTORICAL DATA. Acknowledgement of receipt and the terms must be obtain in writing (or email) from the client.
WARNING: ANY DATA WHICH IS REMOVED FROM THE CURRENT DATABASE AND THAT CANNOT BE RECREATED BY INTERNAL PROCESSES MAY BE LOST AND ONLY OBTAINABLE WITH CERTAINTY FROM THE PERMANENT BACKUPS HELD BY THE CLIENT BECAUSE THE HISTORICAL DATABASE HELD ONLINE BY NEOSYS IS *NOT* BACKED UP
Procedure:
- Email client proposing archiving and removal of historical data and containing a draft acknowledgement of receipt of and acceptance of terms of data destruction online.
- Wait for client's agreement in principle and instructions to proceed.
- Deliver two copies of BACKUP.ZIP electronically to the client
- Obtain full and proper acknowledgement of receipt and acceptance of terms from client
- Restore the live database to a XXXXTEST database with name something like ARCHIVE 2099 where 2099 is the last year that will be deleted
- Delete the data from the live database
Sample email to the Client proposing archiving and removal of historical data:
Dear XXXX,

NEOSYS Support recently reviewed the server to examine its performance. During the investigation we found that the current Database has lot of old DATA.
Generally NEOSYS keeps decades of data online without any issue however in some cases you might want to reduce the database size of NEOSYS to make it easier to manage and slightly faster to operate.

We will follow a tested and verified method to reduce the Database size by removing the old DATA from the current Data set and copy it to a separate newly created Data set inside the existing database.

We will pick a year from past, the DATA up to which is considered to be old then copy the DATA of all the years up to and including the picked year to the newly created data set.
This DATA is removed from the current Data set and will be present as a separate data set online in your NEOSYS installation for reference.

In your case we have picked the year "YYYY" and we will create a new data set "XYYYY" which shall contain all the DATA up to and including year YYYY.

This Dataset "XYYYY" will will not be backed up by NEOSYS ever like the other live dataset which is backed up every day according to the nightly USB Backup procedure .

We need your approval to remove the DATA up to the above mentioned year to a separate Dataset.
After getting your approval we will send you two copies of the latest Backup.zip which containing all the historical Data. Then we will request for confirmation from your side that you have received the backup copies.
The removed DATA cannot be recreated again, it will only exist in the permanent backups held by you and for online reference as mentioned above.
After sending the backup.zip Support will send below email to get the confirmation from client for receiving backup copies and accept the terms of data destruction online:
Dear XXXX,

I am sending you a SAMPLE EMAIL to confirm that you have received the backup folders. Kindly send us a conformation email in the following format saying that you have received the backups.
Only after getting the confirmation from you we will go ahead with removing and copying the historical DATA to the new data set "XYYYY" (database code - to be mentioned by Support)

SAMPLE EMAIL:-

Dear NEOSYS Team,

We confirm that we have received the Backup.zip copies of DatabaseName (DatabaseCode) (date of backup - to be mentioned by support). We also accept the following terms:

1. NEOSYS has no responsibility for the historical data containing data upto and including year YYYY.
2. As this is the only copy of our DATA so we AGREE TO DUPLICATE AND KEEP IT SAFE because NEOSYS will NOT keep any backup copy of this historical data.
Also refer to: Cost for setting up a historical NEOSYS database
How to solve garbled characters after importing xls/csv into Excel
- In a new Excel sheet or file, open Text Import Wizard by clicking on Data tab > Get External Data > From Text.
- Change the 'File Origin' setting to "65001: Unicode (UTF-8)."
- Tailor the remaining settings as suits your preference.
- Click "Finish" to open the UTF-8 file in Excel.
