Setting up and Configuring NEOSYS Timesheets System: Difference between revisions
| Line 184: | Line 184: | ||
Timesheet reminder emails are sent to users on a certain hour of everyday (see timesheet configuration file, 'Reminder Hour'). | Timesheet reminder emails are sent to users on a certain hour of everyday (see timesheet configuration file, 'Reminder Hour'). | ||
The email reminds users which dates required timesheets to be filled and provides usually two links giving the user option to access timesheet entry page from either inside or outside the office (if mobile). | The email reminds users which dates required timesheets to be filled and provides usually two links giving the user option to access timesheet entry page from either inside or outside the office (if mobile). | ||
To modify these links see 'Browser Address' in the System Configuration File, any domains entered there, will be have "2/jobs/timesheets.htm" append to end will be present in that email. | To modify these links see 'Browser Address' in the System Configuration File, any domains entered there, will be have "2/jobs/timesheets.htm" append to end will be present in that email. <br> | ||
[[image:examplereminderemail.jpg]] | [[image:examplereminderemail.jpg]] | ||
Revision as of 07:22, 24 May 2018
Creating Activities for Timesheets
- Go to Menu > Timesheets > Files > Activity File ( Keyboard Shortcut - Alt+M, T, F, C)
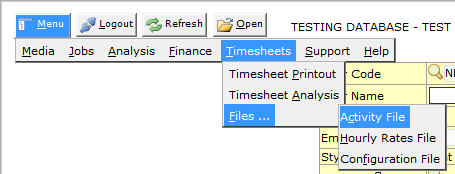
- You will see the activity file. Enter the details as follows:
- Click on Save
Activities already setup in NEOSYS for Timesheets
NEOSYS has a list of activities setup in the standard database for groups in the authorisation file. e.g Creative group has activities like Artwork, Copy writing, layout etc all relevant to the job type of users in the group.
You can use the pre setup activities for a new group also. First you will have to figure out if the job type of the new group is similar to any existing group. Then rename or add a group heading to the new group with a name similar to the existing group whose activities you want it to inherit.
e.g a group called Digital which does not have any activities setup. You figure out that the work done by the users in this group is similar to Creative group and there is already a creative group present with its own set of users. So for Digital to have Creative group's activities, add a line "Creative2" below Digital.
Table below showing the set of activities setup in the standard database.
| AV | BTL | CREATIVE | CLIENT SERVICE | PR | MEDIA | FINANCE |
|---|---|---|---|---|---|---|
| Attend briefing session by Account Service | Administration | Administration | Administration | Administration | Administration | Administration |
| Do airing copies | Archiving/ backup | Archiving/ Backup | Audio Recording | Analysis | Brief with Client Service | Business Chatting |
| Arrange for PPM | Briefing | Artwork Supervision | Brand development | Business travel | Business travel | Business Travel |
| Attend radio sessions | Business travel | Business travel | Business travel | Creative brief | Media buying | Internal Meeting |
| Brief in animation work | Concept development | Concept development | Budget / Forecast | Client Meetings | Client's meeting | Monthly Reports |
| Brief in TV edits to radio | Client meeting | Creative Execution | Creative brief | Co-ordination of network offices | Coordination with other offices / Media | Personal Leave |
| Brief production H | Contract | Client presentations | Client meeting | Contact Report | Competitive monitoring | Sick Leave |
| Brief in radio | Correspondence | Correspondence | Contract | Correspondence | Other meetings with Client Service | Supplier Meeting |
| Brief to bid suppliers | Copywriting | Copy writing | Contact report | Contact | Follow up on issues | |
| Business travel | Final Artwork | Final Artwork | Correspondence | Event Management and Logistic Planning | Follow up on material & campaigns | |
| Follow up on client service quote approval | Finance | Idle Time | Creative review | Financial | Idle Time | |
| Invoices suppliers | Idle Time | Internal Meeting | Estimates | Job brief | Invoicing clients | |
| Negotiate quote | Illustration | Internal reviews + presentations | Follow Up Media | Media monitoring | Media Research | |
| Negotiate & renegotiate quote | Internal meeting | Image Search | Account financials | Personal | Media monitoring | |
| Produce animatics | Layout | Layout | Follow-up Production | Press Release development | Media negotiation | |
| Write production brief | Personal | Print production briefing | Follow Up Supplier | Personal travel | Other Research/ Web browsing | |
| Personal | Photography | Personal | Idle Time | Research | Proposals / Creative buys | |
| Post production | Proof reading | Proof reading / color seps. | Internal Meeting | Reports | Media planning | |
| PPM | Print supervision | Photography supervision | Media brief | Strategy development | Media presentation | |
| Present quotes to client | Personal travel | Personal travel | Media review | Sick Leave | Media recommendations | |
| Produce radio spots | Photo retouching | Photo retouching | New business | TV Production | Media scheduling | |
| Phone calls to suppliers | Storyboard | Radio/ Audio production supervision | Production brief | Sending material | ||
| Personal travel | Sick Leave | Recording Session | Project List | Sick Leave | ||
| Quotes to Account Service | Search Web / Image/ premium | TVC Storyboard development | Production review | Supplier's meeting | ||
| Search for directors | Traffic | Sickness | PR Review | Strategic planning | ||
| Shoots | Training/ Seminar | Traffic | PR Brief | Media scene updates | ||
| Sick Leave | TV Production | TV production briefing | Research | Internal training | ||
| TV Production | Training | Photo Shoot | ||||
| Write creation details to suppliers | "TV production, shoot supervisions" | Sick Leave | ||||
| TV Production | Supplier's Meeting | |||||
| Viewing show reels | T.V. Production | |||||
| Web Mastering |
Setting Hourly Rates for Users
- Go to Menu > TimeSheets > Files > Hourly Rates File (Keyboard Shortcut - Alt+M, T, F, H)
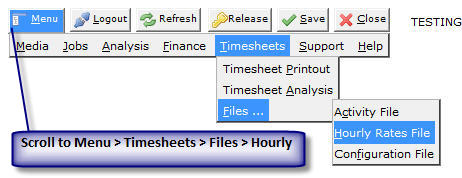
- Enter the Hourly Rate against the user-name of the employees.
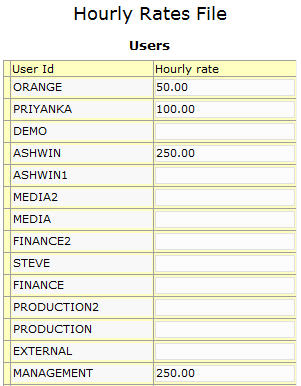
- Click on Save
Timesheets Configuration File
- Go to Menu > TimeSheets > Files > Configuration File (Keyboard Shortcut - Alt+M, T, F, F)
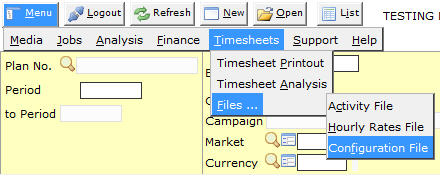
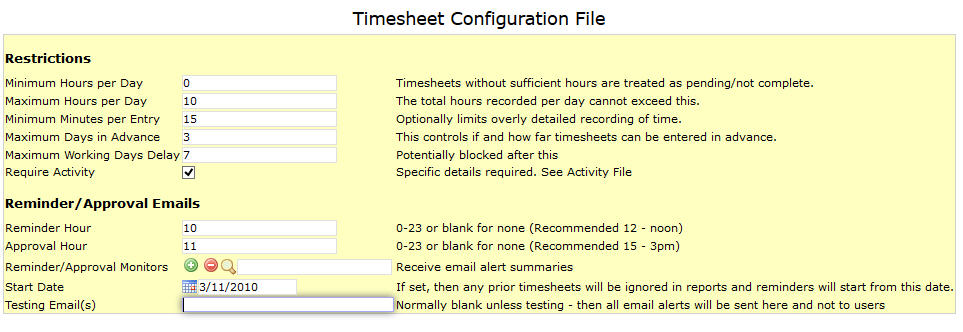
- You will see the timesheet configuration file. Enter the details as required:
Maximum Working Days Delay
This field controls the number of working days before the current date, for which the users can enter timesheet data.
e.g. in the above screenshot Maximum Working Days Delay is set to 7. This means that if a date is more than 7 working days old, then the user will be blocked from entering timesheet for that date.
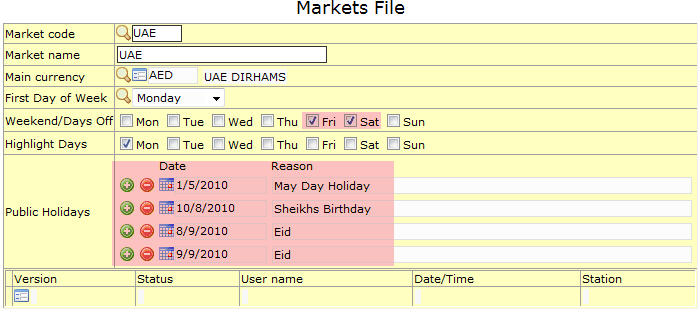
Public holidays entered in the Market File and Away/Holiday dates entered in the User Details page are not counted in the Maximum Working Days Delay.
Setting up Approval Monitors
Support staff MUST ensure that users who should receive the Reminder/Approval emails are mentioned in this field. The first monitor on the list MUST have TIMESHEET ADMINISTRATION authorisation otherwise he will not be able to access the Timesheet Reminder/Summary documents and get an error message "You are not authorized to do Timesheet Administration".
Avoiding timesheet reminders / approval emails
NEOSYS, by default, does not send reminders to people who have not entered any timesheets in the last 31 days.
Specifying user specific holiday to avoid reminders / approval emails
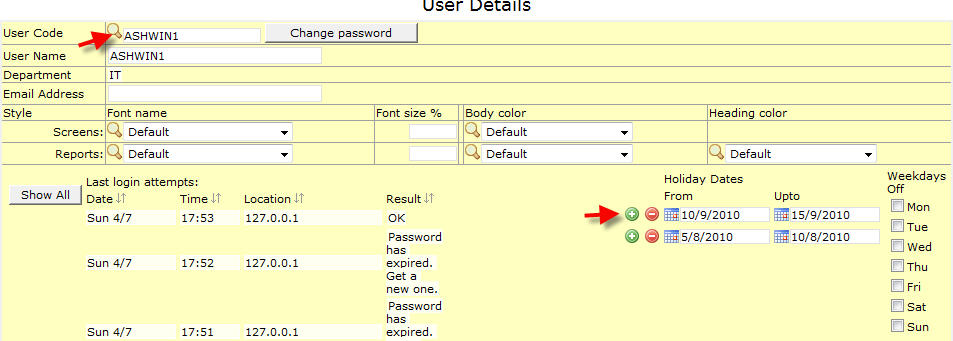
You can specify user specific holidays or annual leave or any other off days for a particular user. This can be done by a Timesheet Administrator and you have to go to the neosys2 URL using only Internet Explorer and follow the steps below:
- Select the user from the drop down
- Specify the leave dates (do not delete old ones, but instead just add new lines for new dates)
Specifying holidays for all users to avoid reminders / approval emails
NEOSYS Timesheets does not remind users to fill in previous days empty/incomplete timesheets if the market file (default market code specified in either Media or Job Configuration File) has either weekends or specific holidays mentioned in it.
Avoiding reminders for dates prior to the joining date of users
Once the timesheet system is configured and running you are aware we have a start date in the Timesheet Configuration File. As such if ANY user does not fill in timesheet from this date onwards, the system will keep sending reminders. For example, this could be annoying if the user has joined 2 months after the start date and is reminded to fill in timesheets for these 2 months. In such a case you will configure the period of the use absence in the user details file as a workaround to avoid the reminders. This can only be done by a Timesheet Administrator.
Configuring users to receive approval emails
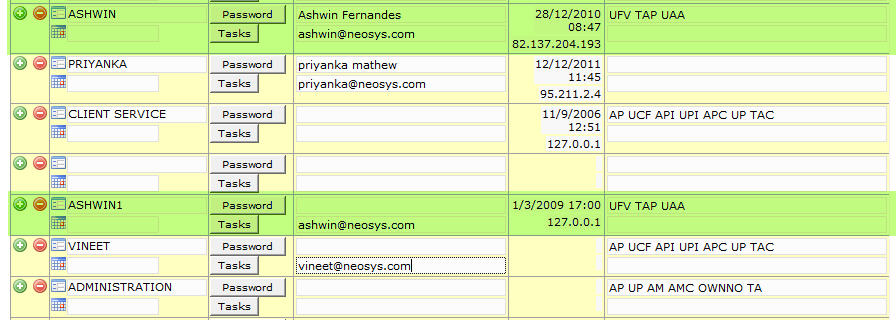
Users belonging to the group which is granted a TAP key will receive the approval emails. These users have to be placed on top of the group, they will receive the approval emails daily for all the users in his group. There can be multiple group approvers at the head of the group and they all get a copy of the approval emails daily.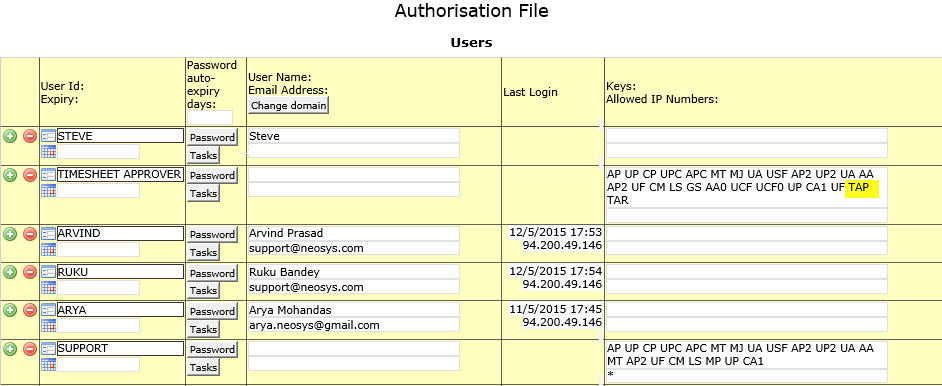

Setting up weekly approval emails
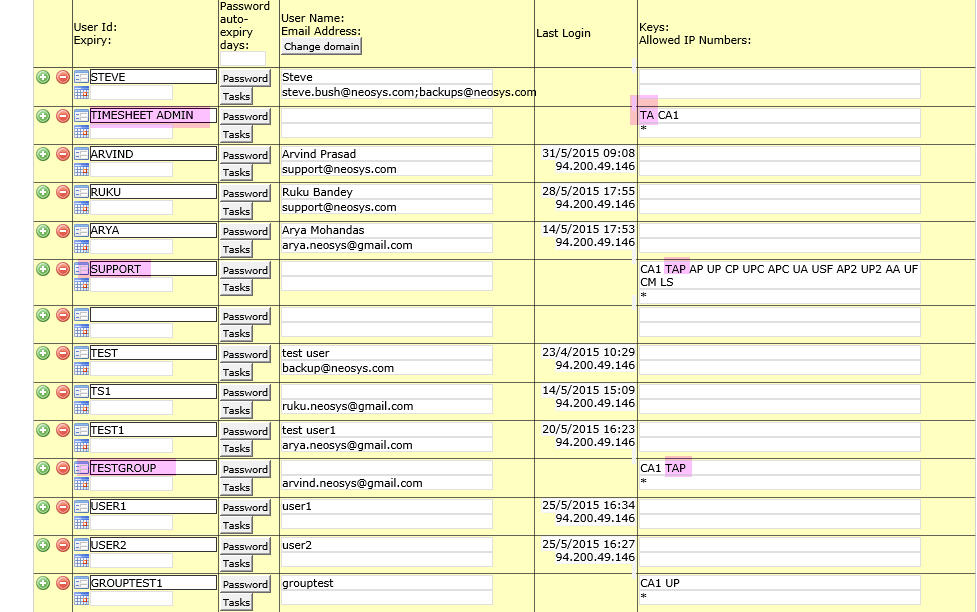
To setup weekly approval emails for multiple timesheet approvers belonging to different groups, give TA (timesheet administrator key) in addition to TAP to the the timesheet administrator. The timesheet administrator will now receive approval emails for all the timesheet approvers under him till the next timesheet administrator in the file.
Configuring a user to receive approval emails in more than one department
It maybe possible that a Timesheet Approver may be the same in more than one department. In such a case, you enter the email id of the approver/s in the level/department i.e in user Ashwin for below example. This will help approver/s to receive approval emails for both user groups.
Example:
Simplifying access for mobile timesheet users
Timesheet users outside the office can be given a streamlined interface to enter their timesheets.
- web address is easier to remember
- web address is easier to type on mobile devices
- no need to use menu
- goes directly to Timesheet data entry
For example:
redirects into the Timesheet File for data entry
https://batestime.neosys.com/neosys/jobs/timesheets.htm
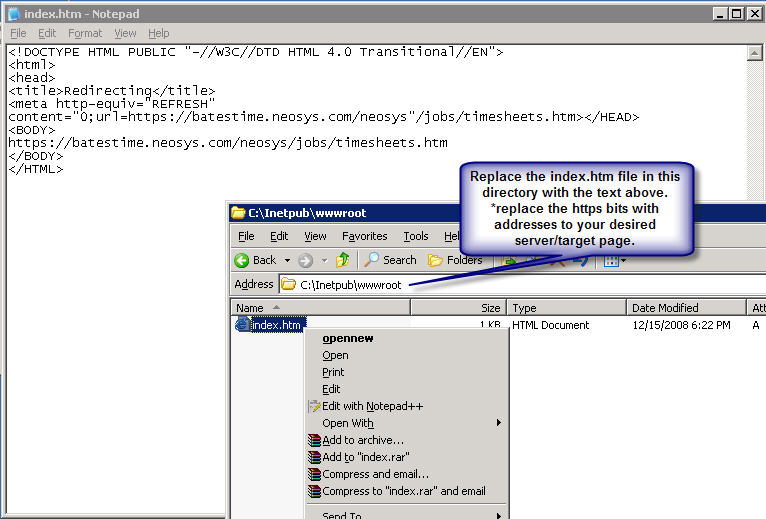
To do this, replace or create the index.htm page in the root directory of the web server
notepad c:\Inetpub\wwwroot\index.htm
Note - YOU MUST change the https url in the below example to point to your own server.
<!DOCTYPE HTML PUBLIC "-//W3C//DTD HTML 4.0 Transitional//EN">
<html>
<head>
<title>Redirecting</title>
<meta http-equiv="REFRESH" content="0;url=https://batestime.neosys.com/neosys/jobs/timesheets.htm></HEAD>
<BODY>
https://batestime.neosys.com/neosys/jobs/timesheets.htm
</BODY>
</HTML>
Timesheet Reminders Email
Timesheet reminder emails are sent to users on a certain hour of everyday (see timesheet configuration file, 'Reminder Hour').
The email reminds users which dates required timesheets to be filled and provides usually two links giving the user option to access timesheet entry page from either inside or outside the office (if mobile).
To modify these links see 'Browser Address' in the System Configuration File, any domains entered there, will be have "2/jobs/timesheets.htm" append to end will be present in that email.

Disabling Timesheets for a Client
- In the authorisation file remove the Timesheet menu access from all the users.
- Do not remove the other timesheet authorisations in the authorisation file because if in future the client wants to reactivate timesheets it will be easier for support to set it up again at that time.
- In the timesheet configuration file remove
- The Start Date
- The Approval/Reminder Hours
- The Approval/Reminder Monitors
Importing Activities
Preparing a file of activities to import
Valid columns for activity file are below:
- ACTIVITY CODE - required, unique, three letter code advisable. It is recommended that first letter is same as that of department code
- ACTIVITY NAME - required, lower case allowed.
- DEPARTMENT - required, uppercase forced. It must be in the authorisation File.
Get an excel sheet containing the columns above and save the file as activity.txt in tab delimited text format.
Importing the activities file
Do the actual import into a test database until you verify that all is ok.
In NEOSYS Maintenance mode press F5 to get a command box
First do a trial import which doesn't actually import as follows. The only error that this does not catch is if you have duplicate activity codes in the file to be imported so check against that carefully BEFORE importing.
IMPORTX C:\ACTIVITY.TXT ACTIVITIES
Check that there are no errors and resolve any errors before continuing to do the actual import.
IMPORTX C:\ACTIVITY.TXT ACTIVITIES (C)
Get a List of activities in the standard user interface to check that all have been loaded ok.

