Using NEOSYS Generally: Difference between revisions
No edit summary |
|||
| Line 7: | Line 7: | ||
#Next, Enable the Internet Explorer Compatibility View. See [[Setting_up_and_Configuring_NEOSYS_Generally#Enabling compatibility view in IE8, IE9 and IE10 |Compatibility Mode]] for instructions. | #Next, Enable the Internet Explorer Compatibility View. See [[Setting_up_and_Configuring_NEOSYS_Generally#Enabling compatibility view in IE8, IE9 and IE10 |Compatibility Mode]] for instructions. | ||
#You should now see the Login page. Add this URL to your favourites. | #You should now see the Login page. Add this URL to your favourites. | ||
#If you are a new user or have forgotten your password click on [[How_to_reset_the_password | #If you are a new user or have forgotten your password click on [[General_FAQ#How_to_reset_the_password.3F|Request Password]] for instructions on how to get your password | ||
#Enter your Username, Password, select the database and click on login. See http://youtu.be/dS62_eSCm-A to learn how to login to NEOSYS. | #Enter your Username, Password, select the database and click on login. See http://youtu.be/dS62_eSCm-A to learn how to login to NEOSYS. | ||
#You should now see the user details page. | #You should now see the user details page. | ||
Revision as of 08:29, 13 February 2014
Getting started with NEOSYS
- Reset your browser to factory settings by following instructions at Reset_Browser
- Ensure that the pop-up blocker is disabled. See Disabling Popup Blocker for instructions.
- Open up the browser
- Open up the NEOSYS login page
- If you get a certificate warning when you access the URL, follow instructions for Internet Explorer or Safari browser
- Next, Enable the Internet Explorer Compatibility View. See Compatibility Mode for instructions.
- You should now see the Login page. Add this URL to your favourites.
- If you are a new user or have forgotten your password click on Request Password for instructions on how to get your password
- Enter your Username, Password, select the database and click on login. See http://youtu.be/dS62_eSCm-A to learn how to login to NEOSYS.
- You should now see the user details page.
Using the NEOSYS testing and training database
Standard NEOSYS practice is to setup a "testing and training" database for each operationally live database. This testing and training database is very useful to try out procedures in NEOSYS without having any real live or permanent effect. The testing and training database is virtually a copy of the live data because every night the live database is cloned over (copied) to the test database. This database is generally available to everybody who has access to the live database unless specifically restricted.
- To access the test database, first log out of the live database if you are logged in, then chose the test database from the dropdown on the login screen before logging in.
- Since the test database is a copy of the live database as at last night (around 1am) it contains up to date info for you to play with any time you like.
- Any work you do in the test database has no effect whatever in your live database.
- There is no way to copy any work done in the test database to the live database
- Since any testing work done in the test database will be OVERWRITTEN during the night, if you wish to perform extended testing which extends overnight, you can ask NEOSYS support to suspend the nightly copy.
- Passwords in the test database are a COPY of whatever was in the live database at the time it was copied (usually last night). Resetting the password in LIVE or TEST does not affect the other database.
- Documents and reports generated from the test database have a mark (in red) in the heading to indicate that they did not come from the live system. This helps to reduce confusion in case people lose track of which system they are working in.
Screen logging in to test database:
Document showing red warning in heading:
Restricting user access to files
Restricting user’s access to certain records of a file depending on company/division
In the following discussion remember that NEOSYS “companies” are used to implement any kind of corporate division. This includes legal entities and any type of internal division including departments, cost centres and profit centres etc.
Step 1 is to use the NEOSYS Authorisation File to generally restrict users access to certain companies/divisions, then they will also be restricted from viewing any records “belonging” to those companies/divisions. Split the groups in the authorisation file into multiple groups per division. For example, instead of one CLIENT SERVICE group in the Authorisation File you can create CLIENT SERVICE1, CLIENT SERVICE2 etc. The only difference must be a trailing integer so that the actual division name can be determined by NEOSYS.
For example to restrict access to company/division “XYZ” you create locked tasks in the NEOSYS Authorisation File as follows. The quotation marks are required.
COMPANY ACCESS “XYZ”
Invent a suitable lock eg =CFX to lock this company, place that lock on the newly created task and add that lock to the keys of the groups that should have access to that company.
Step 2 - Most of the various files in NEOSYS allow, and sometimes require, the association (i.e. tying) of individual records to specific companies/divisions either directly or indirectly.
Depending on the file, restrict access by entering one or more of the following on the individual records that are to be restricted.
- Company code
- A/c No. of an account which is tied to a specific company/division in its chart of accounts
- ”A/c No , company code” eg 99999,XYZ - in most places that you can enter the A/c No. you may also follow it with a comma then the company code.
- Codes of other records which are themselves tied to a specific company/division.
Important Note: brands are associated with the company of the account at the time that the brand was created and removing the company from the account code didnt free up the brand from the company which also includes removing the company code from the chart. Hence if you do such a change you need to run the following in maintenance mode:
F5
CREATEBRANDS
Yes
Restricting access of users to specific individual records
Insert locked tasks in the Authorisation File similar to the following. For example, the following restricts access to company “XYZ”. The quotation marks are required.
COMPANY ACCESS “XYZ”
Generally, wherever there is a task called ‘filename ACCESS’ then you can add tasks like ‘filename ACCESS “XYZ” ’ to restrict access to individual records.
Other examples are:
ACCOUNT ACCESS “99999”
MARKET ACCESS “INT”
Restricting access to the company and market files is rather special in that it also restricts access to any and all records associated with (ie “belonging” to or tied to) that company or market.
Due to limitations in the size of the authorisation file, this should be limited to no more than a few 10’s of records in total for all files.
Using NEOSYS online
Slow speed initially
The first time you use NEOSYS it takes time to get to the login screen because software code has to be downloaded in to the workstations browser cache. Getting to the login screen subsequently will be much faster.
After you login, there is also a delay the very first time that you bring a form (any form) on screen. The workstation has to download the general form handling software that handles all forms.
There is also a delay the very first time you use each specific form while the form specific software is downloaded. Large more complex forms take longer than smaller more simple forms.
Tips for demo
Login and get *any* small form up before the full demo starts then close all windows to start the demo from scratch. If possible also visit as many of the larger forms as you can before the full demo starts
During the demo, if any screen comes up slowly, change to another screen and then go back to the original screen to show that it is fast on the second and subsequent visits.
Use shift+click or right mouse click on the menu to open new windows wherever possible rather than keep changing forms within one window.
Be aware that large complicated forms take longer to download initially but all forms should be fast on secondary visits.
Common error and solution
Sometimes, especially on poor internet connections, NEOSYS doesn't download all the files correctly from nl1 immediately. If this happens you will get a variety of different error messages when you use the system first. You might also get no message but a little warning flag at the bottom of the internet explorer window that says something like "error on page".
The problem is usually resolved by revisiting the page or pressing the F5 button or the Refresh button on the Internet Explorer tool bar
Emailing documents in PDF format
OPTION 1 : Using "PrimoPDF"
Features
- - - - PrimoPDF Must be installed on each user's computer
- +++ Free version (7.2 MB) without any time limitation/adware etc.
- +++ Well supported including Vista with paid version available
- +++ Minimal clicks to accomplish the task (easy to use)
- +++ Option to "Email PDF" directly
- +++ Options to password protect reading/updating
Installation
http://www.neosys.com/software/primopdf.exe (changes)
http://www.neosys.com/software/primopdf4.0.1.exe
You probably also want a pdf viewer installed
http://www.adobe.com/products/reader/
Setting up
- Optionally set PrimoPDF to be your default printer
- Optionally configure your default printer to be landscape mode
- Set the PrimoPDF "Post Process" to be "Email PDF"
- Optionally setup other PrimoPDF options - for example password protection etc
Using
1. Get on screen the document that you want to send.
2. Click Print and select PrimoPDF from the list of printers.
3. Wait for the PrimoPDF screen to open.
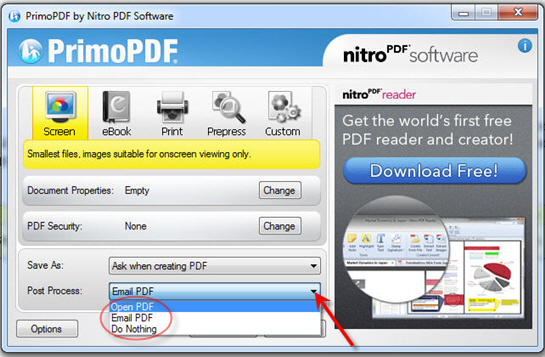
4. You have the option to choose a specific folder to save the PDF you are about to create prior to emailing as shown below. All PDF documents you generate henceforth would automatically get saved at this convenient location.
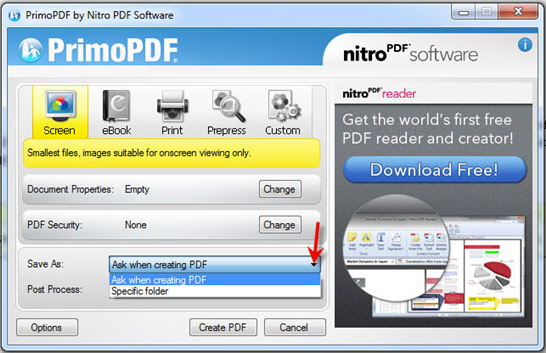
5. Select the post process task from the drop down menu as shown below :
6. If you choose "Email PDF", a blank email template will open up with the attached PDF document you just created.
7. Fill in the desired email address/subject etc.
8. Click Send.
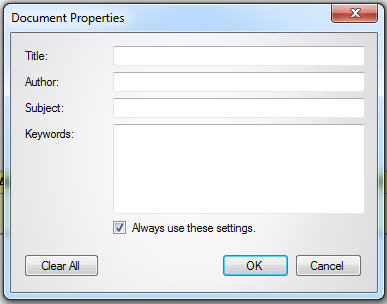
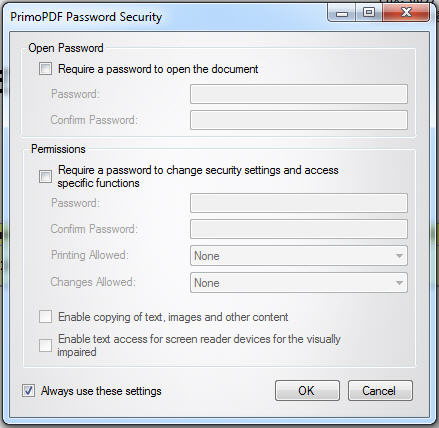
As mentioned earlier, PrimoPDF also allows a user to password protect the document and add document properties by simply clicking "Change" next to the respective options as can be seen in the screenshots above.
Here are screenshots of the "Document Properties" and "PrimoPDF Password Security" windows :
OPTION 2 : Using "CutePDF"
CutePDF Writer allows you to convert any printable document to PDF format. It installs as a virtual printer and is available from any application that offers a `Print` option. The program is easy to use, just select the CutePDF printer and click the print button. CutePDF Writer depends on the install of a PS2PDF converter such as Ghostscript (a small conversion utility) which can be automatically downloaded and installed during setup.
Features
- - - - CutePDF Must be installed on each user's computer
- +++ Free version without any time limitation/adware etc.
- +++ Very light to download and install.
- - - - No option to “Email PDF” directly. File must be saved first and can be attached later to email.
- +++ Supports Microsoft Windows XP/2003/Vista/7 (x86/x64)
Installation
Free Download (3.83 MB) at : http://www.cutepdf.com/
Using CutePDF
As Cute PDF Writer installs itself as a printer on your computer, it enables you to create a PDF document out of anything you can print.
- Get on screen the document you wish to email and click on File -> Print (Control + P)
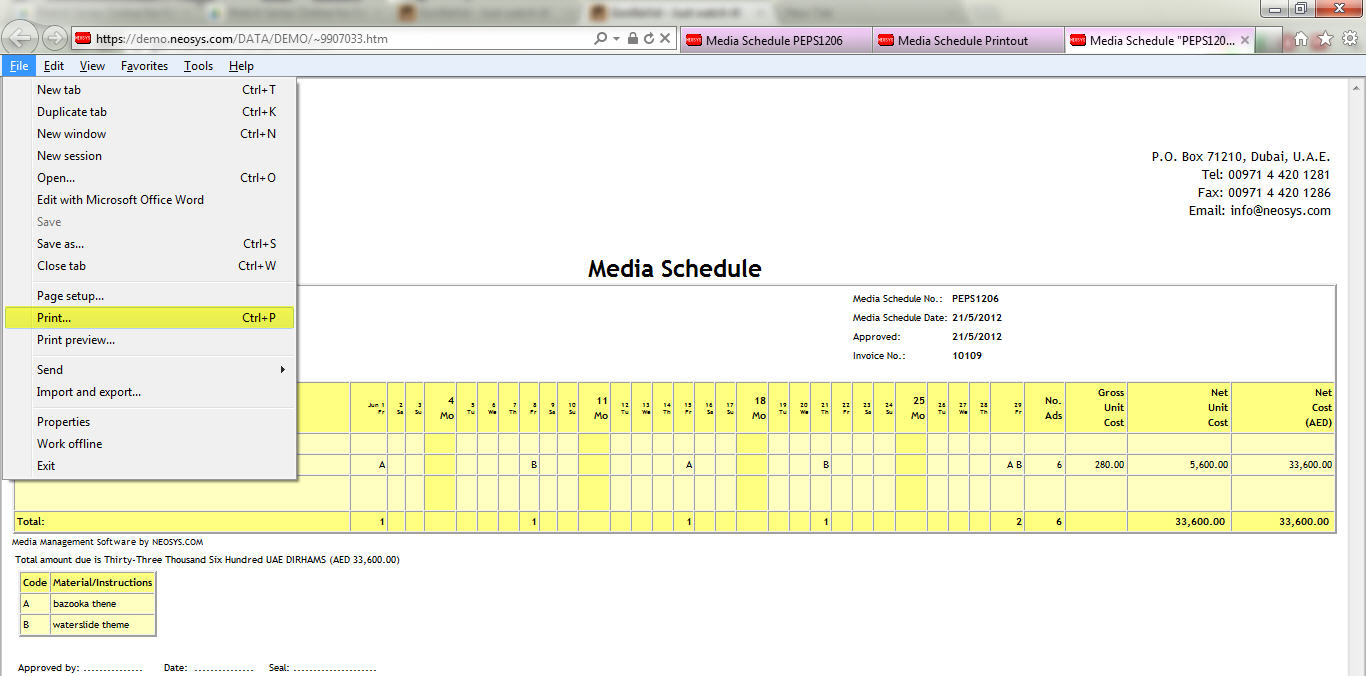
- Select "CutePDF Writer" from the list of printers and Click on Print
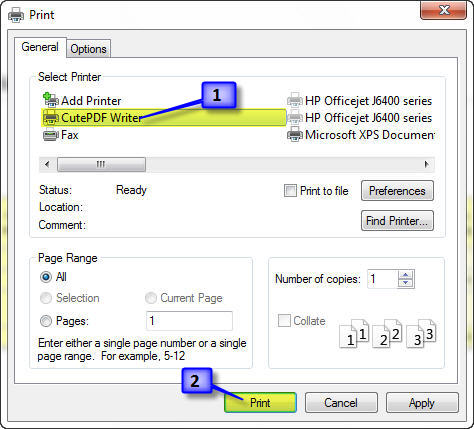
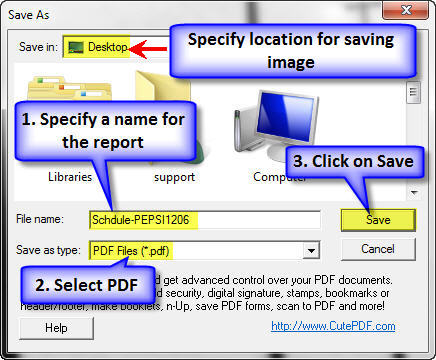
- After sending it to print, a box pops up:
- This PDF document can now be sent as an attachment via email.
Codes in NEOSYS
Inventing codes
In order to speed up data entry, NEOSYS usually allows codes to be entered directly instead of relying on name searches and popups which are slower.
There are three strategies to invent codes:
- Sequential numbers. Easy to generate codes for new records but the codes are difficult to remember and are meaningless
- Meaningful codes. Invent a pretty code so that when you look at the code it reminds you of the name. There are many alternatives though and it is usually difficult later on to re-guess/remember the exact code given only the name.
- Meaningless codes. Use some mechanical rule for generating a code from the name. If the rule is simple, then later on we can re-guess the code from the name easily. Unfortunately looking at the code usually does not remind us of the name.
The real aim of coding, if you think about it for a while, is to be able to know the code to enter it quickly even if all you know is the name. Therefore method three is the most useful.
Surprisingly, the main aim is NOT to know the name on seeing the code which is natural instinct of most people when coding. Meaningful codes are indeed pretty but usually it is difficult to remember the exact code for data entry.
Interestingly, it is common to find NEOSYS clients who have never met each other to be using identical codes for the same clients and suppliers etc.
Using Four letter coding system
This four letter coding system has proven over many years to be easy to use and surprisingly good at avoiding duplicate codes where there are thousands of records.
Follow these steps rigorously:
- If there is a well known abbreviation for something use that regardless of how many letters there are. e.g. IBM or UNESCO
- Remove all standard words from the name to be encoded. Egg The, Company, Al, Incorporated, Ltd etc
- If there is only one word left in the name take the first four letters otherwise take the first two letters of the first two words and ignore any following words.
- ACCIDENTAL DUPLICATIONS: If the code accidentally duplicates with another code, simply add a 2 or 3 or 4 onto the end of the code. DO NOT INVENT YOUR OWN CODES.
- PREDICTABLE DUPLICATIONS: If you know in advance that there are several similar accounts with almost the same name then first use the four letter rules rigorously ... and then add two letters e.g. country, town, currency etc to distinguish the duplicates.
Examples of four letter coding
NESO - NEOSYS Software Ltd. (rule 3: easy to take the first two letters of the first two words)
KHAL - Al Khaleej (rule 2 and 3: Remove the standard word Al and take the first four letters of the only word)
IBM - IBM Corporation (rule 1: Standard abbreviation although in practice would probably have a geographical location appended)
STBU - Stephen Bush (rule 3: Personal names code well in using four letters)
STBU2 - Stephan Butros (Rule 4: An accidental duplication .. simply add 2)
GUOIDU - Gulf Oil Dubai (Rule 5: We know there are many Gulf Oil records so we add two letters for the location)
GIOIJE - Gulf Oil Jeddah (Rule 5:)
The Authorisation Table
The NEOSYS authorisation system uses a concept of users, user groups, tasks, locks and keys.
The Authorisation File is on the Support Menu which is not available to everybody.
Tasks and Locks
The various tasks that users may be authorised to do are listed and have a single code (lock) next to them. The same code (lock) may be placed on many tasks, allowing the bulk authorisation of groups of tasks according to need. The grouping of tasks can be seen by sorting the tasks in order of their lock codes by clicking on the column heading titled "Locks".
Often to do accomplish some function in NEOSYS you need to be authorised to do more than one task in the authorisation table. For example to update a media schedule you need to be authorised to both access the schedule file and to update it.
Access to individual records may be restricted by appending the record key in quotes for example placing a lock on a task called ACCESS COMPANY "X" would restrict access to that company. To restrict access generally to a file but allow access to specific records, place a lock on the file eg ACCESS COMPANY but specifically enable access (place a lock) to specific records eg ACCESS COMPANY "X".
Access to particular datasets may also be restricted by placing a lock on a task called DATASET ACCESS "XXXX" and this would restrict access to users to that particular dataset.
NEOSYS authorisation table is not restricted to controlling access to files. Many tasks are very specific, for example one may or may not be allowed to book coincident ads.
A typical lock code might be AA (mneumonic for "access accounts") which would be placed on all general accounting tasks except those requiring further limitations. The AA key would only be given to accountants, thereby placing a convenient blank restriction on the ability of non-accountants from accessing accounting functions.
The lock code "NEOSYS" locks all users out of a task without exception, the key "NEOSYS" should not be given to any user.
Two of the basic functionalities of locks used in the NEOSYS AUTHORIZATION TABLE are:
- Access
- Update
Depending on the system being used, the lock can be:
- Access Media / Update Media for Media System (AM & UM)
- Access Job / Update Job for Job System (AP & UP)
- Access Accounts / Update Accounts for Finance System (AA & UA)
Every organization has some sort of hierarchy and hence the permissions to be given to the various users depends on the level that they belong to.
The Access Media permission is given to users who may want (and are authorized) to keep tabs on what the media personnel are working on. Typically, this includes Higher Management or people in supervisory roles. People with Access Media Rights can view the various schedules/plans but cannot make any changes to them. Media Personnel who have Update Media rights should also be given Access Media rights since, in NEOSYS, these two permissions have been kept separate deliberately.
Similarly, General Management may have Access Accounts (AA) but only the Finance Team would have Update Accounts (UA) permission since they are responsible for accounting in the organization.
Each lock can have levels (eg. AM0, AM, AM2) to differentiate the tasks at each user level. AM0 is given to lower level users like Junior level and AM2 can be assigned to General Management who may have more detailed Access rights than other users. No lock should be assigned the level 1 (eg. AM1) because a lock without a number indicates level 1 itself.
Ideally a lock code should be informative of its purpose.
Users and Keys
Users are listed in groups for easy comprehension. Each group is separated by a blank line. The last user name in the group is an imaginary user and is used the name of the group.
Any user can be given "keys" which are short alphanumeric codes that correspond to the "locks" on the list of tasks. Users possess all the keys of any users lower in the group including the group user, so keys are typically added and removed to the group user. Possession of a particular key enables (authorises) the user to perform all the tasks that have the same lock code that matches the key code.
Before giving a user a "key", consider sorting/filtering tasks to see what access the key grants to the user. Do not grant keys without fully appreciating what they lock.
Subgroups
In the following example, Joe and John are senior accountants and have all the keys placed on the SENIOR ACCOUNTANT and all the keys placed on the ACCOUNTS "user" whereas Joan and Joseph only have the keys placed on the ACCOUNTS "user". It is a matter of hierarchy.
- JOE
- JOHN
- SENIOR ACCOUNTANTS
- JOAN
- JOSEPH
- ACCOUNTS
- blank line separating the next group
Within a group it is convenient to define users that represent subgroups like SENIOR ACCOUNTANTS. The users above (listed before) this "subgroup user" will have all the keys placed on this subgroup user. All of the users are still in the department ACCOUNTS since that is the last line of the group.
Access restriction by IP No.
1. Access to NEOSYS is by default restricted to users from the standard Local Area Network IP numbers i.e. 192.168.*, 10.* and 127.*.
2. Users may also be restricted to login only from certain IP numbers or IP ranges.
For Example: Assigning the IP address 192.*, 10.* in the System Configuration File would restrict users to logging in only from the local area network.
We can do that as follows:
a) Navigate to the System Configuration File:
Menu >> Support >> System Configuration File
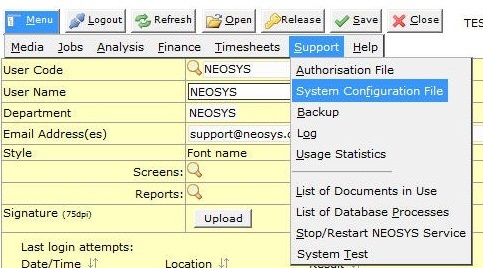
b) Enter the IP Address ranges in the restrictions field

3. If a user is permitted to access NEOSYS from an external IP address, we need to assign that external IP address along with the IP address of the Local Area Network to the level of the user in the Authorisation Table.
We can do that as follows:
a) Navigate to the Authorisation File:
Menu >> Support >> Authorisation File
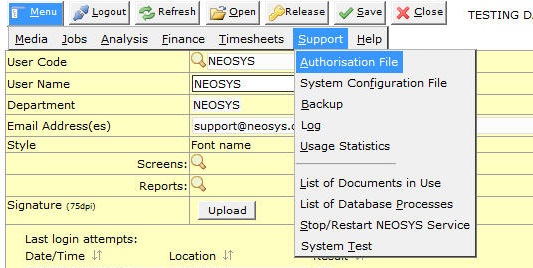
b) Enter the IP Address in the Allowed IP Numbers field

Access restriction for user: NEOSYS
- The user NEOSYS has been restricted to login only from Private LAN, NEOSYS Office/VPN IP addresses and configured static IP addresses.
Ordinary users may or may not be authorised to login from dynamic IP addresses outside the office, but the user NEOSYS cannot. - To prevent NEOSYS access from WAN (public internet) via a NAT router with a private LAN IP, we list the full IP of the NAT Router in the System Configuration File.
How the Authorisation Table works
It consists of mainly two sections :
(a) Users, and
(b) Tasks
The "USERS" section lists all the NEOSYS users licensed to use the software in their respective levels in the organisation.
This section allows support staff to do the following :
- Add/Delete users
- Disable existing users by entering an "Expiry" date
- Generate a password for a user or a level
- Set the number of days for the password to auto-expire
- Enter/change the user domain
- Monitor the users last login date, time and IP
- Add/Remove/Edit tasks for a user / level
- Specify allowed IP Numbers
A user can only access a particular task/function in NEOSYS once the task is allocated to him/her by an authorized person or by NEOSYS support staff
The "TASKS" Section consists of a list of all the tasks that users need authorisation to access in NEOSYS. Authorisation is provided to users by assigning a "LOCK" for each task in the "TASKS" section and allotting the respective LOCKS to the users in the "USERS" section against their name/level.
Customising the Authorisation Table
- The various levels in Authorisation File like Admin, Management, Media, Finance, Production, Client Services, etc. are created as per the clients requirement.
- Each level is allocated locks which enable the users above the level to have access to the corresponding tasks.
- Inserting a blank line between levels prevents the higher level from accessing the tasks allotted to the lower levels.
- Removing the blank line enables the higher levels to access tasks assigned to the lower levels,however, lower levels cannot access tasks in levels above them.
Key Points to Remember:
- Do not enter USERNAMEs for group “user” lines i.e. Departments
Department names/levels need not have any USERNAME specified as these are not real users. Also you should not specify an email address on the same, as these department names/levels are only to identify the user groups. You may login using these for testing purposes. - Do not assign keys to individual users. Assign them to a group “user” i.e. Department instead
If you feel the need to assign keys to a user, feel free to insert a new group user under them and assign the keys to that group user. This will enable us to manage the authorisation table i.e. add / delete users based on what Department they belong to, so that they get all required authorisations.
“Per User” Authorisations
Sometimes there are requests to provide very fine grained “per user” authorisations. However it is very hard to manage “per user” authorisations in the long term since there are a huge array of tasks that need to be decided per user.
Consequently is very important to maintain the VERY MINIMUM number of user groups and subgroups and NOT create additional special groups unless it is absolutely necessary.
Support staff are NOT helping the long term quality of experience of the system to the end users if they “try and be helpful” by providing many special groups and/or private authorisations for individuals. They will create a “rats nest” of incomprehensible unmaintainable authorisations. Worse, it is likely that accidental authorisations will be granted because it is impossible to reliably audit a long and complex set of “per user” authorisations.
Good support is doing the right thing for the long term success of the system. Bad support is doing whatever is asked by anybody chaotically and adding no value. Good support is not taking the easy short term way out. A system succeeds by its long term benefit to the client.
Expired Users
Users who no longer use NEOSYS should be entered as expired. It is probably best to put the current date as the expiry date so that you have a record of when the expiry was entered into the system. You could also backdate the expiry date if you find that more informative.
If you put an expiry date in the future then the user can continue using the system up to, but not including, that date. This is useful if staff are working out a notice period for example.
An expiry will have immediate effect and prevent the user from further access to NEOSYS even if they are currently logged in and working. Following general security principles, expired users are not informed of any reason why they cannot login.
Note: Do not remove/delete the users from the Authorisation Table. An expiry date is sufficient to prevent them accessing NEOSYS or receiving email notifications from NEOSYS.
The expired users can be moved to the bottom of the same authorisation group but should not be either deleted or moved to another location or section in the Authorisation Table otherwise it becomes virtually impossible to answer historical questions about expired users activity or expiration. An option to hide/show expired users isnt available but might be later on.
Expired users will not be removed from Timesheet Summary as their usage details are recorded in it.
Opening NEOSYS documents in Excel, Word etc. in Internet Explorer
Option 1 - Copy Paste Method
- Copy the report and paste it in an excel sheet. (Click on How to Copy a NEOSYS report in MS-Excel to see how to do this.)
- Click on the Home Tab and then Click on Clear -> Clear Formats
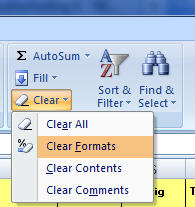
- The NEOSYS Report will now appear in excel in a text format.
Option 2 - Importing Data into Excel directly
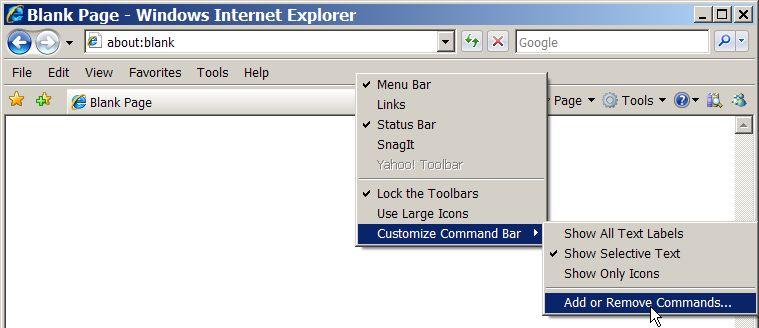
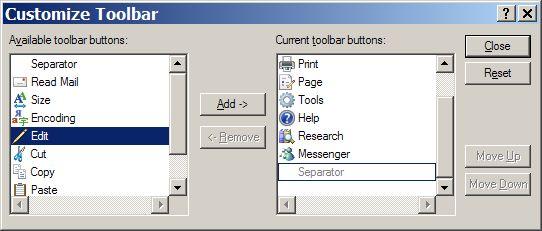
- If you have not already done so, right click on the Internet Explorer tool bar and choose the following options
- Click Edit, Add, Close
- The Internet Explorer tool bar will now have an Edit button with a drop down to select Microsoft Office programs like Excel and Word
- Click on the "right arrow" at the top left corner (it will turn into a checkmark) and click on Options on the top right of your screen
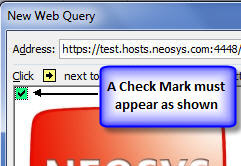
Check Mark 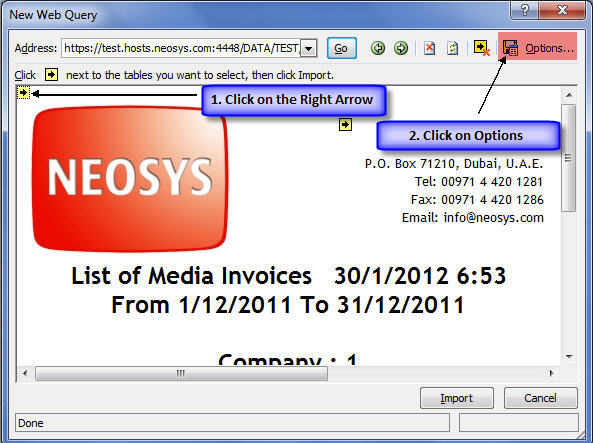
- Select the "None" option and click on Ok
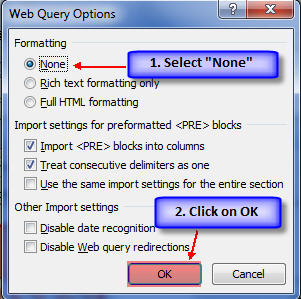
- Select the location to paste data and click on OK
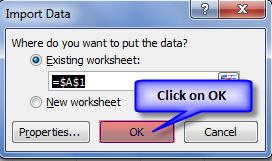
- The NEOSYS Report will now be pasted in excel in a text format.
Opening new windows in new tabs in Internet Explorer 7
Unfortunately Microsoft have decided that this cannot be done programmatically and that the only way is to right click on the menu item and select "open in new tab".
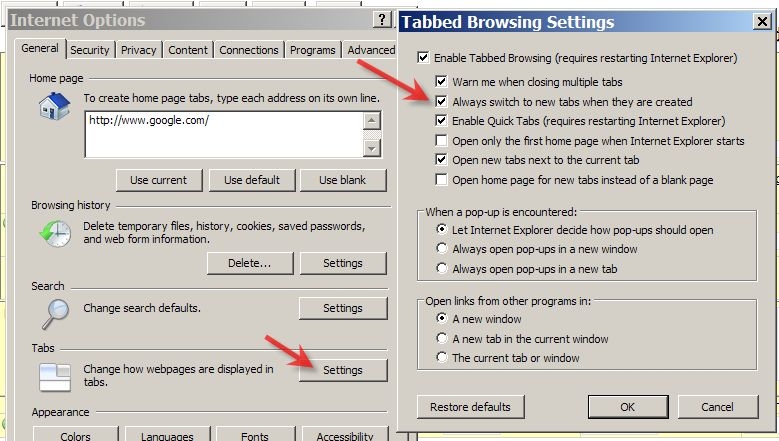
Also surprising is that new tabs do not become the top window automatically unless you configure Internet Explorer as follows:
Tool, Options, Settings and check the option "Always Switch to New Tabs when they are Created"
Showing signatures for people who are not users of NEOSYS
You can issue documents on behalf of anybody by typing in their name as the executive when creating the document, however this does provide a signature.
Solution:
- Create NEOSYS users in the usual way to represent the “issuing” users except that they must not have an email address and therefore will not be able to get passwords or login.
- Upload signatures onto the User File for the issuing users. To update users other than yourself, you need to be authorised to do “USER UPDATE”
- When creating documents on behalf of issuing users, enter the user code of the issuing user as the Executive. The default executive/issuing user can be setup per client and/or brand in the Client/Brand File if desired.


