Using NEOSYS Timesheets System: Difference between revisions
From NEOSYS User Support Wiki
Jump to navigationJump to search
No edit summary |
No edit summary |
||
| Line 1: | Line 1: | ||
=== | === Entering Time Sheets === | ||
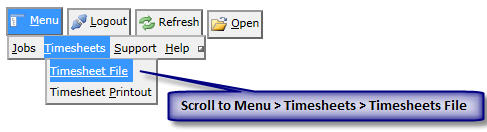
# | #Scroll to Menu > Timesheets > Timesheets File <BR>[[image:timesheet_timesheetfilemenu.jpg]]<BR> | ||
# | #You will come across the following screen <BR>[[image:timesheet_timesheetblankfile.jpg]]<BR> | ||
#Select the date for which timesheet is to be entered | |||
#Enter an existing Job no. or Press F7 to search. You can view Job details by entering job no. and Pressing F6. Click on '''(+)''' to enter multiple Jobs | |||
#Select appropriate 'Activity' | |||
#Enter the Time Duration | |||
#Enter necessary comments in 'Details' | |||
#Click on Save | |||
Revision as of 07:16, 5 January 2012
Entering Time Sheets
- Scroll to Menu > Timesheets > Timesheets File
- You will come across the following screen
File:Timesheet timesheetblankfile.jpg - Select the date for which timesheet is to be entered
- Enter an existing Job no. or Press F7 to search. You can view Job details by entering job no. and Pressing F6. Click on (+) to enter multiple Jobs
- Select appropriate 'Activity'
- Enter the Time Duration
- Enter necessary comments in 'Details'
- Click on Save
