Using NEOSYS Generally
Emailing documents in PDF format using PrimoPDF
Features
- - - - PrimoPDF Must be installed on each user's computer
- +++ Free version without any time limitation/adware etc.
- +++ Well supported including Vista with paid version available
- - - - Quite large download for a printer driver at 17Mb
- +++ Minimal clicks to accomplish the task (easy to use)
- - - - Always slow to open up after you choose "Print"
- +++ Option to "Email PDF" directly
- +++ Options to password protect reading/updating
Installation
http://www.neosys.com/software/primopdf.exe
You probably also want a pdf viewer installed
http://www.adobe.com/products/reader/
Setting up
- Optionally set PrimoPDF to be your default printer
- Optionally configure your default printer to be landscape mode
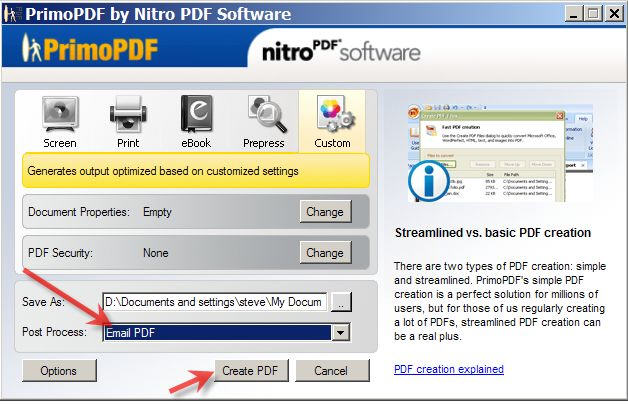
- Set the PrimoPDF "Post Process" to be "Email PDF"
- Optionally setup other PrimoPDF options - for example password protection etc
Using
- Get on screen the document that you want to send
- Click Print
- Wait for primopdf screen to open (slow)
- Click "Email PDF"
- Wait for Email screen to open (fast)
- Fill in email address/subject etc
- Click Send
Codes in NEOSYS
Inventing codes
In order to speed up data entry, NEOSYS usually allows codes to be entered directly instead of relying on name searches and popups which are slower.
There are three strategies to invent codes:
- Sequential numbers. Easy to generate codes for new records but the codes are difficult to remember and are meaningless
- Meaningful codes. Invent a pretty code so that when you look at the code it reminds you of the name. There are many alternatives though and it is usually difficult later on to re-guess/remember the exact code given only the name.
- Meaningless codes. Use some mechanical rule for generating a code from the name. If the rule is simple, then later on we can re-guess the code from the name easily. Unfortunately looking at the code usually does not remind us of the name.
The real aim of coding, if you think about it for a while, is to be able to know the code to enter it quickly even if all you know is the name. Therefore method three is the most useful.
Surprisingly, the main aim is NOT to know the name on seeing the code which is natural instinct of most people when coding. Meaningful codes are indeed pretty but usually it is difficult to remember the exact code for data entry.
Interestingly, it is common to find NEOSYS clients who have never met each other to be using identical codes for the same clients and suppliers etc.
Using Four letter coding system
This four letter coding system has proven over many years to be easy to use and surprisingly good at avoiding duplicate codes where there are thousands of records.
Follow these steps rigorously:
- If there is a well known abbreviation for something use that regardless of how many letters there are. e.g. IBM or UNESCO
- Remove all standard words from the name to be encoded. Egg The, Company, Al, Incorporated, Ltd etc
- If there is only one word left in the name take the first four letters otherwise take the first two letters of the first two words and ignore any following words.
- ACCIDENTAL DUPLICATIONS: If the code accidentally duplicates with another code, simply add a 2 or 3 or 4 onto the end of the code. DO NOT INVENT YOUR OWN CODES.
- PREDICTABLE DUPLICATIONS: If you know in advance that there are several similar accounts with almost the same name then first use the four letter rules rigorously ... and then add two letters e.g. country, town, currency etc to distinguish the duplicates.
Examples of four letter coding
NESO - NEOSYS Software Ltd. (rule 3: easy to take the first two letters of the first two words)
KHAL - Al Khaleej (rule 2 and 3: Remove the standard word Al and take the first four letters of the only word)
IBM - IBM Corporation (rule 1: Standard abbreviation although in practice would probably have a geographical location appended)
STBU - Stephen Bush (rule 3: Personal names code well in using four letters)
STBU2 - Stephan Butros (Rule 4: An accidental duplication .. simply add 2)
GUOIDU - Gulf Oil Dubai (Rule 5: We know there are many Gulf Oil records so we add two letters for the location)
GIOIJE - Gulf Oil Jeddah (Rule 5:)
Authorising and restricting what users can do
The NEOSYS authorisation system uses a concept of users, user groups, tasks, locks and keys.
The Authorisation File is on the Support Menu which is not available to everybody.
Tasks and Locks
The various tasks that users may be authorised to do are listed and have a single code (lock) next to them. The same code (lock) may be placed on many tasks, allowing the bulk authorisation of groups of tasks according to need. The grouping of tasks can be seen by sorting the tasks in order of their lock codes by clicking on the column heading titled "Locks".
Often to do accomplish some function in NEOSYS you need to be authorised to do more than one task in the authorisation table. For example to update a media schedule you need to be authorised to both access the schedule file and to update it.
Access to individual records may be restricted by appending the record key in quotes for example placing a lock on a task called ACCESS COMPANY "X" would restrict access to that company. To restrict access generally to a file but allow access to specific records, place a lock on the file eg ACCESS COMPANY but specifically enable access (place a lock) to specific records eg ACCESS COMPANY "X".
Access to particular datasets may also be restricted by placing a lock on a task called DATASET ACCESS "XXXX" and this would restrict access to users to that particular dataset.
NEOSYS authorisation table is not restricted to controlling access to files. Many tasks are very specific, for example one may or may not be allowed to book coincident ads.
A typical lock code might be AA (mneumonic for "access accounts") which would be placed on all general accounting tasks except those requiring further limitations. The AA key would only be given to accountants, thereby placing a convenient blank restriction on the ability of non-accountants from accessing accounting functions.
Users and Keys
Users are listed in groups for easy comprehension. Each group is separated by a blank line. The last user name in the group is an imaginary user and is used the name of the group.
Any user can be given "keys" which are short alphanumeric codes that correspond to the "locks" on the list of tasks. Users possess all the keys of any users lower in the group including the group user, so keys are typically added and removed to the group user. Possession of a particular key enables (authorises) the user to perform all the tasks that have the same lock code that matches the key code.
Subgroups
In the following example, Joe and John are senior accountants and have all the keys placed on the SENIOR ACCOUNTANT and all the keys placed on the ACCOUNTS "user" whereas Joan and Joseph only have the keys placed on the ACCOUNTS "user". It is a matter of hierarchy.
- JOE
- JOHN
- SENIOR ACCOUNTANTS
- JOAN
- JOSEPH
- ACCOUNTS
- blank line separating the next group
Within a group it is convenient to define users that represent subgroups like SENIOR ACCOUNTANTS. The users above (listed before) this "subgroup user" will have all the keys placed on this subgroup user. All of the users are still in the department ACCOUNTS since that is the last line of the group.
Access restriction by IP No.
Users may be restricted to login only from certain ip numbers or ip ranges. eg 192.*,10.* would restrict a user to logging in only from the local area network.
Opening NEOSYS documents in Excel, Word etc. in Internet Explorer 7
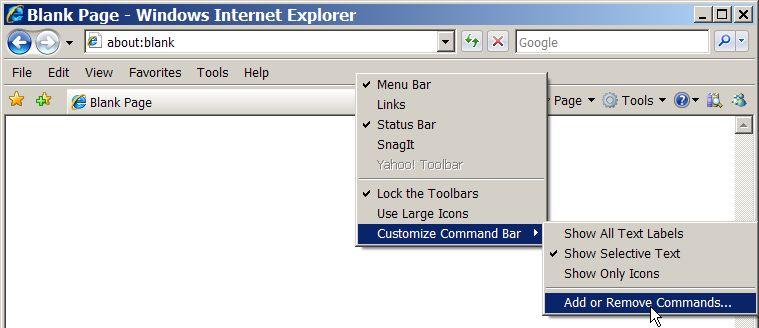
1. If you have not already done so, right click on the Internet Explorer tool bar and choose the following options
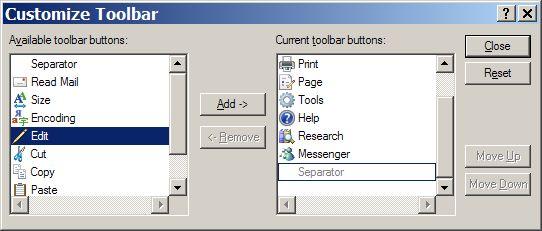
2. Click Edit, Add, Close.
3. The Internet Explorer tool bar will now have an Edit button with a drop down to select Microsoft Office programs like Excel and Word.
Opening new windows in new tabs in Internet Explorer 7
Unfortunately Microsoft have decided that this cannot be done programmatically and that the only way is to right click on the menu item and select "open in new tab".
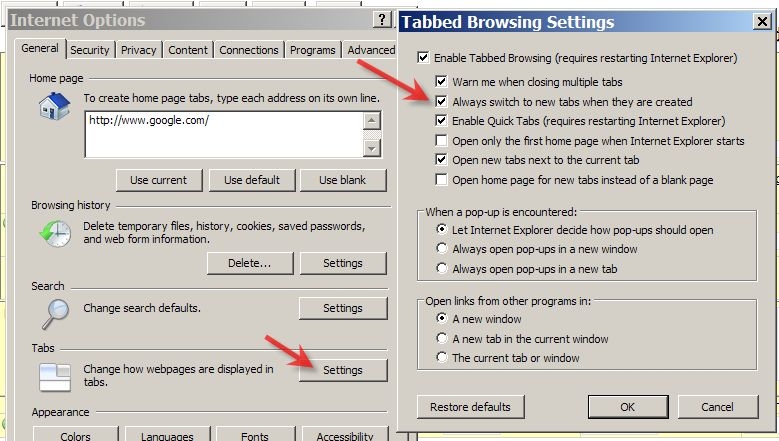
Also surprising is that new tabs do not become the top window automatically unless you configure Internet Explorer as follows:
Tool, Options, Settings and check the option "Always Switch to New Tabs when they are Created"


