Ledger Account: Difference between revisions
mNo edit summary |
|||
| Line 3: | Line 3: | ||
==Ledger Account== | ==Ledger Account== | ||
NEOSYS Ledger Account is a powerful feature where a list of all transactions/items of an account or ledger for a period range | NEOSYS Ledger Account is a powerful feature where a list of all transactions/items of an account or ledger can be generated for a period range of your choosing. This report also provides a wide range of filters such as Account Type, Currency, Output format, Journal Type, Tax Categories etc. | ||
It is a quick method of checking the balance of any account or ledger and also helps to discover any discrepancies in your entries. | It is a quick method of checking the balance of any account or ledger and also helps to discover any discrepancies in your entries. | ||
A basic ledger printout can be generated following the steps below: | A basic ledger printout can be generated following the steps below: | ||
#Open the Ledger Account screen (Menu-> Finance-> Ledger) | #Open the Ledger Account screen (Menu-> Finance-> Ledger -> Ledger Account) | ||
#Click on | #Click on 'Change' button to edit the Finance settings. [[File:Finance settings.jpg|center|frame]] | ||
#*Enter a period range which | #*Enter a period range which be the default range if no other period or date range is entered in the Ledger Account screen. | ||
#*Select | #*Select a single or multiple companies, as required. Choosing multiple companies gives a consolidated report. | ||
#*The default option is to convert into base currency or a selected currency but you can also choose to leave it | #*The default option is to convert into base currency or a selected currency but you can also choose to leave it unconverted. | ||
#Enter an account code or a ledger code manually or by | #Enter an account code or a ledger code manually or by Search. Multiple accounts/ledgers can be selected. | ||
#Select the type of Account transactions/items that you | #Select the type of Account transactions/items that you want to view. By default, 'Movements during the period' and 'Outstanding items at the end of the period' are selected. | ||
#Click OK to generate the printout. [[File:Ledger Account - jtypes.jpg|center|frame]] | #Click OK to generate the printout. [[File:Ledger Account - jtypes.jpg|center|frame]] | ||
| Line 26: | Line 26: | ||
<b>Format:</b> | <b>Format:</b> | ||
Choose to display a detailed or a simplified report. | |||
Ledger Account: Used for internal purposes. Includes links to the voucher file. | |||
Statement of Account: Used for external purposes. Provides an official summary of an account. | |||
<b>Columns:</b> | <b>Columns:</b> | ||
| Line 46: | Line 50: | ||
<b>Account type(s):</b> | <b>Account type(s):</b> | ||
NEOSYS provides several options for choosing the type of transactions to display. | |||
Movements during the period: Transactions that occur in the date or period range specified. Displays all details of the transactions. | Movements during the period: Transactions that occur in the date or period range specified. Displays all details of the transactions. | ||
| Line 52: | Line 56: | ||
Movements totalled by type of voucher: Same report as above but displays only the type of voucher and the total, suppressing the reference and the details. | Movements totalled by type of voucher: Same report as above but displays only the type of voucher and the total, suppressing the reference and the details. | ||
Outstanding items at the end of the period: | Outstanding items at the end of the period: Display entries/transactions that are pending allocation at the end of the selected period range. | ||
Outstanding items at the beginning of the period: | Outstanding items at the beginning of the period: Display all unallocated entries/transactions from the beginning of the selected period range. | ||
Open items: | Open items: Display all transactions that include open item accounts, providing an item-wise balance showing the transactions in the specified account and it's contra-account. | ||
Open items (current period only): Same as above option but will display only transactions in the current period. | Open items (current period only): Same as above option but will display only transactions in the current period. | ||
Overdue items: | Overdue items: Display all transactions which are overdue past the Due date entered. | ||
<b>Due Date:</b> | <b>Due Date:</b> | ||
| Line 72: | Line 76: | ||
<b>Contra Accounts:</b> | <b>Contra Accounts:</b> | ||
Contra accounts are accounts with an opposite balance to the selected accounts | Use this filter to either include or exclude any contra accounts from your report. Contra accounts are accounts with an opposite balance to the selected accounts. | ||
<b>Journal Types:</b> | <b>Journal Types:</b> | ||
| Line 84: | Line 88: | ||
<b>Include:</b> | <b>Include:</b> | ||
Tick the | Tick the 'Unposted Vouchers' checkbox to include unposted vouchers in the report. | ||
<b>Grouping:</b> | <b>Grouping:</b> | ||
Tick the | Tick the 'By company' checkbox to generate a consolidated report of all companies selected with all the transactions grouped by the company. | ||
<b>Show Allocation:</b> | <b>Show Allocation:</b> | ||
Tick the | Tick the 'Show allocation' checkbox to show any allocations (eg invoices paid, receipts etc.) in the voucher details column. This reduces the need to type in details during journal data entry and also provides a wealth of additional information on ledger accounts that could previously only be seen by drilling down to the individual vouchers. | ||
Revision as of 07:19, 3 August 2021

Ledger Account
NEOSYS Ledger Account is a powerful feature where a list of all transactions/items of an account or ledger can be generated for a period range of your choosing. This report also provides a wide range of filters such as Account Type, Currency, Output format, Journal Type, Tax Categories etc.
It is a quick method of checking the balance of any account or ledger and also helps to discover any discrepancies in your entries.
A basic ledger printout can be generated following the steps below:
- Open the Ledger Account screen (Menu-> Finance-> Ledger -> Ledger Account)
- Click on 'Change' button to edit the Finance settings.
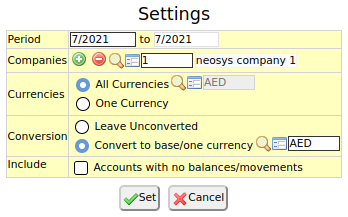
- Enter a period range which be the default range if no other period or date range is entered in the Ledger Account screen.
- Select a single or multiple companies, as required. Choosing multiple companies gives a consolidated report.
- The default option is to convert into base currency or a selected currency but you can also choose to leave it unconverted.
- Enter an account code or a ledger code manually or by Search. Multiple accounts/ledgers can be selected.
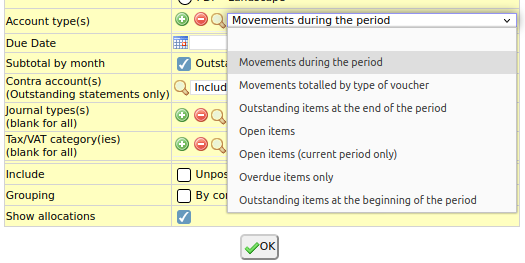
- Select the type of Account transactions/items that you want to view. By default, 'Movements during the period' and 'Outstanding items at the end of the period' are selected.
- Click OK to generate the printout.


Ledger Account filters :
Period or Dates:
Choose to display transactions either by a range of dates or use the Period range entered in the Settings. Date range filters by the transaction dates entered in the Voucher file.
Format:
Choose to display a detailed or a simplified report.
Ledger Account: Used for internal purposes. Includes links to the voucher file.
Statement of Account: Used for external purposes. Provides an official summary of an account.
Columns:
Choose to display 'Despatch Date', 'Approval Date' and 'Due Date'. The dates are generated from the Voucher file.
Billing Analysis columns:
Billing Analysis columns (eg: Client, Supplier, Type etc.) will appear automatically on Open Item accounts and Income/Cost accounts (although they are balance forward accounts). Choose 'Yes' to display on all account types or 'No' to suppress it on all types.
Paging:
Tick the 'Per A/c' checkbox to force headers for each account on the report, treating each account as a separate page.
Stationery:
Select the preferred form of output between html (with or without letterhead) and pdf (portrait or landscape).
Account type(s):
NEOSYS provides several options for choosing the type of transactions to display.
Movements during the period: Transactions that occur in the date or period range specified. Displays all details of the transactions.
Movements totalled by type of voucher: Same report as above but displays only the type of voucher and the total, suppressing the reference and the details.
Outstanding items at the end of the period: Display entries/transactions that are pending allocation at the end of the selected period range.
Outstanding items at the beginning of the period: Display all unallocated entries/transactions from the beginning of the selected period range.
Open items: Display all transactions that include open item accounts, providing an item-wise balance showing the transactions in the specified account and it's contra-account.
Open items (current period only): Same as above option but will display only transactions in the current period.
Overdue items: Display all transactions which are overdue past the Due date entered.
Due Date:
Enter a due date. A due date is required if Account type 'Overdue items only' is selected.
Subtotal by month:
View the outstanding subtotaled by month.
Contra Accounts:
Use this filter to either include or exclude any contra accounts from your report. Contra accounts are accounts with an opposite balance to the selected accounts.
Journal Types:
Leave blank to display all journal types or choose a specific journal type to filter transactions by it.
Tax/VAT category(ies):
Select from list of tax codes to display only transactions that use the selected tax code(s).
Include:
Tick the 'Unposted Vouchers' checkbox to include unposted vouchers in the report.
Grouping:
Tick the 'By company' checkbox to generate a consolidated report of all companies selected with all the transactions grouped by the company.
Show Allocation:
Tick the 'Show allocation' checkbox to show any allocations (eg invoices paid, receipts etc.) in the voucher details column. This reduces the need to type in details during journal data entry and also provides a wealth of additional information on ledger accounts that could previously only be seen by drilling down to the individual vouchers.