Ledger Account: Difference between revisions
From NEOSYS User Support Wiki
Jump to navigationJump to search
m (→Ledger Account) |
|||
| Line 7: | Line 7: | ||
To take a quick basic ledger printout follow the steps below: | To take a quick basic ledger printout follow the steps below: | ||
# | #Open the Ledger Account screen (Menu-> Finance-> Ledger) | ||
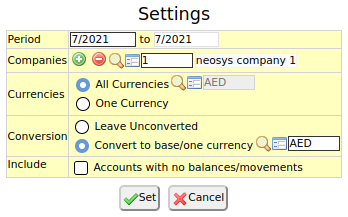
# | #Click on "Change" button to edit the Finance settings. [[File:Finance settings.jpg|center|frame]] | ||
#* | #*Enter a period range which will act as the default if no other period or date range is entered in the Ledger Account screen. | ||
#*Select only the company/ies that you require. Choosing multiple companies gives a consolidated report. | |||
#* | #*By default, option is to convert into base currency but you can choose to leave it Unconverted. | ||
#* | #Enter an account code or a ledger code manually or by using Search. Multiple accounts/ledgers can also be entered. | ||
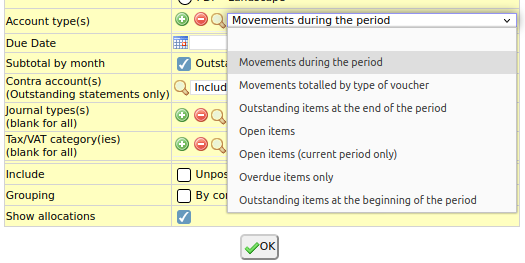
# | #Select the type of Account transcations/items that you wish to view. By default, Movements during the period and Outstanding items at the end of the period is selected. [[File:Ledger Account - jtypes.jpg|center|frame]] | ||
# | |||
#Click OK to generate the ledger printout | #Click OK to generate the ledger printout | ||
| Line 27: | Line 26: | ||
*<b>Paging:</b> Tick "Per A/c" checkbox if you want printout of each account on a different page. This options forces printing of header after each account. | *<b>Paging:</b> Tick "Per A/c" checkbox if you want printout of each account on a different page. This options forces printing of header after each account. | ||
*<b>Stationery:</b> Choose stationery – Either pre-printed option which suppresses the header or blank option which forces the printing of header | *<b>Stationery:</b> Choose stationery – Either pre-printed option which suppresses the header or blank option which forces the printing of header | ||
*<b>Due Date:</b> Choose due date. This is required if Account type "Overdue items only" is selected. | *<b>Due Date:</b> Choose due date. This is required if Account type "Overdue items only" is selected. | ||
*<b>Subtotal by month:</b> Tick the “Outstanding” checkbox if you wish to view the outstanding subtotaled by month | *<b>Subtotal by month:</b> Tick the “Outstanding” checkbox if you wish to view the outstanding subtotaled by month | ||
*<b>Contra Accounts:</b> Choose contra accounts to include/exclude in the report | *<b>Contra Accounts:</b> Choose contra accounts to include/exclude in the report | ||
Revision as of 12:30, 27 July 2021

Ledger Account
NEOSYS Ledger Account screen generates a report listing transactions, filtered by account/s or ledger/s, period and various other filters the user can set on this screen.
To take a quick basic ledger printout follow the steps below:
- Open the Ledger Account screen (Menu-> Finance-> Ledger)
- Click on "Change" button to edit the Finance settings.
- Enter a period range which will act as the default if no other period or date range is entered in the Ledger Account screen.
- Select only the company/ies that you require. Choosing multiple companies gives a consolidated report.
- By default, option is to convert into base currency but you can choose to leave it Unconverted.
- Enter an account code or a ledger code manually or by using Search. Multiple accounts/ledgers can also be entered.
- Select the type of Account transcations/items that you wish to view. By default, Movements during the period and Outstanding items at the end of the period is selected.
- Click OK to generate the ledger printout


Additional Options
Additionally the following filters are available
- Period or Dates: Leave the "Use financial period from settings" checkbox ticked, or uncheck and enter from and to periods to filter transactions
- Format: Choose one format – detailed or simplified
- Columns: Tick the the "Due Date" and "Dispatch Date" checkboxes if you wish to view the Due date and Dispatch Date columns. The due date and the dispatch date is picked from the voucher file.
- Billing Analysis columns: Billing Analysis columns will appear automatically on Open Item accounts and Income/Cost accounts (although they are balance forward accounts). Choose Yes to force it on all other Balance Forward accounts and No to suppress it on reports of all account types.
- Paging: Tick "Per A/c" checkbox if you want printout of each account on a different page. This options forces printing of header after each account.
- Stationery: Choose stationery – Either pre-printed option which suppresses the header or blank option which forces the printing of header
- Due Date: Choose due date. This is required if Account type "Overdue items only" is selected.
- Subtotal by month: Tick the “Outstanding” checkbox if you wish to view the outstanding subtotaled by month
- Contra Accounts: Choose contra accounts to include/exclude in the report
- Journal Types: Choose a specific journal type to filter transactions that use it or leave it blank for all journal types
- Include: Tick the "Unposted Vouchers" checkbox to include unposted vouchers in the report
- Grouping: Tick the “By company ”checkbox to create a consolidated ledger account of multiple companies but transactions grouped by companies
- Show Allocation: Tick the “Show allocation” checkbox to show any allocations (eg invoices paid, receipts etc.) in the voucher details column. This reduces the need to type in details during journal data entry and also provides a wealth of additional information on ledger accounts that could previously only be seen by drilling down to the individual vouchers.