Ledger Account: Difference between revisions
From NEOSYS User Support Wiki
Jump to navigationJump to search
(Created page with 'image:LedgerAccount_2011.jpg') |
No edit summary |
||
| Line 1: | Line 1: | ||
[[image:LedgerAccount_2011.jpg]] | [[image:LedgerAccount_2011.jpg]] | ||
==Ledger Account== | |||
NEOSYS Ledger Account screen generates a report listing transactions, filtered by account/s or ledger/s, period and various other filters the user can set on this screen. | |||
To take a quick basic ledger printout follow the steps below: | |||
#Goto the Ledger Account screen under Finance Menu | |||
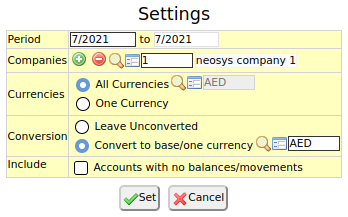
#Check Finance settings first [[File:Finance settings.jpg|center|frame]] | |||
#*Click on "Change" button to change Finance settings. | |||
#*Choose the period which will act as default if the checkbox in step 3 is checked. | |||
#*In case of multiple companies in the installation, choose the correct company. | |||
#*Choose currency conversion settings. You can choose to leave currencies unconverted or convert to base currency/1 single currency | |||
#EITHER select single/multiple accounts OR single/multiple ledgers by manually entering account/ledger codes or using the search | |||
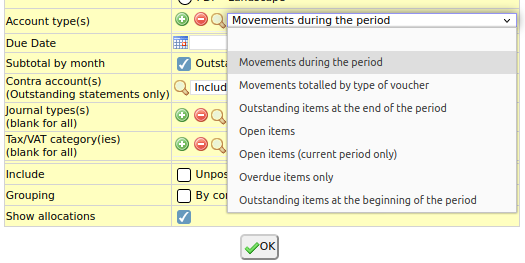
#Choose type of Ledger account [[File:Ledger Account - jtypes.jpg|center|frame]] | |||
#Click OK to generate the ledger printout | |||
===Additional Options=== | |||
Additionally the following filters are available | |||
*<b>Period or Dates:</b> Leave the "Use financial period from settings" checkbox ticked, or enter from and to periods to filter transactions | |||
*<b>Format:</b> Choose one format – detailed or simplified | |||
*<b>Columns:</b> Tick the the "Due Date" and "Dispatch Date" checkboxes if you wish to view the Due date and Despatch Date columns | |||
*<b>Billing Analysis columns:</b> Billing Analysis columns will appear automatically on Open Item accounts. Choose Yes to force it on Balance forward accounts and No to suppress it on reports of all account types. | |||
*<b>Paging:</b> Tick "Per A/c" checkbox if you want printout of each account on a different page. This options forces printing of header after each account. | |||
*<b>Stationery:</b> Choose stationery – Either pre-printed option which suppresses the header or blank option which forces the printing of header | |||
*<b>Due Date:</b> Choose due date | |||
*<b>Subtotal by month:</b> Tick the “Outstanding” checkbox if you wish to view the outstanding subtotaled by month | |||
*<b>Contra Accounts:</b> Choose contra accounts to include/exclude in the report | |||
*<b>Journal Types:</b> Choose a specific journal type to filter transactions that use it or leave it blank for all journal types | |||
*<b>Include:</b> Tick the "Unposted Vouchers" checkbox to include unposted vouchers in the report | |||
*<b>Grouping:</b> Tick the “By company ”checkbox to create a consolidated ledger account of multiple companies but transactions grouped by companies | |||
*<b>Show Allocation:</b> Tick the “Show allocation” checkbox to show all allocations under the Details column | |||
Revision as of 13:32, 1 June 2014

Ledger Account
NEOSYS Ledger Account screen generates a report listing transactions, filtered by account/s or ledger/s, period and various other filters the user can set on this screen.
To take a quick basic ledger printout follow the steps below:
- Goto the Ledger Account screen under Finance Menu
- Check Finance settings first
- Click on "Change" button to change Finance settings.
- Choose the period which will act as default if the checkbox in step 3 is checked.
- In case of multiple companies in the installation, choose the correct company.
- Choose currency conversion settings. You can choose to leave currencies unconverted or convert to base currency/1 single currency
- EITHER select single/multiple accounts OR single/multiple ledgers by manually entering account/ledger codes or using the search
- Choose type of Ledger account
- Click OK to generate the ledger printout


Additional Options
Additionally the following filters are available
- Period or Dates: Leave the "Use financial period from settings" checkbox ticked, or enter from and to periods to filter transactions
- Format: Choose one format – detailed or simplified
- Columns: Tick the the "Due Date" and "Dispatch Date" checkboxes if you wish to view the Due date and Despatch Date columns
- Billing Analysis columns: Billing Analysis columns will appear automatically on Open Item accounts. Choose Yes to force it on Balance forward accounts and No to suppress it on reports of all account types.
- Paging: Tick "Per A/c" checkbox if you want printout of each account on a different page. This options forces printing of header after each account.
- Stationery: Choose stationery – Either pre-printed option which suppresses the header or blank option which forces the printing of header
- Due Date: Choose due date
- Subtotal by month: Tick the “Outstanding” checkbox if you wish to view the outstanding subtotaled by month
- Contra Accounts: Choose contra accounts to include/exclude in the report
- Journal Types: Choose a specific journal type to filter transactions that use it or leave it blank for all journal types
- Include: Tick the "Unposted Vouchers" checkbox to include unposted vouchers in the report
- Grouping: Tick the “By company ”checkbox to create a consolidated ledger account of multiple companies but transactions grouped by companies
- Show Allocation: Tick the “Show allocation” checkbox to show all allocations under the Details column