Configuring Letterhead
Primary Letterhead Requirements
While setting up the letterhead for any company, NEOSYS requires the following:
- Exact company name to appear on invoices etc
- Company logo
- Address for letterhead
Location of images for letterhead
Placing letterhead images in the local data folder
If users don't have access to the world wide web from their computers then the put images is in the data\xyz folder (where xyz is the database code) and then in the HEAD.HTM file you can put src="http://192.168.0.1/neosys/data/xyz/SOMEFILE.JPG". (replace the IP 192.168.0.1 with the real IP and xyz with the dataset name). Do not use just the file name because if a document with such a link goes out over the network then the recipients email program recognizes the mail as a phishing mail and might even block it.
Placing letterhead images on neosys.com
Placing letterhead images on neosys.com means that documents properly show the logo regardless of where they are sent or used AS LONG AS there is access to the web.
1) Using FTP etc., upload the image file to neosys.com in TWO places.
httpdocs/img
httpsdocs/img
2) In the letterhead configuration file, prefix the image file name with //www.neosys.com/img/
For example:
<IMG SRC="//www.neosys.com/img/MEDIALIN.JPG" ALT="MediaLine">
Note: Do NOT start the src with http: to avoid browser questions when accessing neosys using https. Neither prefix it with https to avoid browser questions when using http.
Naming logo files
- It is recommended that logo file names include useful info like company name and not useless info like “logo”.
- The objective is that we can look at a directory of files and take a reasonable guess of what each file contains.
- We should be able to keep a lot of logo files in one directory without risk of clashing.
For example: Version 2 of the right hand side logo of company Abracadabra LLC the file name could be ABRA2R.JPG.
General format for image files
File names for all letterhead logos, Company stamp/signature etc should in simple “8.3” format, i.e.
 - Max 8 characters plus extension like “.JPG” or “.GIF” etc
 - All capital letters
 - No punctuation, special characters or spaces
Otherwise the NEOSYS restore process will corrupt the filename into something like LOGO_M~1.JPG and the logos will not appear on documents.

Naming Convention
 - Rename to only CAPITAL alphanumeric characters i.e. A-Z and 0-9 and underscore _
 - Use all UPPER CASE letters since any lower-case letters will be converted to upper-case on backup/restore.

The above rules apply to all files placed in DATA directory since files there are subject to limitations in the backup/restore process.

Image Format
     - Must be a *.JPG or *.GIF or *.PNG file
     - Must be about 100 pixels high and proportionally wide with NO MARGINS or WHITE SPACES inside the file.
    ** LOGO WILL NOT BE ACCEPTED IF IT DOES NOT FOLLOW THE ABOVE FORMAT **
     - A correctly sized image MUST be created from the ORIGINAL graphic design file (eg. Photoshop PSD).
   Crude resizing of image files using image editing programs is unacceptable. This is because random
   re-pixelation of the edges and (especially) the text from an already pixelated image leads to an
   unacceptable loss of quality.
  (Click here to see why NOT to resize images for letterheads: http://userwiki.neosys.com/index.php/General_FAQ#Is_it_okay_to_resize_images_for_use_in_letterhead_for_NEOSYS_documents.3F )
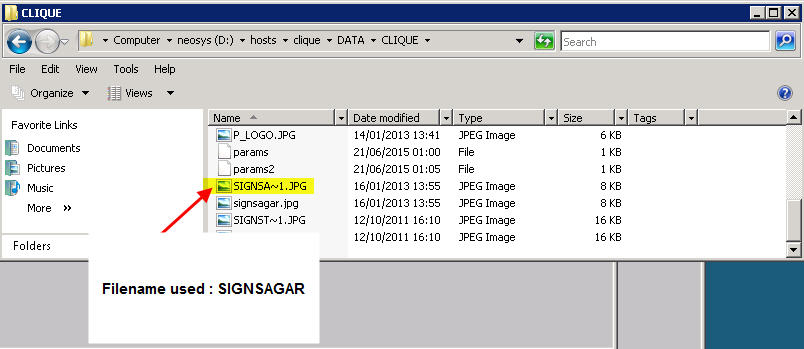
If file names have been used contrary to the instructions above e.g using long names more than 8 characters, then when you restore backups the file names are changed and will no longer appear on any letterhead/footing etc. Note that files uploaded or otherwise placed in the IMAGES directory are not restricted to 8.3 format and will be backed up to USB with their full correct file name.
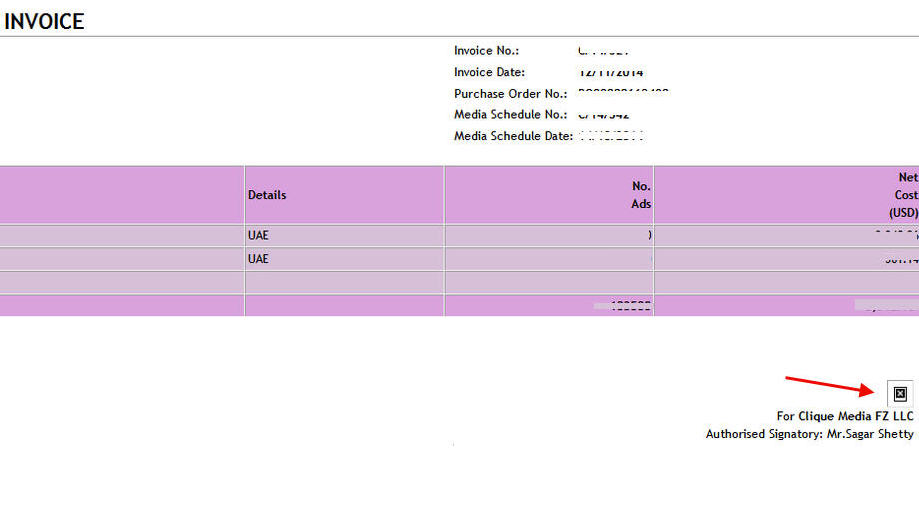
In the screenshots below file name is more than 8 characters long, after restore file name changed and the image does not get displayed in the Invoices.
Customising the letterhead for all printed documents
Set the letterhead aesthetically pleasing by following the below points:
- DONT just cut and paste whatever you have been given with no care and attention to it looking nice.
- DO balance up the lines in some clever way and avoid stretching across the whole page as far as possible
- DO JOIN multiple lines onto one line or SPLIT lines to make full use of the vertical space that the logo height reserves in the letterhead
- DO something nice even if you see other cases and examples done badly
- DONT copy existing letterheads if they dont follow the above principles (unless it is known that the client specifically wants it like that)
In Maintenance mode, press F5 and the following command:
ED DEFINITIONS HEAD.HTM
Then edit it as how you would do to a HTML file.
Commands:
Ctrl + N	New Line
Ctrl + D	Delete line
F9	        Save
Alt + D        Delete the document
Example 1
Logo top left. Address top right.
<TABLE width=100%>
 <tr>
  <td align=left>
   <img src=http://192.168.0.1/neosys/data/xyz/SOMEFILE.JPG></img>
  </td>
  <td align=right>
   <table style=font-size:80%>
     <tr>
      <td align=left>
       www.websitename.com<br>
       P.O. Box 493, Dubai, U.A.E.<br>
       Tel: +971 4 2222222 <br>
       Fax: +971 4 2222223
     </td>
    </tr>
   </table>
  </td>
 </tr>
</table>
Example 2
Logo top center.
<p align=center><img src=http://192.168.0.1/neosys/data/xyz/SOMEFILE.JPG></img></p>
Checking what file names are actually used for logos
- Get the document on screen
- Right click the image you want to check
- Choose Properties
- Look at “Address (URL)”. The last bit is the file name.
Customising the letterhead for transmission certificates
“Transmission certificate” is an option on the Schedule Printout that formats the schedule printout slightly differently so that it can be used as a transmission certificate i.e. a formal document suitable for certifying that advertising has appeared correctly.
See Certificate option in Schedule printout
The letterhead of a transmission certificate can customised per media vehicle so that the agency can issue them on behalf of the media.
Media vehicle logo per vehicle can be uploaded on the Vehicle file.
Customising the letterhead for accounting documents
Accounting documents may have a different letterhead from all other documents and the accounting letterhead is often set to blank so that all accounting documents (eg invoices and statements) are printed on real letterheaded stationary for stronger impact and formality.
Stationary option can be set in NEOSYS Configuration file, New invoices page, ledger account page etc.
To maintain a different letterhead for accounting documents, go to maintenance mode, press F5 and use the following command to edit the file INVHEAD.htm.
ED DEFINITIONS INVHEAD.HTM
Do not create INVHEAD.HTM which is a duplicate of HEAD.HTM because it causes problems in future when only HEAD.HTM is edited and INVHEAD.HTM is not.
Positioning address at bottom of page
This unfortunately cannot be done in NEOSYS due to lack of facility in HTML web pages or at least lack of knowledge of how to do it at the moment.
Many NEOSYS clients print their invoices on pre-printed letterhead stationary in order to get precise branding and the formality of real letterhead.
One can set printer margin to adjust the invoice text on a pre-printed letterhead.
Deciding to use portrait or landscape pre-printed letterhead
NEOSYS media invoices use the "date list" mode by default (instead of "date grid" mode as for schedule printouts) and therefore can fit in portrait mode but, since media schedules and plans usually must be printed in landscape mode, it is common to print media invoices in landscape mode too.
Location of HTML files
All html documents output by NEOSYS are put in the data\xyz folder (where xyz is the database code) and deleted automatically after about one hour)
Searching for earlier created letterheads
You can search for all earlier created letterheads in the maintenance mode. This is useful when you have several companies and want to see which companies have been configured with letterheads.
In maintenance mode, press F5
FIND DEFINITIONS HEAD.HTM
Changing the letterhead for printed documents
The letterhead is edited using the below command in maintenance mode.
ED DEFINITIONS HEAD.HTM
     or
ED DEFINITIONS X_HEAD.HTM
(where X is the company code followed by an underscore)
MUST follow the below steps to ensure proper setup of letterhead:
- Ensure that all HEAD.HTM files are edited including INVHEAD.HTM else reports will have different logos. Also delete duplicate invhead.htm files
- Primary Letterhead Requirements
- Location of images for letterhead
- Naming logo files
- General format for image files
- Customising the letterhead for all printed documents
- Checking what file names are actually used for logos
Copying and Deleting letterheads
We can manage letterheads by using the following commands:
COPY DEFINITIONS X_HEAD.HTM TO: (DEFINITIONS Y_HEAD.HTM)
DELETE DEFINITIONS X_HEAD.HTM
(where X is the division whose letterhead you want to delete, or copy into letterhead for division Y)
Using substitution macros in HEAD.HTM
To avoid having to make separate HEAD.HTM entries per company in multi-company databases, various "macros" can be inserted into HEAD.HTM.
The macros used in HEAD.HTM file are replaced with the corresponding values from the Company File at the time of document or report creation.
NEOSYS Support team MUST always put Tax Reg No/Company Name/Company Reg No in the Company file and NOT directly into HEAD.HTM, as it is unnecessary repetitive work and prone to errors if and when changes are required to be made.
- %COMPANY_NAME% from the Company File
- %COMPANY_REG_NO% from the Company File
- %TAX_REG_NO% from the Company File
- more options can be added on request
Multiple letterheads in single user version of NEOSYS
Multiple letterheads are provided by using different company codes.
Normally NEOSYS does not provide multicompany system for single user price so if the client is only doing the occasional document in other company then perhaps they can edit the document to remove/change the letter head. Editing should be easy enough in Word from the Edit button in Internet Explorer tool bar although after editing they probably have to save it somewhere (anywhere really) in order to print/email it.
If they are just emailing documents then they can edit the email before sending it.
Although it is often not practical, another possible way, is to make the letterhead blank (put just ) and they could print all documents on real letterhead depending on which company they want. This would still leave the main company name just above the body of the document though.

