Using NEOSYS Media System
Creating a Media Schedule
The Media Scheduling system is the heart of Neosys, it is the protagonist of the Media system. The schedule contains all the important information like vehicle data, client data,invoice data,booking orders,cost to client and cost to the agency,dates,etc. and almost all the important tasks can be executed from the schedule. The schedule contains all the precise information. We will do a complete step by step tutorial of how a schedule is created…. File:Mediaschedule.jpg
First things first, Neosys is not so colourful. We have only outlined some of the columns and numbered them as well in order to get a better understanding of the columns that are being referred to further ahead in the tutorial and the nature of the data that is entered in each column
1) The Red Box –
a) Schedule no. – this column contains the schedule number. The schedule number can either be generated automatically or manually entered. As we press ‘enter’ we will get a popup which would give us the option of creating a new schedule or copying data either from an existing schedule or plan onto a new schedule,we can choose the desired option and click ‘ok’.
b) Period – this would be automatically updated and would by default mention the current month and year which can be changed as reaquired.
c) Start date & Stop date – as the name suggests these columns would mention the start and the end date of the campaign. This is not necessarily required, it is used by the client just for reference
2) The Blue box –
a) Proposal date – this column would mention the date the campaign was proposed which by default would show the current date and can be changed as required.
b) Approval date – this column would mention the date the campaign is approved. We can press F7 and select the date.
c) Fully booked – this column mentions the date the schedule has been fully booked.
d) Fully invoiced - this column mentions the date the schedule has been fully invoiced.
3) The Green box –
a) Brand – this column would mention the name of the brand and the company.
b) Market – this column would mention the market in which the product is to be advertised.
c) Currency – this would be the base currency. Invoicing is always done in the base currency.
d) Executive – this column would mention the name of the executive preparing the schedule.
4) The Brown box –
a) Vehicle code – this column would contain the vehicle code.
Question – What is a vehicle code and how do I create a new vehicle?
The vehicle code is simply the code for the vehicle which will advertise the product. If the vehicle does not show in the existing list (F7) we can hit F6 and create a new vehicle after entering details such as currency,market,supplier,account number,etc.
b) Specification and Loading – this column would contain information about the specification and loading. The columns are directly linked to the rate cards. Assuming the rate cards have the rates updated the cost of the ad would be automatically calculated by the system based on the size mentioned in the column and entered in the ‘bill’ and ‘cost’ column.
5) The Pink box –
a) Certify – in neosys when an ad is certified it means the ad has appeared. It is just a way to differentiate between the ads that have appeared from the ones that have not yet appeared. When we click on ‘certify’ the number of ads with details would appear and we can use a number or a letter (preferably X) below the ‘Certificate/ Voucher no.’ to signify that the ad is certified.
b) Book – this is where we make the booking orders from. The details have to be filled as required and a preview of the booking order can be viewed before issuing the final booking order. The ‘Order no.’ column would list all the booking orders issued to date and the booking orders can be accessed directly from the ‘Order no.’ column.
c) Dates – this is where the dates on which the ads are scheduled to appear will be selected. The letter X can be used to mark the dates and once we press OK we wil get a popup confirming the number of dates chosen. NOTE – only those days of the week can be chosen which have been selected in the vehicle file. If unable to select a particular day in ‘Dates’ please select that day in the ‘Day of week’ column in the vehicle file.
d) Diary – the diary gives us detailed information about each and every ad in the schedule. Information such as cost, billing, margin, vehicle, etc. is mentioned in the diary.
e) Invoice – this is where the client is invoiced from. Clicking on the invoice button would lead us to a page where changes can made on the invoice as required and the proforma invoice can be viewed before invoicing the client. NOTE – Neosys recommends to always check the proforma invoice before invoicing the client in order to avoid mistakes on the original invoice.
f) Free – this is where the information about the free ads is updated. The ad could be free of cost either to the agency or the client or to both, Neosys makes it possible to choose all options and the system would automatically make the changes in the ‘bill’ and ‘cost’ based on the number of free ads.
Bill and Cost Section -
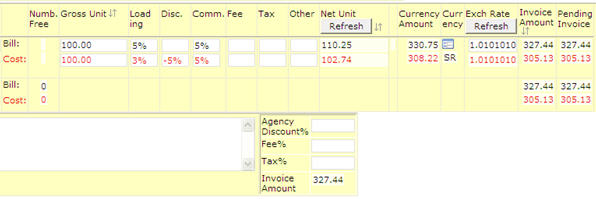
What we see above is another vital aspect of the media schedule, the bill and cost section. All the details about the cost to the agency and client, discounts received and given, commission, etc. are available in the bill and cost section. The scenario we have above is where the vehicle currency is in USD and the invoice currency, which is the base currency, is in AED. The system would calculate the invoice amount based on the exchange rate updated in the system.
NOTE – currency exchange rates have to be updated in Neosys as and when required.
media scheduling
Entering Vehicle rate cards into Neosys
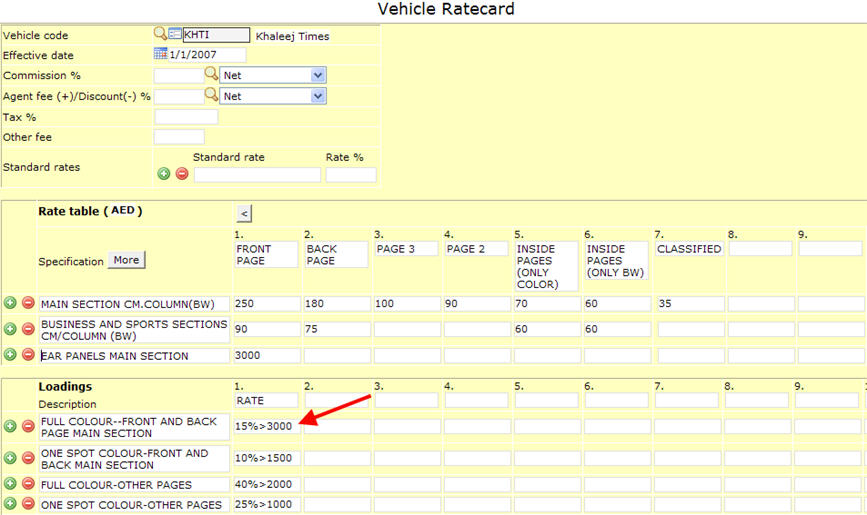
The ratecards are directly linked to the media schedule and when the prices are mentioned in the ratecard the system can automatically calculate the cost of per ad based on the size provided in the schedule.
As we can see in the image above Neosys allows the precise rate card information to be fed in the system which can very easily be retrieved when preparing the schedule.There is a seperate column for loading where the loading details can be specified.
How do i enter a minimum amount in the rate card?
The 'greater than' sign is required before the amount. In the image we can see in the loading section (where the arrow points) an example of how we document a minimum amount in the rate card which on the actual rate card was mentioned as '15% extra charge for full colour (minimum Dhs 3,000).
Issuing Credit Notes in Media
Once the client has been invoiced any of the ‘bill’ columns have to be added with a negative amount and a credit note of the same will be issued. Any amount added after the invoicing is done would be only for the credit note
What if none of the columns are vacant?
In this scneario we can choose any of the columns and enter ‘ / ‘ (forward slash) and enter the amount in negative. In case specification is required we can also mention ‘credit note’ or any other details next to the negative amount after pressing space.
Another way of issuing a credit note in Media is to remove the date of the particular ad from the ‘dates’ tab and a credit note for the amount of that ad would be issued.
Issuing separate invoices or credit notes for selected discounts and charges
NEOSYS can optionally provide clients with a supplementary invoices/credit notes for certain discounts and charges. Without this option, all discounts and charges would have to show on a single invoice.
On media plans and schedules append the letter "X" (or "x") to the discount or charge(s) that are not to show on the initial invoice and should appear on a separate invoice/credit note.
For example, enter a discount as -5%X if it is to be shown on a separate credit note.
When creating invoices to clients, an option is provided on the invoice creation form to allow raising of either a) the initial invoice only, or b) the final invoice/credit note only or c) both at the same time.
You cannot raise the final invoice/credit note unless the initial invoice is actually raised. Note that this means that you cannot get proforma invoices for the "Both" option.
Booking without showing all discounts and charges from the supplier
NEOSYS can optionally issue media booking orders with certain discounts and charges omitted.
This allows the final net cost of media to be recorded in NEOSYS while not forcing the final net cost to be shown on booking orders.
On media plans and schedules append the letter "X" (or "x") to the discount or charge(s) that are not to show on the booking order.
For example, enter a discount as -5%X if it is not to be shown on the booking order.
Posting media supplier invoices before issuing schedules to the client
Assuming that you are accruing media costs by schedule and not by vehicle or supplier then the contra account of the supplier invoice posting will be the schedule code or, if the schedules codes are pure numbers then SCH9999 where 9999 is the number of the schedule.
Supplier invoices posted before issuing invoices to client are work in progress (assets) but, in NEOSYS common practice, we still post them into the Media Accruals Ledger which could more properly be called Media Accruals/WIP Ledger.
The accrual account for the schedule is created as soon as the schedule is approved and not only when the invoice is issued to the client. Schedule approval happens in practice automatically at the time of the first booking. Therefore unless you book a schedule (or specifically enter the approval date on the schedule file, there will be no accrual account created for you to post the supplier invoice into. This is logical since if you haven't booked or specifically approved a schedule then you should arguably not be able to post supplier invoices for that schedule.
Removing unnecessary items from List of Schedules Pending Invoices
Sometimes, schedules which don't need invoicing appear on the List of Schedules Pending Invoicing. This occurs if you do the following:
- Invoice the schedule. NEOSYS removes it from the pending invoicing list.
- Modify the schedule. NEOSYS puts it back onto the pending invoicing list.
- Modify the schedule back to as it was invoiced in. NEOSYS *doesn't* remove it from the pending invoicing list.
The solution is to ask for a proforma invoice for the schedule. This will give you a "nothing to invoice" message and remove it from the list. Asking for a proforma instead of an invoice is a precaution to avoid accidentally raising an invoice if there really is something to invoice on the schedule that you didn't expect, and will show you exactly what is pending invoicing.

