Using NEOSYS Job System: Difference between revisions
No edit summary |
No edit summary |
||
| Line 1: | Line 1: | ||
=== How do i create a job in production system? === | |||
Production is used for BTL advertising, a job file consists detailed information about the job. Information such as the client, brand, market, bill and cost, etc. is mentioned in the job file. So we shall go ahead and look at the steps involved in creating a job – | |||
What we see above is what the job file looks like. We can broadly divide it into two main divisions, one which contains the information about the job and the second division is where the cost and billing information is to be entered. | |||
We will begin with a step by step tuturial for the first half of the job file - | |||
1) Job No. – as we press ‘enter’ the system would automatically generate the job number and if you wish to have a specific job number it can be entered manually, the system would then give the option of either creating a new job or copying from an existing job. | |||
NOTE – this feature is common throughout Neosys and also aplies to ‘costs’ (PO/PI) and ‘billing’ (estimate/invoice) file. | |||
2) Period – this would mention the current month and year and would be updated automatically. | |||
3) Brand – this would mention the client and brand data . We can press F7 to choose the brand from the existing list or press F6 and create a new brand. | |||
4) Company – this would mention the code of the company which is represented by the executive preparing the job file. | |||
5) Status – this would mention the status of the job which by default is ‘open’ and could otherwise be ‘closed’ and ‘reopened’. | |||
NOTE – not all users are given the authority to alter the status of the job file. | |||
6) Type – this would mention the medium chosen for advertising which can be selected from an existing list of option after pressing F7 or a new type can be created after pressing F6. | |||
7) Executive – this would be the user ID which was used to sign into Neosys. | |||
8) Attention – this would mention the name of the client representative. | |||
9) Description – it is a sort of a header, usually between one or two words, to the detailed information which is entered in the following column. | |||
10) Brief – this contains detailed technical information regarding the type of media chosen for the advertising. We also have the option of copying the ‘brief’ to the estimate or the purchase invoice. The details mentioned in the brief can also used later for reference purposes. | |||
NOTE – the nature of information entered in the ‘brief’ may differ based on the mode of functioning of the agency. | |||
NOTE – at all times please press F9 to save the data before moving on to another window. | |||
COSTS & BILLING SECTION – | |||
Billing – this is where we raise estimates to the client and invoice the client from. The estimate has the quantity and unit price mentioned. | |||
How do I Invoice the client? | |||
On the estimate/invoice file we can click on ‘Invoice’ tab and view the proforma invoice and subsequently invoice the client. | |||
Costs - the purchase order has information about the costs involved and supplier details. When the supplier invoice is received we can change the status to ‘invoice’ and mention the invoice details. | |||
NOTE – for the changes made in the cost or billing section please click on ‘reopen’ for the changes to reflect. | |||
CREDIT NOTE – | |||
What is a credit note? | |||
A credit note is the opposite of invoice. It is issued by a seller to a purchaser to record the reduction of bill possibly due to a discount, return or cancellation. | |||
How do I issue a credit note in production? | |||
Once the client is invoiced another estimate can be made with the desired amount in negative and a credit note of the same can be issued directly. | |||
=== Raising purchase orders/invoices to/from SUNDRY SUPPLIERS === | === Raising purchase orders/invoices to/from SUNDRY SUPPLIERS === | ||
1. PO/PI with a normal supplier | 1. PO/PI with a normal supplier | ||
Revision as of 11:50, 4 June 2007
How do i create a job in production system?
Production is used for BTL advertising, a job file consists detailed information about the job. Information such as the client, brand, market, bill and cost, etc. is mentioned in the job file. So we shall go ahead and look at the steps involved in creating a job –
What we see above is what the job file looks like. We can broadly divide it into two main divisions, one which contains the information about the job and the second division is where the cost and billing information is to be entered. We will begin with a step by step tuturial for the first half of the job file - 1) Job No. – as we press ‘enter’ the system would automatically generate the job number and if you wish to have a specific job number it can be entered manually, the system would then give the option of either creating a new job or copying from an existing job. NOTE – this feature is common throughout Neosys and also aplies to ‘costs’ (PO/PI) and ‘billing’ (estimate/invoice) file. 2) Period – this would mention the current month and year and would be updated automatically. 3) Brand – this would mention the client and brand data . We can press F7 to choose the brand from the existing list or press F6 and create a new brand. 4) Company – this would mention the code of the company which is represented by the executive preparing the job file. 5) Status – this would mention the status of the job which by default is ‘open’ and could otherwise be ‘closed’ and ‘reopened’. NOTE – not all users are given the authority to alter the status of the job file. 6) Type – this would mention the medium chosen for advertising which can be selected from an existing list of option after pressing F7 or a new type can be created after pressing F6. 7) Executive – this would be the user ID which was used to sign into Neosys. 8) Attention – this would mention the name of the client representative. 9) Description – it is a sort of a header, usually between one or two words, to the detailed information which is entered in the following column. 10) Brief – this contains detailed technical information regarding the type of media chosen for the advertising. We also have the option of copying the ‘brief’ to the estimate or the purchase invoice. The details mentioned in the brief can also used later for reference purposes. NOTE – the nature of information entered in the ‘brief’ may differ based on the mode of functioning of the agency.
NOTE – at all times please press F9 to save the data before moving on to another window.
COSTS & BILLING SECTION –
Billing – this is where we raise estimates to the client and invoice the client from. The estimate has the quantity and unit price mentioned.
How do I Invoice the client?
On the estimate/invoice file we can click on ‘Invoice’ tab and view the proforma invoice and subsequently invoice the client.
Costs - the purchase order has information about the costs involved and supplier details. When the supplier invoice is received we can change the status to ‘invoice’ and mention the invoice details.
NOTE – for the changes made in the cost or billing section please click on ‘reopen’ for the changes to reflect.
CREDIT NOTE –
What is a credit note?
A credit note is the opposite of invoice. It is issued by a seller to a purchaser to record the reduction of bill possibly due to a discount, return or cancellation.
How do I issue a credit note in production? Once the client is invoiced another estimate can be made with the desired amount in negative and a credit note of the same can be issued directly.
Raising purchase orders/invoices to/from SUNDRY SUPPLIERS
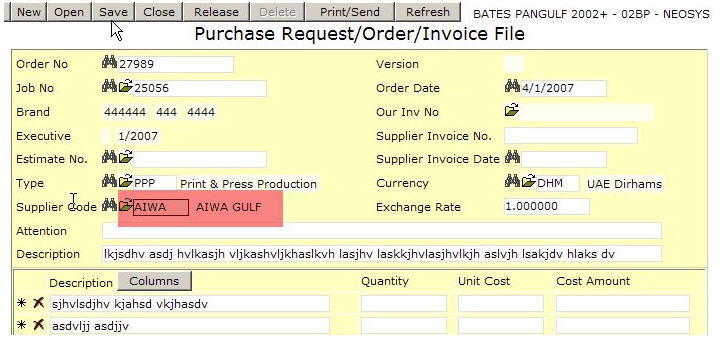
1. PO/PI with a normal supplier
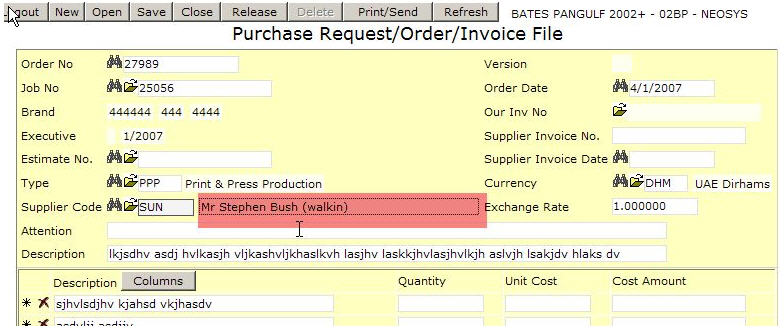
2. PO/PI with a sundry supplier. An extra box popups up if the supplier name starts with the letters SUNDRY (case insensitive). The operator must type in something.
To do this you need to first create a supplier with name something like "Sundry Suppliers"

