Setting up and Configuring NEOSYS Generally: Difference between revisions
No edit summary |
|||
| Line 232: | Line 232: | ||
#The command bar will be displayed at all times now <br>[[image:combardisp.jpg]] | #The command bar will be displayed at all times now <br>[[image:combardisp.jpg]] | ||
=== Disabling the pop-up blocker | === Disabling the pop-up blocker === | ||
==== IE7 & above ==== | ==== IE7 & above ==== | ||
# Click the Tools menu | # Click the Tools menu | ||
Revision as of 05:29, 9 February 2012
Configuring letterhead
Configuring Client Security mark
All client installations are hardcoded with the name of the NEOSYS client allowed to use the software. This client mark is generated by the programmer and given to Technical Staff during installation and is a mandatory feature and cannot be removed. This Client security mark is printed on all documents generated out of NEOSYS and appears as below:
This can be changed incase the client's legal name changes.
The client security mark can only be changed by NEOSYS technical support staff.
Configuring fonts and colors for all users
Current latest version of NEOSYS software allows choice of font for all columnar reports and documents produced by NEOSYS.
The default for all NEOSYS reports and documents unless you follow this procedure is a dark and light buff yellow.
ED DEFINITIONS SYSTEM
line 46 then press Ctrl+E to edit multivalues (sublines)
mv 1: color for table column heading rows
mv 2: color for table body rows
mv 3: font
Press F9 to save, then Esc to get out of editing multivalues
Users can override the above the colors and fonts in their user details after login.
Changing the signatory
In Maintenance mode, press F5 and the following command:
ED DEFINITIONS AGENCY.PARAMS
Be careful not to insert lines except at the end. Moving other lines down will totally screw NEOSYS!
Than go to the bottom of the page (Ctrl+Page down). Once you reach at the bottom, ENTER enough times to add additional lines if required, than search for line 61 (Ctrl+G) and edit the document / add this code:
<br><br><br>Name of General Manager<br>General Manager<br>
Configuring backup procedures
See the System Configuration File on the NEOSYS Support Menu.
Note that this configuration file is missing the option to email a NEOSYS backup.zip file daily after the backup has been completed. To configure this go to the Maintenance mode and hit the F5 key and type:
ED DOS BACKUP.CFG
In line number 10, set the email address of the recipient/s who should receive a backup.zip file. This method is extremely useful as an offsite backup procedure in case of any server or USB failures.
Configuring automated emails in NEOSYS
See the System Configuration File on the NEOSYS Support Menu.
The default configuration will send email via mailout.neosys.com on port 2500.
Note that neosys mail server will accept email from anywhere as long as the sender email is @neosys.com
Authorising Users
Preventing users from assigning their own passwords
The task AUTHORISATION INVENT OWN PASSWORDS should always have the lock NEOSYS to prevent users from creating their own passwords. Most users create unsafe passwords given the choice.
People nearly always ask to give their own passwords but you should tell them that NEOSYS always assigns random passwords for security reasons. It is not worth arguing and discussing the point with most people since they don't usually grasp the importance and soon learn their NEOSYS password anyway.
NEOSYS support staff who login as NEOSYS are still authorised to create their own passwords but it is better not to leak this information to clients immediately since people will grasp on to it and be disappointed or even offended that you are not granting this privilege to them.
Unfortunately there is no general way for people to change their own passwords at the moment. Only the few people who have access to the Support Menu and Authorisation File can do it. Changing your own passwords should be on the NEOSYS Help menu so everybody can do it.
Authorising access from outside the LAN
From 15/2/2008 access to NEOSYS is by default restricted to users from the standard local area network ip numbers starting 192.168, 10 and 127 so you might get clients complaining that they cannot login.
In order to allow access from outside you will have to update the Authorisation File and put a list of valid ip numbers that they are authorised to login from.
You dont have to put ip numbers on every single user. If the user ip numbers are blank for a user then the system will look for and use the nearest ip numbers on the following users below within the same department. Therefore you only have to put the ip numbers on the bottom "department user".
Examples
To allow someone to login from a) anywhere in the office and b) from another office with a static ip number of say 80.11.22.33 put something like 192.168.*,10.*,127.*,80.11.22.33
To allow someone to login from anywhere put * This is not recommended but necessary if someone absolutely has to login from anywhere in the world.
Enabling Minimal Access to Certificate File for Monitoring Department Staff
The following tasks are required at a minimum.
COMPANY ACCESS or COMPANY ACCESS "X"
CERTIFICATE ACCESS - AMCF
CERTIFICATE CREATE – UMCF or CMCF
CERTIFICATE UPDATE – UMCF
MENU MENU – AM0
SCHEDULE ACCESS OTHERS – AM0
MEDIA COST ACCESS - Not required
Suggested locks
AMCF – Access Media Certificate File
UMCF – Update Media Certificate File (required to change or remove certification data)
CMCF – Create Media Certificate File (required to enter new certification data)
AM0 – Access Media Level 0 – given to all media staff including Monitoring Staff
All other tasks should not be authorised to monitoring, especially the common keys AM AMC etc. should not be given unless specifically required.
Giving users access to the Support Menu
The Support Menu in NEOSYS enables users to access the following:
- List of Database processes
- List of Documents in use
- Stop/Restart NEOSYS service
- Backup
- Log
- Authorisation file
This menu is locked with the task SUPPORT MENU ACCESS and has the LS key. To give any user/I.T. administrator access to this menu, you have to give him the LS key.
Configuring Payment instructions
NEOSYS picks up the first available payment instructions from the following locations and ignores any instructions in the later files.
- Client file
- Currency file
- Company file
- Configuration File
If, following the normal rules, the payment instructions are "NONE" then the instructions are blank.
There is a manually edited flag in the company file on one NEOSYS client (cannot remember which) which makes the company file payment instructions take precedence over any currency file payment instructions. This may be added to the Client File u/i as "For all currencies"
The usual way of configuring payment instructions is to put it in the Company file under Finance. However this does not allow for different payment instructions per currency. If you put the payment instructions in the currency file however, then these instructions apply to all companies unless you edit the manual flag in the company record to say that the company file instructions take precedence over. There is no way at the moment in NEOSYS to have different instructions per company AND per currency.
Tip: Since the rules of getting payment instruction are not simple, if you are *changing* payment instructions, locate where the old instructions are and simply change them without worrying about the rules.
Creating Email Alerts in NEOSYS
Currently this is a manual process done in maintenance mode using F5. It will be replaced by a web interface.
To find existing alerts
SORT DOCUMENTS ALERTS
Syntax
CREATEALERT alertid module alerttype runhours,... runasusercode {targetusercode,...} testemail} (options)
The command must be followed by five parameters in a fixed order and separated by spaces. Two additional parameters and options in "()" may follow in a fixed order. To replace an existing alert use the overwrite option.
Alertid
Required. Invent some short identifying alphanumeric code for your alert e.g. XYZ001. It will show in the email subject and is required if you want to change or remove the alert.
Module
Required. One of the following.
- GENERAL
- FINANCE
- AGENCY
- MEDIA
- JOB
Alerttype
Required. Various alert types are available depending on the module. See individual module documentation.
Runhours
Required. For example, 10 to run at 10am or 10,13,17 to run at 10am, 1pm and 5pm.
Runasuser
Required. Determines the authorisation level during processing
Targetuser(s)
Optional commas separated list of user codes (no spaces!) to receive any output from the alert. Note that some s may not have any output and that some alerts may automatically direct their output to various users.
Test email
Optional. An email address or addresses separated by ;. All emails generated by the process will be redirected here regardless of who they are normally directed at.
Options
Optional. One or more of the following letters must be in "()"
- R=Remove - remove an existing alert (only the alertid parameter is required)
- O=Overwrite - required to overwrite an existing document.
- S=Silent
- ROS=forget last run time
Alert emails to some executives are being received by their managers
You can put whatever you like in the executive name but NEOSYS must be able to find their email somehow.
For example if the executive is entered as “Steve Bush” and there is no user called Steve Bush in the Authorisation File.
1. Does the executive name contains an “@” character? then it is the email address 2. Is there a user in Authorisation matching either the executive name (Steve Bush) … or the first word of the executive name (Steve)? 3. If none of the above then the email of the user running (usually a manager) the process is used
To solve this problem create users matching the executive names.
Note that creating users with email addresses enables them to login to NEOSYS by requesting password reminders to their email address so like all users you must ensure that their authorisation level is appropriately limited.
Configuring Internet Explorer
Enabling Menu Bar
If you cannot see the Menu Bar ( File , Edit, View etc), configure internet explorer as follows:
- Right Click on the Internet Explorer Window and Select the "Menu Bar" option

- The Menu Bar will now be displayed at all times

Enabling Status Bar
NEOSYS uses the Internet Explorer status bar (the bottom line of the Internet Explorer window) to inform you when it is communicating with the server. This is particularly useful when you are working over the internet and/or with large documents since it gives you some feedback of how the system is working.
Unfortunately, when the NEOSYS server is not on your office LAN, NEOSYS cannot update the status bar unless you configure Internet Explorer as follows:
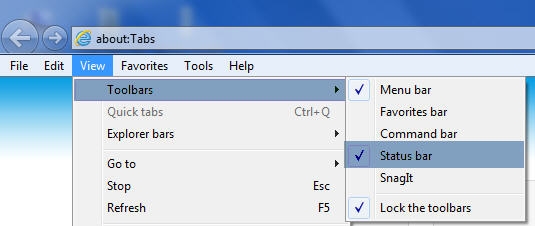
- Click on View menu, select Toolbars, and tick “Status bar” ( In case view menu is not displayed then see procedure mentioned at Enabling Menu Bar to enable it)
- In Internet Explorer, login to NEOSYS then open the Tools menu (press Alt+T), select Internet Options, Security, Trusted Sites, Sites, Add, Close, OK
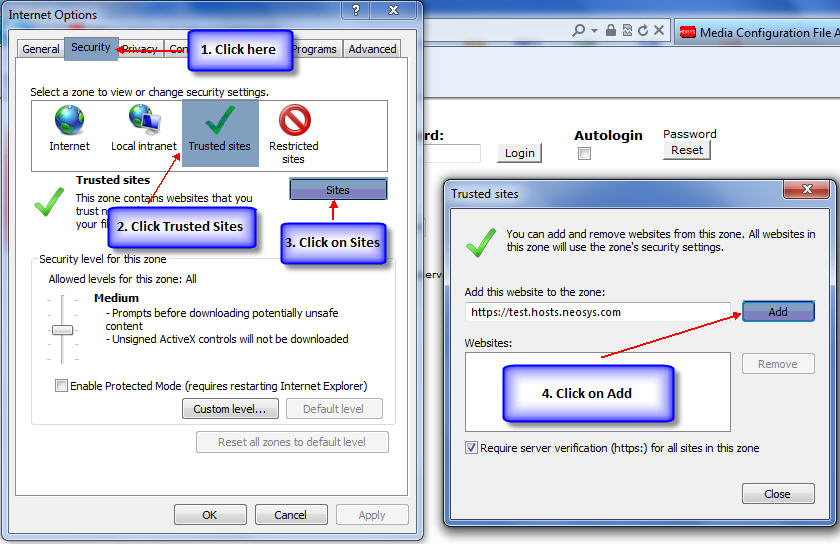
- The status bar will be displayed at the bottom.
Enabling Command Bar
- Click on View menu, select Toolbars, and tick “Command bar” ( In case view menu is not displayed then see procedure mentioned at Enabling Menu Bar to enable it)
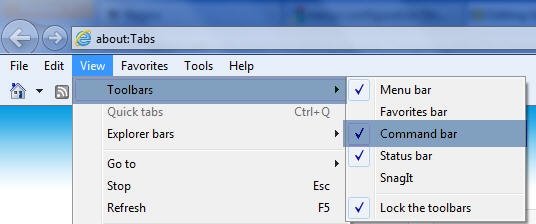
- The command bar will be displayed at all times now

Disabling the pop-up blocker
IE7 & above
- Click the Tools menu
- Click Pop-up Blocker
- Click Turn off Pop-up Blocker
- Confirm by clicking the Yes button.
Note:If already off, it will offer an option to Turn on Pop-up Blocker
IE6
With Windows Service Pack 2, Internet Explorer 6 is configured by default to block pop-up windows from most websites. While many people appreciate this feature, others would rather not have Internet Explorer 6 automatically block these webpages. To disable pop-up blocking.
- From Internet Explorer 6, Click "Tools".
- Select "Pop-Up Blocker".
- Select "Turn off Pop-up Blocker".
Enabling compatibility view in IE8 and above
Users who upgrade to Internet Explorer 8 (IE8) or above might complain that they do not have access to NEOSYS it mostly means when the NEOSYS homepage is opened up, they would get a message that "You Need Internet Explorer 5.5 and or greater" or some other undocumented error. However, the most common message looks like this:
The quick fix for this is to click on the Compatibility Mode on IE 8 and IE 9 as follows:
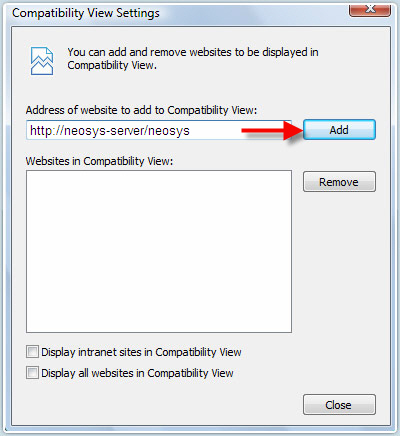
Another way is to add the NEOSYS URL to the Compatibility View Settings under Tools:
Resolving HTTPS certificate error when logging in from an external link using IE8 and above
NEOSYS provides an external link to login to the program to function when staff are outside the office. This address is different from an internal address (eg. an internal address when accessing NEOSYS from within the office may be http://192.168.1.100/neosys, however an external link from which you access NEOSYS from outside the office maybe https://clientname.redirectme.net:4430/neosys). As this is a secure 128 bit encrypted method to protect your data from prying eyes on the internet, this method involves the creation of self signed certificates.
The error message would be something like this on IE8 and above browsers:
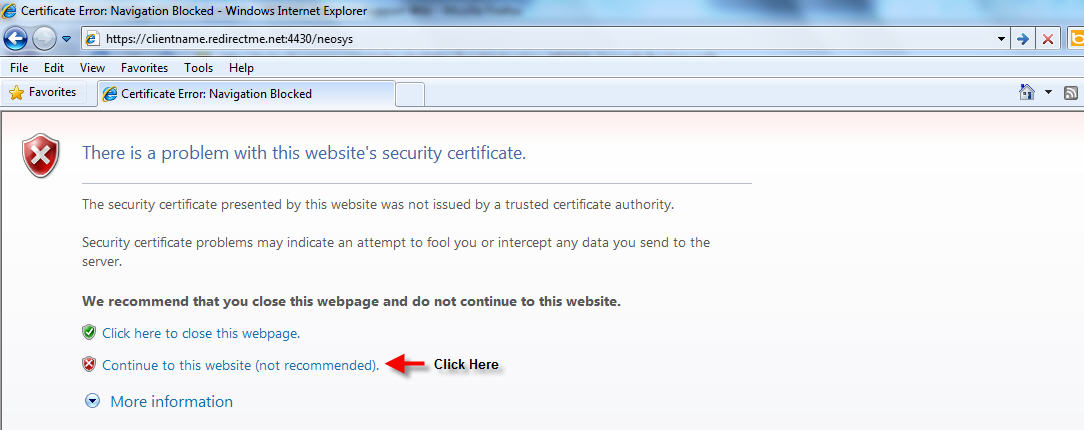
As the message states, Internet Explorer does not recognise the issuing authority which is NEOSYS SOFTWARE and hence warns the user. The solution to remove this message is documented at the link below:
Instructions for IE 8 & above
Enabling the Edit button in Internet Explorer
To enable the Edit button in the Command Bar, do the following:
- Open Internet Explorer
- Right Click on the Command Bar and Select Customize > Add or Remove Commands.
Note - If you cannot see the Command Bar then click on Enabling Command Bar to learn how to view it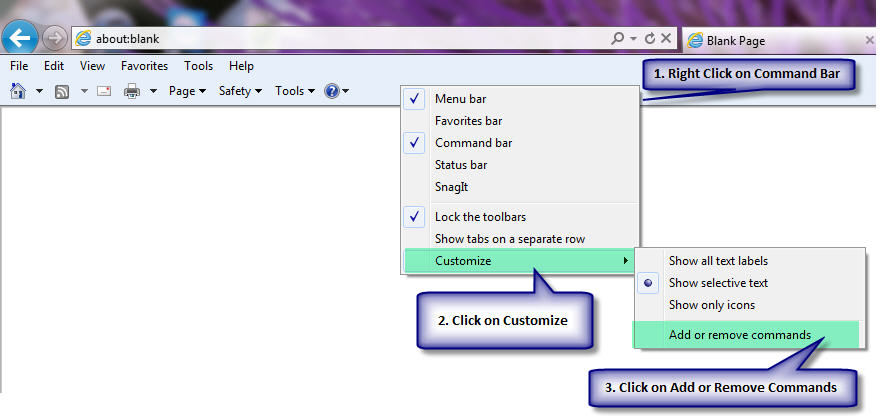
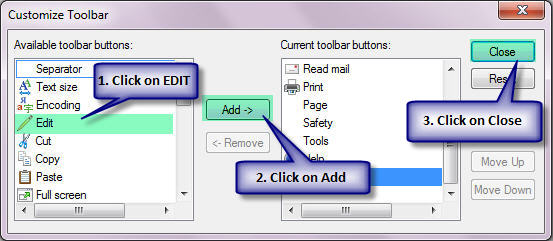
- From the Available Toolbar Buttons on the left hand side Select EDIT, Click on Add and Click on Close
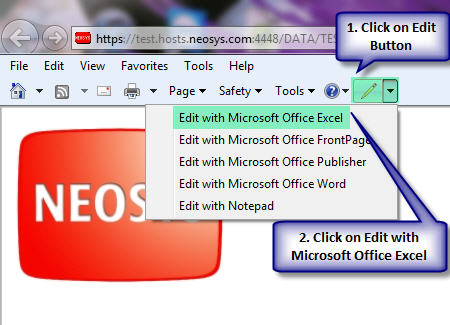
The EDIT Button shows up in your Command Bar. - You can now open the NEOSYS report in excel by Clicking on the Edit Button and Select Edit with Microsoft Office Excel.
Configuring Safari for MAC OS
Resolving HTTPS certificate error when logging in using an external link using MAC Operating System
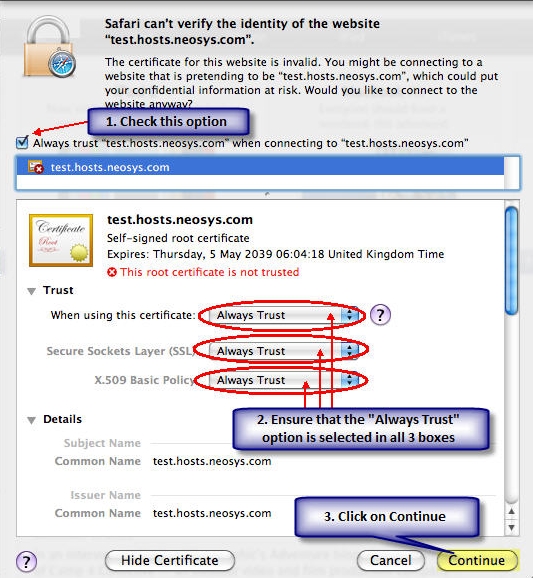
When you try accessing NEOSYS using a MAC OS based computer, you may face a similar certificate issue as mentioned above.
You can proceed as follows:
