Setting up and Configuring NEOSYS Generally: Difference between revisions
| (One intermediate revision by one other user not shown) | |||
| Line 266: | Line 266: | ||
To find existing alerts | To find existing alerts | ||
EXO_DATA=<DBCODE> list documents alerts | |||
===Syntax=== | ===Syntax=== | ||
| Line 321: | Line 321: | ||
===Targetuser(s)=== | ===Targetuser(s)=== | ||
Optional commas separated list of user codes (no spaces!) to receive any output from the alert. Note that some | Optional commas separated list of user codes (no spaces!) to receive any output from the alert. Note that some alerts may not have any output and that some alerts may automatically direct their output to various users. | ||
===Test email=== | ===Test email=== | ||
Latest revision as of 08:00, 3 November 2025
Configuring letterhead
List of macro variables available
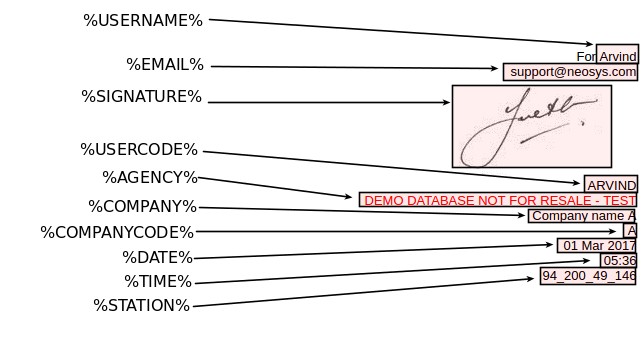
The following codes are available:
- %USERNAME% - of the user who created the document
- %EMAIL% - of the user
- %SIGNATURE% - shows the image file uploaded for the users signature if any
- %USERCODE% - of the user who created the document
- %AGENCY% - the "client mark" usually an abbreviated version of the NEOSYS licenced company name. Not client configurable. Refer Configuring Client Security mark. The client security mark shouldn't be used as company name as %AGENCY% may be present in many other configurations.
- %COMPANY% - company name taken from the Company File. While configuring footer for invoices of a company, use %COMPANY% instead of %AGENCY%, since %AGENCY% is the client security mark which is common to all or most companies in an installation.
- %COMPANYCODE% - from the Company File. Useful for configuring logo per company/division (e.g. src=%COMPANYCODE%logo.jpg)
- %DATE% - normally the date the document was actually created (user's local date)
- %TIME% - similar to date
- %STATION% - usually IP number.
The following obsolete codes are also supported for backward compatibility but should be replaced by the newer forms above where-ever possible.
- %USER
- %USERNAME
- %AGENCY
Below screenshots show an example of how the available macros can be used in the invoice footer in System Configuration File and how they appear on the invoice output.
Location of JPEG Images for Company Stamp/Signature
Make sure the JPEG image is located in the neosys/data/xxx folder (where "xxx" is the database code)
Single Company Installation
In the Media / Job Configuration File, Scroll down to the Invoice Footer field under the Invoicing section and add the script
<img src = imagename.jpg></img>
where "imagename.jpg" is the name of the JPEG image.
Note: While reprinting invoices, footers remain as they were when the invoice was created.
Booking Orders
In the "Media Types File", add a new line in the "Order Footer" and add the script
<img src = imagename.jpg></img>
where "imagename.jpg" is the name of the JPEG image.
Multiple Company Installation
In the Media / Job Configuration File, Scroll down to the Invoice Footer field under the Invoicing section and add the script
<img src = imagename%COMPANYCODE%.jpg></img>
and "imagename%COMPANYCODE%" will be converted to "imagenameXYZ" where "XYZ" stands for the company code in capitals.
Booking Orders
In the "Media Types File", add a new line in the "Order Footer" and add the script
<img src = imagename%COMPANYCODE%.jpg></img>
and "imagename%COMPANYCODE%" will be converted to "imagenameXYZ" where "XYZ" stands for the company code in capitals.
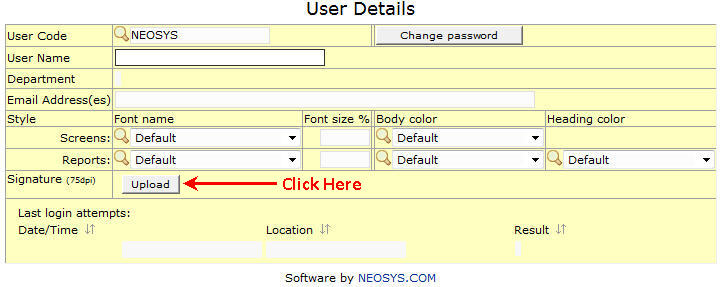
Users can configure their personal signatures on the USER FILE by uploading a JPEG image of their signature.
Such signatures will be inserted below any "%USERNAME%" or "%USER" code configured in document footings unless %SIGNATURE%, %NOSIGNATURE% or another image is configured in the footing. This feature can be suppressed and controlled in the System Configuration File.
See System_Configuration_File#Style Signature setting in System Configuration File
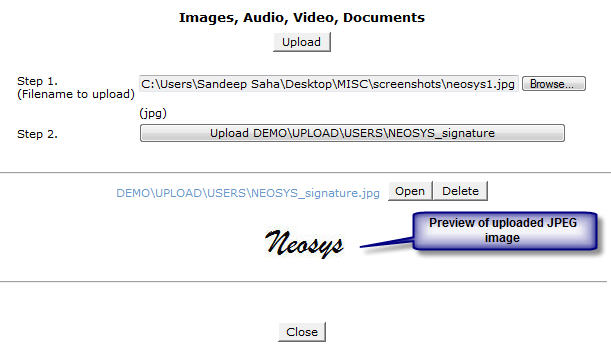
- Browse for the required file and click on upload:

- Once the desired file is uploaded successfully, a file upload summary would be displayed as follows :
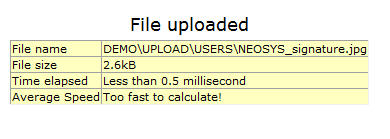
- Once you close the file upload summary, you would see a preview of the uploaded JPEG image.
- If you would like to delete the uploaded image, click the "Delete" button to do so.
- To replace the uploaded image with a new one, you may simply click "Upload" and upload a new image which would overwrite the previous one.
General Guidelines for uploading Signature Image Files
To ensure that the signature appears correctly on NEOSYS documents, the following guidelines must be followed:
- Signature image files should be scanned at 96 dpi for proper alignment on documents
- Avoid margins / white spaces around the image i.e. the free blank space around the signature should be cropped out using MS Paint or similar software
- Signatures do not have to be top quality like logos so if you can get an acceptable quality by any means then you could go ahead. e.g if the Client sends it as a pdf file, take its screenshot and save as JPEG file making sure it does not hamper the quality of the image.
Procedure for cropping signature image files in Microsoft Paint
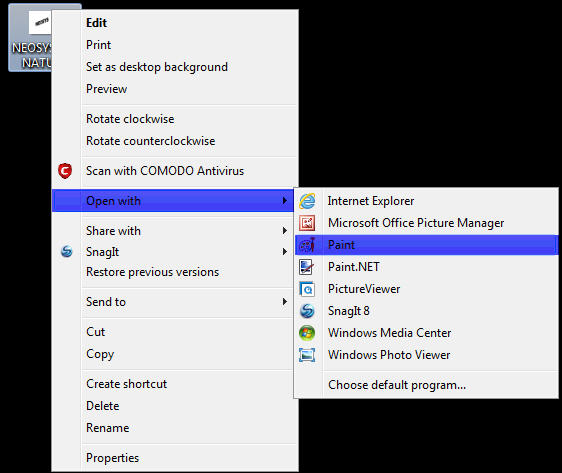
- Open the Signature image file in Paint.
( Right click on the image file -> Open with -> Paint )
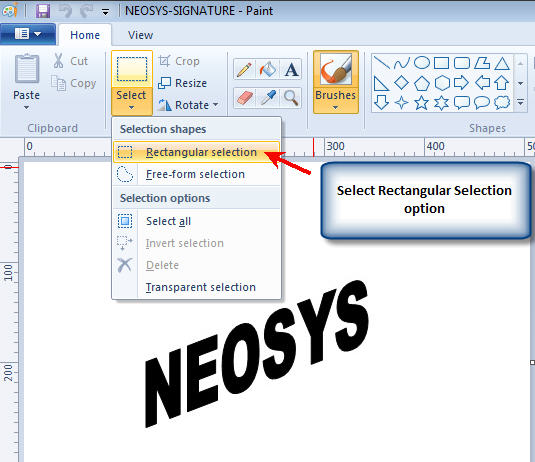
- Click on the Select Button and select the "Rectangular Selection" option
- Using the mouse pointer, select only the signature part of the image avoiding unnecessary white spaces and click on CROP
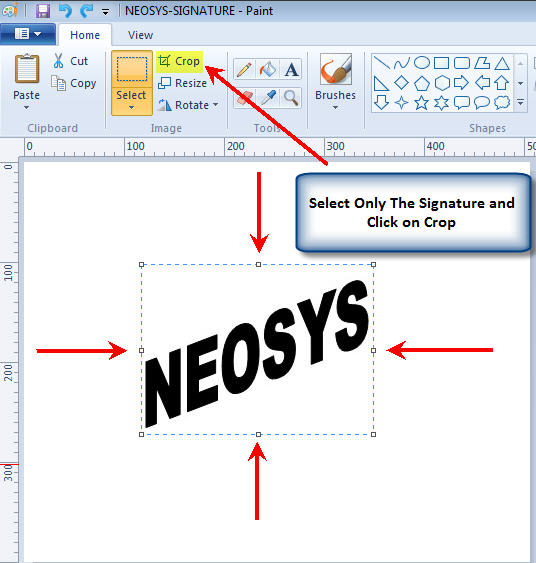
- Now, click on Resize -> Pixels and enter the appropriate dimensions and click on OK
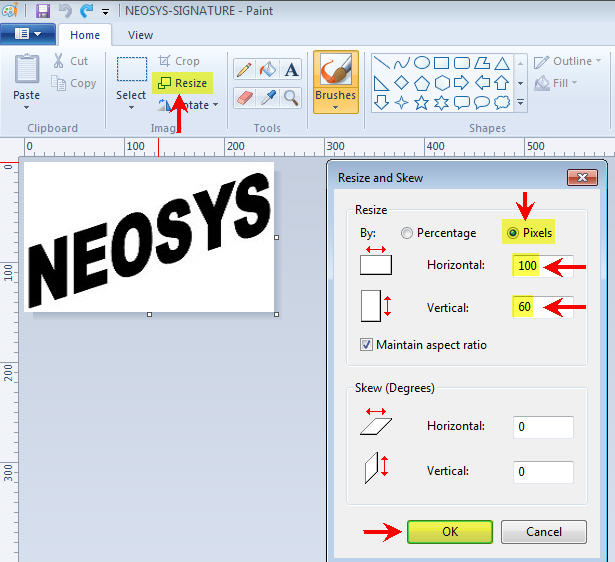
- Save the image (Control + S)
- Exit Paint application
- Open/View the image. It should be cropped now :

Cropped Signature Image File
Configuring Client Security mark
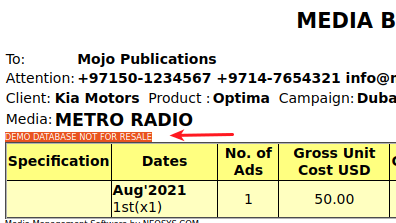
A "client security mark" which represents the client's general public identity or trading name is printed on all documents generated out of NEOSYS. This client mark is a mandatory contractual feature and cannot be removed.
The objective of the client mark is that anyone can easily identify the general source of a document or report produced by NEOSYS. It, therefore, MUST clearly indicate the public identity of the client and CANNOT be brief or anonymous.
The client mark must be something simple like a brand word or phrase that is common to all companies in a client installation. It should NOT be the precise legal name of the company or the website name or the email domain name because that is not required to achieve the objective and requires more maintenance
Any new companies added later on will use the same mark SO KEEP IT SIMPLE.
The corporate group name and possibly geographical location is a good concept to follow for example:
Adline Kuwait
Setting a default security mark
For all companies that do not have a specific mark
AREV
SETMARK * "<clientmark>"
Exodus
Run below command to start a live process in debugger mode,
./run <database>
Press 'x' to open the command line interface, then type
setmark * "<clientmark>"
Setting a security mark per company
In addition to the above initial general default client mark per database, in case certain companies within the same NEOSYS database cannot use the same mark at all, for example due to different branding, additional client security marks can be assigned to specific companies. This will not be allowed where a simpler client mark could cater for all companies.
AREV
SETMARK <companycode> "<clientmark>"
Exodus
./run <database>
Press 'x', then type
setmark <companycode> "<clientmark>"
Removing a security mark
AREV
SETMARK <companycode>
Exodus
./run <database>
Press 'x', then type
setmark <companycode>
Configuring fonts and colors for all users
The default font and color for all users is set up in the System Configuration File.
It can also be set up per department by setting the same on the department user record in the User Details page.
Users can override the above colors and fonts in their User Details page after login.
Changing the signatory
In Maintenance mode, press F5 and the following command:
ED DEFINITIONS AGENCY.PARAMS
Be careful not to insert lines except at the end. Moving other lines down will totally screw NEOSYS!
Then go to the bottom of the page (Ctrl+Page down). Once you reach at the bottom, ENTER enough times to add additional lines if required, then search for line 61 (Ctrl+G) and edit the document / add this code:
<br><br><br>Name of General Manager<br>General Manager<br>
Configuring backup procedures
See the System Configuration File on the NEOSYS Support Menu.
Note that this configuration file is missing the option to email a NEOSYS backup.zip file daily after the backup has been completed. To configure this go to the Maintenance mode and hit the F5 key and type:
ED DOS BACKUP.CFG
In line number 10, set the email address of the recipient/s who should receive a backup.zip file. This method is extremely useful as an offsite backup procedure in case of any server or USB failures.
Configuring automated emails in NEOSYS
See the System Configuration File on the NEOSYS Support Menu.
The default configuration will send email via mailout.neosys.com on port 2500.
Note that neosys mail server will accept email from anywhere as long as the sender email is @neosys.com
Authorising Users
Preventing users from assigning their own passwords
The task AUTHORISATION INVENT OWN PASSWORDS should always have the lock NEOSYS to prevent users from creating their own passwords. Most users create unsafe passwords given the choice.
People nearly always ask to give their own passwords but you should tell them that NEOSYS always assigns random passwords for security reasons. It is not worth arguing and discussing the point with most people since they don't usually grasp the importance and soon learn their NEOSYS password anyway.
NEOSYS support staff who login as NEOSYS are still authorised to create their own passwords but it is better not to leak this information to clients immediately since people will grasp on to it and be disappointed or even offended that you are not granting this privilege to them.
Unfortunately there is no general way for people to change their own passwords at the moment. Only the few people who have access to the Support Menu and Authorisation File can do it. Changing your own passwords should be on the NEOSYS Help menu so everybody can do it.
Authorising access from outside the LAN
From 15/2/2008 access to NEOSYS is by default restricted to users from the standard local area network ip numbers starting 192.168, 10 and 127 so you might get clients complaining that they cannot login.
In order to allow access from outside you will have to update the Authorisation File and put a list of valid ip numbers that they are authorised to login from.
You dont have to put ip numbers on every single user. If the user ip numbers are blank for a user then the system will look for and use the nearest ip numbers on the following users below within the same department. Therefore you only have to put the ip numbers on the bottom "department user".
Examples
To allow someone to login from a) anywhere in the office and b) from another office with a static ip number of say 80.11.22.33 put something like 192.168.*,10.*,127.*,80.11.22.33
To allow someone to login from anywhere put * This is not recommended but necessary if someone absolutely has to login from anywhere in the world.
Authorising users to access from dynamic IP when previously only authorized to access from known static IP
In situations when users who are authorised to access from known static IP till date but now have access to dynamic IPs only , Support must get permission from management before configuring NEOSYS to allow them access from any IP and informing them the risks of allowing users access from any IP.
Support must not agree to do serial work of adding the IP to list of allowed IPs in NEOSYS each time the client gets an IP from the ISP.
Sample Email:
 Dear XXX,

  We need your agreement to allow XXXX users to access NEOSYS from any location/IP address. Until now XXXX users were
  restricted to office/authorised location only but your IT team is no longer able to provide a static IP.

  Users will get frustrated when they are unable to log in and will lose valuable time because NEOSYS cannot grant
  users permission to access from arbitrary dynamic IPs given by the ISP each time.

  Your IT person should provide us with the fixed static address urgently as it is not recommended to enable access
  from any IP due to risks like access of data by unauthorised persons , malicious hacking attempts etc.

  Please confirm that you understand the risks and permit authorization of access from any IP temporarily and agree
  to provide our Support Team with a static IP urgently.
Enabling Minimal Access to Certificate File for Monitoring Department Staff
Giving users access to the Support Menu
The Support Menu in NEOSYS enables users to access the following:
- List of Database processes
- List of Documents in use
- Stop/Restart NEOSYS service
- Backup
- Log
- Authorisation file
This menu is locked with the task SUPPORT MENU ACCESS and has the LS key. To give any user/I.T. administrator access to this menu, you have to give him the LS key.
Configuring Payment Instructions
Support MUST strictly economise on number of lines used for payment instruction to avoid more lines taking up more space on the printout. This is because sometimes more lines could cause the printout to creep into two pages instead of one.
Support MUST strictly avoid duplication of payment instructions by copying and pasting it into all company files. It is a blunder to copy and paste the same data into all companies when it can instead be entered just once in the Media/Job Configuration File. This is because anyone maintaining this data in future is likely to fail to notice that the data has to be maintained in multiple places, which will in turn lead to data inconsistency. It is also a waste of time to mindlessly do easy cutting and pasting instead of thinking what is correct.
Payment instructions must be entered in the company file ONLY if the payment instructions are different per company.
NEOSYS picks up the first available payment instructions from the following locations and ignores any instructions in the later files.
- Client file
- Company file with currency code
- Currency file
- Company file with currency code left blank
- Configuration File
If, following the above rules, no payment instructions can be found, or the payment instructions are "NONE" or a single dot (.), then no payment instruction are displayed.
Tip: Leave the currency code field blank in Company file to configure the default payment instructions for all currencies without having to tediously enter them in the Currency file for each and every currency.
There is a manually edited flag in the company file on one NEOSYS client which makes the company file payment instructions take precedence over any currency file payment instructions. This may be added to the Client File user interface as "For all currencies"
The usual way of configuring payment instructions is to put it in the Company file under Finance. This configuration allows different payment instructions per currency. If you put the payment instructions in the currency file, then these instructions apply to all companies, unless the manual flag in the company record is manually edited in the maintenance mode by NEOSYS programmers to say that the company file instructions take precedence.
Tip: Since the rules of getting payment instruction are not simple, if you are *changing* payment instructions, locate where the old instructions are and simply change them without worrying about the rules.
Also refer to: Difference between terms of payment and payment instructions
Entering Payment Instructions in NEOSYS
Lines that have no tags in them (no <> characters) and have up to 10 "words" in them will be chunked, i.e. placed continuously one after the other on the same line, if there is room for the whole chunk.
Commas are automatically added at the end of chunks that do not already end in commas, except for the last line.
You can add break tags when you want instructions to start on a new line, as shown below.
Sample Payment instructions:
 If no written objection is received within 10 days, this invoice will be considered as accepted unconditionally for payment.<br>
 Cheques/Demand/Drafts/Bank Transfers to be in favour of NEOSYS.<br>
 Bank Name : Commercial Bank of Dubai
 Account Number : 0XX 00X0XX 00X
 IBAN Number : AEX00X0000XX00X
 Swift Code : BBMEAXAD
The above sample appears as below, in NEOSYS:

Configure Currency File
NEOSYS allows clients to change how invoice amounts are presented on their invoices.
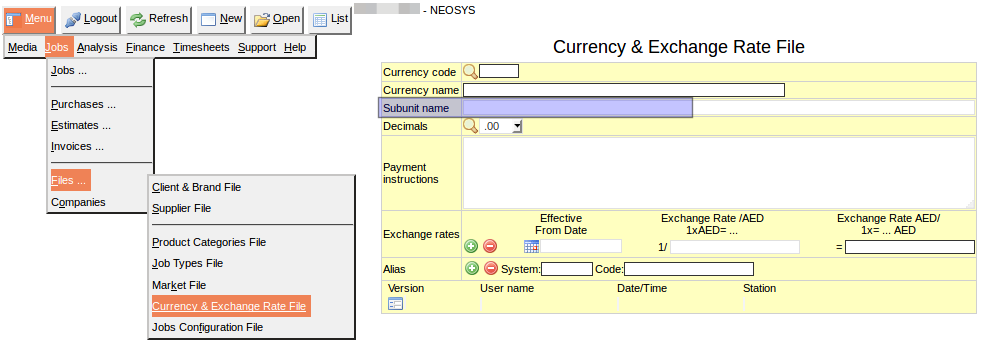
Clients or NEOSYS Support need to edit the subunit field in the Currency & Exchange Rate File:
To change this setting, depending on which NEOSYS modules you use, follow the appropriate path:
NEOSYS Menu -> "Jobs" OR "Media" OR "Finance" -> Files -> Currency & Exchange Rate File.
Invoices amounts can be displayed in two ways:
a) "Five thousand, three hundred and forty five .25"
Do: Leave subunit field blank, this is the default.
OR
b) "Five thousand, three hundred and forty five and 25 fils"
Do: Edit subunit field to "fils" and edit the
Specifying Payment Terms on Invoices
Different payment terms can be concurrently specified at various levels. Any payment terms specified at a more detailed level take precedence over payment terms specified at a more general level
In order of preference, when creating an invoice or estimate/quotation, payment terms are looked up in the following order. The first payment terms found are used.
- New Invoices screen - per invoice
- Chart of Accounts if not suppressed in configuration file
- Client File - per client
- Company File - per company
- Configuration File - per database
Entering a full stop (.) or the word NONE in Client or Company File payment terms suppresses any terms found in Company or Configuration File allowing you to suppress, per client or company, any default payment terms specified in the Company or Configuration Files.
Also refer to: Difference between terms of payment and payment instructions
Creating Email Alerts in NEOSYS
Currently this is a manual process done in maintenance mode using F5. It will be replaced by a web interface.
See Configuring Media Module Email Alerts
To find existing alerts
EXO_DATA=<DBCODE> list documents alerts
Syntax
CREATEALERT alertid module alerttype runhours,... runasusercode {targetusercode,...} testemail} (options)
The command must be followed by five parameters in a fixed order and separated by spaces. Two additional parameters and options in "()" may follow in a fixed order. To replace an existing alert use the overwrite option.
Alertid
Required. Invent some short identifying alphanumeric code for your alert e.g. XYZ001. It will show in the email subject and is required if you want to change or remove the alert.
Module
Required. One of the following.
- GENERAL
- FINANCE
- AGENCY
- MEDIA
- JOB
Alerttype
Required. Various alert types are available depending on the module.
See Alert Types
Runhours
Configure hours as per server timezone.
Required. Syntax: {minutes,,,}:{hours,,,}:{dayofmonth,,,}:{monthNo,,,}:{weekday,,,}
Examples:
Run at 9am every day
9
Run at 9am on the 15th of every month
9:15
Run at 9am on the 15th of months January and July
9:15:1,7
Run at 15mins & 30mins past hours 9am and 5pm, on the 15th of every month
15,30:9,17:15
Runasuser
Required. Determines the authorisation level during processing
Targetuser(s)
Optional commas separated list of user codes (no spaces!) to receive any output from the alert. Note that some alerts may not have any output and that some alerts may automatically direct their output to various users.
Test email
Optional. An email address or addresses separated by ;. All emails generated by the process will be redirected here regardless of who they are normally directed at.
Options
Optional. One or more of the following letters must be in "()"
- R=Remove - remove an existing alert (only the alertid parameter is required)
- O=Overwrite - required to overwrite an existing document.
- S=Silent
- ROS=forget last run time
Enable/Disable Existing Alerts
- Identify alert key, in maintenance mode: "SORT DOCUMENTS ALERTS"
- Edit 12th field of the alert record (ENABLED), e.g "ed documents COLL01". 1 - enabled or 0 - disabled.
Alert emails to some executives are being received by their managers
You can put whatever you like in the executive name but NEOSYS must be able to find their email somehow.
For example if the executive is entered as “Steve Burns” and there is no user called Steve Burns in the Authorisation File.
- Does the executive name contains an “@” character? then it is the email address
- Is there a user in Authorisation matching either the executive name (Steve Burns) … or the first word of the executive name (Steve)?
- If none of the above then the email of the user running (usually a manager) the process is used
To solve this problem create users matching the executive names.
Note that creating users with email addresses enables them to login to NEOSYS by requesting password reminders to their email address so like all users you must ensure that their authorisation level is appropriately limited.
Automatically Running and Emailing Saved Documents
Saved documents in NEOSYS (Menu -> Media -> Diary -> Saved Reports) can be configured to run automatically and be emailed to users. This can only be done in maintenance mode, by doing
ED DOCUMENTS <document no.>
Line 12 should be 1 to mean run automatically.
Line 14 should be the user code to email to. If emailing to multiple users, press Ctrl + E on this line and enter the user codes to email to.
Line 22 should be the scheduled hour e.g. 7 for 7am server time. Use commas for more than one scheduled hour.
Line 25 should be the day of week to run on. e.g. Mon=1, Sun=7. Use commas for more than one.
To force the document to run again on the same hour or day for testing changes, you have to clear line 13.
For more information about the DOCUMENTS file format, do
LD DOCUMENTS

