Using NEOSYS Job System: Difference between revisions
| (70 intermediate revisions by 10 users not shown) | |||
| Line 1: | Line 1: | ||
== | ==How to create a job in NEOSYS?== | ||
You can view a short video tutorial which explains how to create a job in NEOSYS by clicking on http://youtu.be/FNHhQNDp8bw or visit the neosys youtube channel at http://www.youtube.com/user/neosysdubai/videos for all available tutorial videos. | |||
==How to create an estimate in NEOSYS?== | |||
You can view a short video tutorial which explains how to create an estimate in NEOSYS by clicking on http://youtu.be/GrNplNQ1-P4 or visit the neosys youtube channel at http://www.youtube.com/user/neosysdubai/videos for all available tutorial videos. | |||
===Formatting Estimate Printout=== | |||
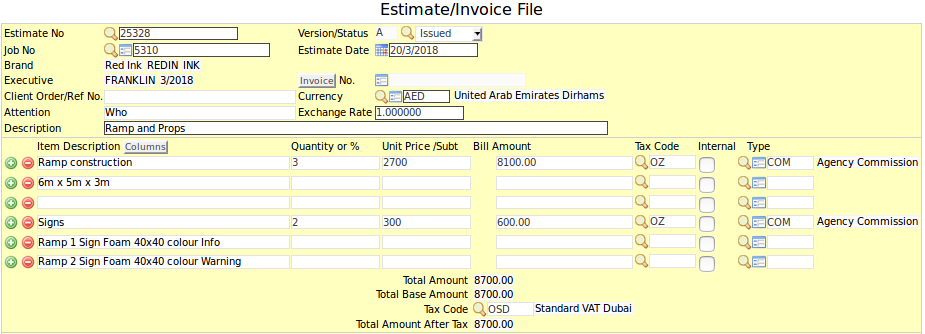
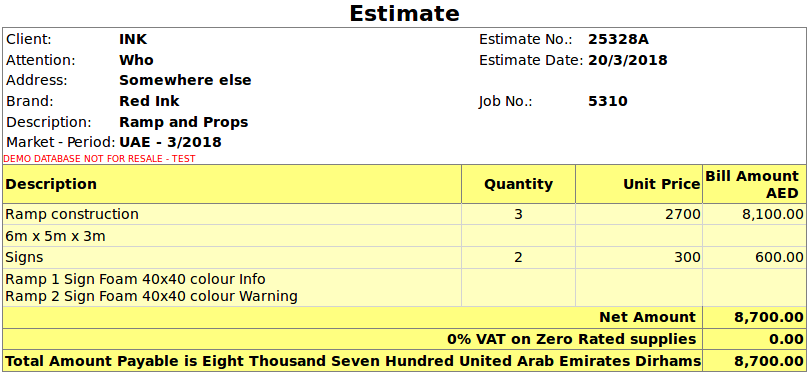
Use a blank 'Item Description' line to separate between different groups of cost items with extra lines of description. | |||
[[image:EstimateLinesSeparated.png]] | |||
[[image:EstimatePrintLnSeparated.png]] | |||
==How to create a purchase order in NEOSYS?== | |||
You can view a short video tutorial which explains how to create a purchase order in NEOSYS by clicking on http://youtu.be/3NvyZWuTMYg or visit the neosys youtube channel at http://www.youtube.com/user/neosysdubai/videos for all available tutorial videos. | |||
==Using templates to standardise work== | |||
This is REALLY powerful concept if you have both a) a real need for it and b) the discipline to implement it. | This is REALLY powerful concept if you have both a) a real need for it and b) the discipline to implement it. | ||
You can develop “template jobs”, “template orders” and “template estimates” to increase the general quality of users work by prompting for standard information and reducing data entry. Once you have designed some templates, then instead of users creating jobs, estimates and orders from scratch they can use the standard NEOSYS “copy from” option. | You can develop “template jobs”, “template orders” and “template estimates” to increase the general quality of users work by prompting for standard information and reducing data entry. Once you have designed some templates, then instead of users creating jobs, estimates and orders from scratch they can use the standard NEOSYS “copy from” option. | ||
=== Creating Templates === | ===Creating Templates=== | ||
Create templates in the same place as normal Jobs, Estimates and Orders. If you have multiple types of business then you should create multiple templates, one for each type of business. | Create templates in the same place as normal Jobs, Estimates and Orders. If you have multiple types of business then you should create multiple templates, one for each type of business. | ||
| Line 21: | Line 37: | ||
The templates should all be entered with a special executive name - for example “Templates” or your choice of something suitable. Then users can search for all templates created by executive “Templates”. | The templates should all be entered with a special executive name - for example “Templates” or your choice of something suitable. Then users can search for all templates created by executive “Templates”. | ||
=== Finding and Searching Templates === | ===Finding and Searching Templates=== | ||
It is easy for users to search through a library of templates by asking to view all documents belonging to executive “Templates” or whatever you used to create the templates. There are a wide variety of ways in NEOSYS to search and browse existing documents so it is usually easy to find what you want. | It is easy for users to search through a library of templates by asking to view all documents belonging to executive “Templates” or whatever you used to create the templates. There are a wide variety of ways in NEOSYS to search and browse existing documents so it is usually easy to find what you want. | ||
=== Using Templates === | ===Using Templates=== | ||
Whenever you create a job, estimate or order in NEOSYS select the option “Copy an existing document” .. and enter the code of the template which you want to use. If you are reusing the same templates frequently then you will rapidly get to learn the codes of the main templates or you can search the documents to find them. | Whenever you create a job, estimate or order in NEOSYS select the option “Copy an existing document” .. and enter the code of the template which you want to use. If you are reusing the same templates frequently then you will rapidly get to learn the codes of the main templates or you can search the documents to find them. | ||
==Pasting existing data from MSWord or Excel to Estimates or Purchase Orders== | |||
If for example the item descriptions or quantities or amounts have already been described in an Excel or Word document, then it is possible to paste that data into the file, saving the user from having to re-enter the data.<br>In order to achieve this, NEOSYS requires the data to have at least one of the following column titles present (with CAPS): | |||
<pre> | |||
ITEM DESCRIPTION, ITEM DESCRIPTION2, QUANTITY, UNIT PRICE, AMOUNT, LINE TAX CODE, TYPE CODE | |||
</pre> | |||
Then simply paste the data into the first item field on any row of the Estimate or Purchase order file in NEOSYS. | |||
NOTE - If the system cannot find any column heading in the data you pasted then it will display an error, listing the possible column titles. <br>If you misspell a column title, the data for that column will be ignored. | |||
==Issuing Invoices== | |||
On the estimate/invoice file we can click on ‘Invoice’ tab and view the proforma invoice and subsequently invoice the client. | On the estimate/invoice file we can click on ‘Invoice’ tab and view the proforma invoice and subsequently invoice the client. | ||
NOTE – for the changes made in the cost or billing section please click on ‘reopen’ for the changes to reflect. | NOTE – for the changes made in the cost or billing section please click on ‘reopen’ for the changes to reflect. | ||
== Issuing | ==Issuing Partial Invoices== | ||
There are two main ways to accomplish partial invoicing of estimates in NEOSYS. | |||
===Method 1 – Partial Invoicing using “Proformas”=== | |||
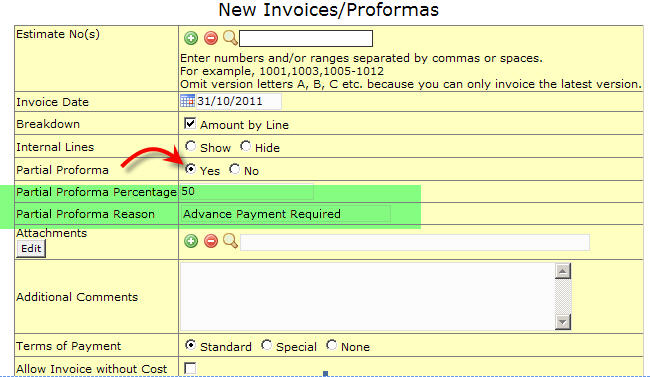
Partial Invoicing can be done by issuing a proforma invoice for a percentage of the estimate. | |||
The option to create partial proforma invoices is on the invoice creation screen. | |||
[[Image:New_Invoice_Proforma.jpg]] | |||
There are potential problems with this approach: | |||
#Some clients are not prepared to make a payment versus a proforma invoice. | |||
#No invoice appears on the client’s account and any payment will show as an unallocated payment until the final full invoice is issued. | |||
There are also an advantage in some cases: | |||
#Unlike real invoicing, you can issue multiple proforma invoices on an estimate without restriction. If the client doesn’t accept the proforma and wants changes, it is very easy to issue revisions. | |||
(Note that all proformas issued are stored and can be reprinted at any time) | |||
===Method 2 – Partial Invoicing by Splitting the Estimate=== | |||
Partial Invoicing can be done by copying or splitting the original estimate into two (or more) estimates. | |||
#Copy the original estimate to a new estimate | |||
#Reduce the amount on the copy estimate (“pre-billing estimate”) to the amount that you wish to pre-bill. | |||
#Reduce the amount on the original estimate (“final installment estimate”) by the amount that you are pre-billing. | |||
(Note that “reducing” an estimate can be done either by simply deleting the parts of the estimate that should not be billed (e.g. when the estimate contains stages), or by appending a deduction line (percent or amount) on the bottom of the estimate) | |||
====Splitting the costs==== | |||
If the costs can be split into stages as well then amend the purchase orders that are not related to the pre-billing and tie them to the original estimate. Remember that any purchase orders which are not specifically tied to any estimates will be accounted as costs on the first estimate to be invoiced. This can result in apparently non-profitable accounting entries per invoice if you are not careful - even though the profitability of the overall job is not affected. | |||
If the costs cannot be split then you need to decide if they should be tied to the first or second invoice. | |||
==Issuing Credit Notes== | |||
What is a credit note? | What is a credit note? | ||
| Line 44: | Line 99: | ||
How do I issue a credit note in production? | How do I issue a credit note in production? | ||
To Issue a credit note in production create an estimate with | To Issue a credit note in production, create an estimate with a NEGATIVE amount and Invoice the estimate. | ||
{{:Accounting_entries_created_by_the_Production_system}} | |||
== | ==Raising purchase orders/invoices to/from SUNDRY SUPPLIERS== | ||
#PO/PI with a normal supplier <br><br>[[Image:Purchase_Order_1.jpg]]<br><br> | |||
#PO/PI with a sundry supplier. An extra box popups up if the supplier name starts with the letters SUNDRY (case insensitive). The operator must type in something. <br>To do this you need to first create a supplier with name something like "Sundry Suppliers". <br>[[Image:Purchase_Order_2.jpg]]<br><br> | |||
==Using NEOSYS VAT/Sales Tax Accounting for Jobs== | |||
===[[Understanding_VAT/Sales_Tax_in_the_NEOSYS_finance_module#Configuring_NEOSYS_to_handle_VAT.2FSales_Tax| Configuring VAT/Sales Tax in Finance module]]=== | |||
===Setting up standard Sales Tax Percentage=== | |||
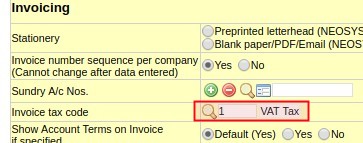
If all Jobs should have the same VAT/Sales Tax% then specify it in the Job Configuration File. | |||
The default Tax Code can be entered here as well. | |||
[[ | [[image:vatj1.jpg]] | ||
== | ===Create an Estimate or Purchase order with VAT/Tax%=== | ||
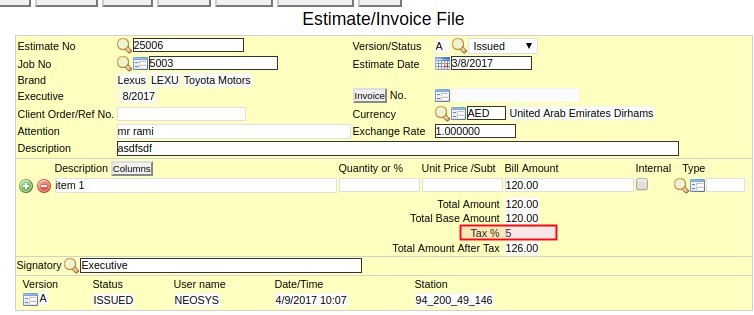
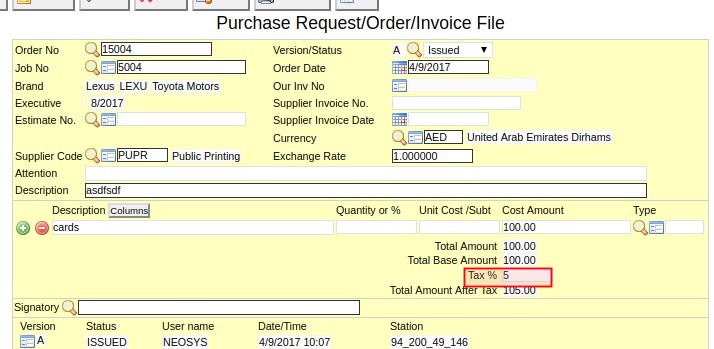
If a standard VAT/Sales Tax% is not defined in the Job Configuration File then you must manually add the tax percentage at the bottom of the Estimates and the Purchase Orders for every Job that should have tax. | |||
Estimate: | |||
[[image:vatj2.jpg]] | |||
Purchase Order: | |||
[[image:vatj2p.jpg]] | |||
===Create the Invoice/Purchase Invoice=== | |||
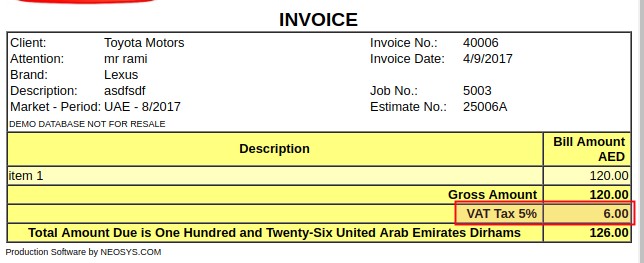
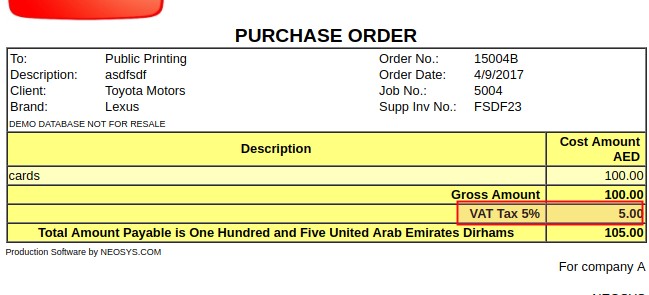
Before you do this, Issue a proforma invoice first to check that the tax appears correctly. | |||
Invoice: | |||
[[image:vatj3.jpg]] | |||
Purchase Invoice: | |||
[[image:vatj3p.jpg]] | |||
===Finance Entries=== | |||
====Automatic entries created in Invoice Journals==== | |||
These are Automatic entries created in Invoice Journals when client is invoiced for 120, Production cost is 100 and VAT is 5 %. | |||
Client A/C Dr. + 126 | |||
Income A/c Cr. - 120 | |||
VAT Control A/C Cr. - 6 | |||
Cost A/C Dr. + 100 | |||
Work in Progress A/C Cr. - 100 (Job a/c) | |||
'''Note:''' Work in Progress is a provision done as you haven’t received supplier invoice. | |||
====Automatic entries created in Purchase Invoice Journals==== | |||
These are Automatic entries created in Purchase Invoice Journals when Supplier Invoice is recorded in Purchase order i.e. PO to PI conversion. | |||
Cost A/C Cr. - 100 | |||
Work in Progress A/C Dr. + 100 (Job a/c) | |||
Cost A/C Dr. + 100 | |||
VAT Control A/C Dr. + 5 | |||
Supplier A/c Cr. - 105 | |||
For a more detailed note on this topic, refer to [[Accounting_entries_created_by_the_Production_system | Accounting entries created by the Production system]] | |||
===Post the Sales Invoice Journal created=== | |||
In Finance Journals, check that the tax columns appear, the tax amount is correct, and then post it. | |||
[[image:vatj4.jpg]] | |||
===Check that the Sale Tax A/c is correct=== | |||
It should show an entry for the tax liability incurred by issuing and posting the above sales invoice. | |||
[[image:vatj5.jpg]] | |||
==Switching from manual costing to automatic NEOSYS Job Costing== | |||
Assuming that jobs are numbered sequentially just start from any particular job number and ensure that all costs that relate to that job number ("new jobs") and beyond are handled through the new automated NEOSYS practice and not through the old manual procedures. | Assuming that jobs are numbered sequentially just start from any particular job number and ensure that all costs that relate to that job number ("new jobs") and beyond are handled through the new automated NEOSYS practice and not through the old manual procedures. | ||
All cost entries that relate to jobs prior to that number ("old jobs") must be continue to be handled in the old way and | All cost entries that relate to jobs prior to that number ("old jobs") must be continue to be handled in the old way and if any entries are generated by NEOSYS for these old jobs then those entries must be deleted and not posted. | ||
NEOSYS will automatically create job account in a chart with code "WIPxx" where xx is the current year like "WIP08". | NEOSYS will automatically create job account in a chart with code "WIPxx" where xx is the current year like "WIP08". | ||
You must create the initial chart (e.g. with code "WIP08") yourself and then NEOSYS will create all future year charts for you. When creating the initial chart make it an open item type chart and you will have to put a control A/c. The control A/c for a WIP ledger is normally in the current assets section of the General Ledger. If you do not have a WIP control A/c (or you have | You must create the initial chart (e.g. with code "WIP08") yourself and then NEOSYS will create all future year charts for you. When creating the initial chart make it an open item type chart and you will have to put a control A/c. The control A/c for a WIP ledger is normally in the current assets section of the General Ledger. If you do not have a WIP control A/c (or you have a WIP account but it is not a control account and has any journals passed against it) then you will have to create a new account in the GL called something like WIP Control A/c. | ||
If there are too many jobs in one chart then NEOSYS will create "WIP082", "WIP083" etc. | If there are too many jobs in one chart then NEOSYS will create "WIP082", "WIP083" etc. | ||
== Correct Incorrect Purchase Invoices == | ==Correct Incorrect Purchase Invoices== | ||
Once you convert a Purchase Order to a Purchase Invoice, you may encounter a situation where you have recorded the supplier invoice wrongly. In such a case if you are authorised to make changes a PI, you need to go back to the PO/PI, amend the amount and save it again. This will create a reversal entry, reversing the earlier created journal and puts back the corrected amount. | Once you convert a Purchase Order to a Purchase Invoice, you may encounter a situation where you have recorded the supplier invoice wrongly. In such a case if you are authorised to make changes a PI, you need to go back to the PO/PI, amend the amount and save it again. This will create a reversal entry, reversing the earlier created journal and puts back the corrected amount. | ||
This procedure could be used for recording credit notes too. However if you are not authorised to amend a PI, then follow the procedure below. | This procedure could be used for recording credit notes too. However if you are not authorised to amend a PI, then follow the procedure below. | ||
'''Note:''' Once a Purchase Order is invoiced NEOSYS does not allow to delete the Order. If you wish to cancel the Purchase order then the Version/Status can be changed to Cancelled. | |||
== | ===Recording Supplier Credit Notes=== | ||
If you are not authorised to amend a PI, then you need to create a new PO with a NEGATIVE amount (to record the credit note the supplier has sent you or the difference for which you mistakenly entered the earlier PI). Once this is done you could either save it or change the status to Invoice, enter the supplier credit note number or reference number and date and save it. Relevant journal entries will be created. | |||
[[Using_NEOSYS_Agency_System#Cancelling_or_Amending_Incorrect_Client_Invoices]] | ==Cancelling or Amending Incorrect Client Invoices== | ||
See [[Using_NEOSYS_Agency_System#Cancelling_or_Amending_Incorrect_Client_Invoices|Cancelling or Amending Incorrect Client Invoices]] for NEOSYS procedure for cancelling and amending Client invoices. | |||
Steps to cancel an incorrect invoice: | |||
#Firstly, if the job is closed, reopen it using Job File. If you are not authorised to reopen jobs, then get an authorised person to do this. Note that, by default, jobs are closed at the time of issuing an invoice. | #Firstly, if the job is closed, reopen it using Job File. If you are not authorised to reopen jobs, then get an authorised person to do this. Note that, by default, jobs are closed at the time of issuing an invoice. | ||
| Line 94: | Line 215: | ||
#Create another estimate by copying the original wrongly invoiced estimate again and modify the copy and/or invoice it as and when you like. | #Create another estimate by copying the original wrongly invoiced estimate again and modify the copy and/or invoice it as and when you like. | ||
== | ==Cancelling a Job== | ||
Steps to Cancel a Job: | |||
#Login to NEOSYS | |||
#Go to Menu -> Jobs -> Jobs -> Job File <br>[[image:jobfilemenu.jpg]]<br> | |||
#Enter the job number of the job you wish to cancel | |||
#Open each purchase order of the Job <br>[[image:canpo.jpg]]<br> | |||
#Mark it as 'Cancelled' <br>[[image:canpoclose.jpg]]<br> | |||
#Open each estimate of the Job <br>[[image:canest.jpg]]<br> | |||
#Mark it as 'Cancelled' <br>[[image:cancelledestimate.jpg]]<br> | |||
#Go back to the Job and mark it as 'Closed' <br>[[image:closedjob.jpg]]<br> | |||
#Save the job | |||
===Cancelling all old jobs and estimates=== | |||
Below procedure can only be done on old (AREV) NEOSYS and will be removed from wiki once the old NEOSYS is no more in use. | |||
In case staff have routinely not been cancelling stale estimates or closing stale jobs, and you want the various NEOSYS "Pending" reports to show only truly pending estimates and jobs, and in order to save cancelling/closing them one by one, you can ask NEOSYS support staff to cancel/close all estimates and jobs up to a certain date. This is done in NEOSYS maintenance mode on the server. | |||
Individual estimates and jobs may be reopened one by one in the normal manner. | |||
Instructions for NEOSYS Support follow: | |||
NEOSYS SUPPORT STAFF MUST GET WRITTEN/EMAIL CONFIRMATION FROM THE CLIENT OF EXACTLY WHAT IS TO BE CLEARED AND UP TO WHAT DATE AND ACCEPTANCE THAT THIS IS IRREVERSIBLE. | |||
The command first selects records for clearing and the 2nd command actually does the job. Do NOT perform the 2nd command except immediately after the 1st command and DO NOT perform the 2nd command unless the 1st command selects 1 or more records. | |||
Make sure you enter the date in the correct format for the database concerned. | |||
WARNING1! This is irreversible so do this in test database first if not familiar with the process and DONT make any typing or other errors! | |||
WARNING2! YOU WILL CANCEL/CLOSE ***ALL*** ESTIMATES/JOBS IF YOU DO NOT GET SOME RECORDS SELECTED BY THE FIRST COMMAND *OR* IF YOU DO ANY OTHER COMMANDS BETWEEN THE FIRST COMMAND AND 2ND COMMAND. DO NOT PROCEED TO THE 2ND COMMAND UNLESS YOU GET SOME RECORDS SELECTED IN THE FIRST COMMAND! | |||
====Estimates==== | |||
SELECT PRODUCTION.INVOICES WITH STATUS 'DRAFT' 'ISSUED' 'APPROVED' AND WITH DATE LE '31/12/2013' | |||
CLEARFIELD PRODUCTION.INVOICES STATUS/CANCELLED | |||
Estimates with status DELIVERED are NOT cancelled in this procedure because they may need attention and not simple cancellation. They are likely to be few and can be manually cancelled or processed as required. | |||
====Jobs==== | |||
SELECT JOBS WITH CLOSED NE 'Y' AND WITH DATE_CREATED LE '31/12/2013' | |||
CLEARFIELD JOBS CLOSED/Y | |||
==Tracking job progress using My Jobs== | |||
Menu > Jobs > My Jobs is a feature to internally track job progress. | |||
My Jobs contains a list of jobs allocated to or managed by the user, the jobs status, who is currently working on the job etc. | |||
All new jobs are initially added to the job executive or job creator's my jobs list. | |||
From there, the job executive/creator can assign the job's work to other users such as production team heads. | |||
Any user with the authorisation, such as department heads, have the ability to reassign the job's work to other staff members (there's no limit). | |||
Users can mark allocated jobs as started or complete. All people are alerted by email whenever they are allocated a new task or when there is a change of status in a task that they requested be done. | |||
My Jobs is only effective when client service create jobs for a single task, instead of creating a single job for multiple jobs. | |||
If a client requires many tasks, e.g. design, events etc., users should create the job with additional sub-jobs for each task. Sub-jobs are simply new jobs with numbers such as JOB1234-1 or JOB1234-2. | |||
The key TASK ACCESS must be added to department before users can view jobs in 'My Jobs'. | |||
Every task is assigned to a NEOSYS user who is considered responsible to either do the task themselves or create additional tasks for other NEOSYS users. | Every task is assigned to a NEOSYS user who is considered responsible to either do the task themselves or create additional tasks for other NEOSYS users. | ||
| Line 104: | Line 285: | ||
When the initial task is created automatically for a new job, if the job executive is a valid NEOSYS user, then the task appears on that executive’s list of tasks (on “My Jobs”), otherwise the task is assigned to the job creator. The “requestor” for all initial tasks is automatically configured in the system and is typically someone in finance department so that finance can act on completed jobs. | When the initial task is created automatically for a new job, if the job executive is a valid NEOSYS user, then the task appears on that executive’s list of tasks (on “My Jobs”), otherwise the task is assigned to the job creator. The “requestor” for all initial tasks is automatically configured in the system and is typically someone in finance department so that finance can act on completed jobs. | ||
The status of tasks can be allocated, started, completed, suspended | The status of tasks can be allocated, started, completed, suspended or cancelled. | ||
=== What shows in My Jobs === | ===What shows in My Jobs=== | ||
You will see: | |||
*All Job that you are responsible to either do or manage<br> | |||
*All Job that you have requested other people to do<br> | |||
Jobs that are “Completed” or “Cancelled” do not show. | Jobs that are “Completed” or “Cancelled” do not show. | ||
| Line 118: | Line 299: | ||
You will not see tasks for jobs that you are not authorised to access due to restrictions on clients, brands or internal divisions/companies. | You will not see tasks for jobs that you are not authorised to access due to restrictions on clients, brands or internal divisions/companies. | ||
=== Changing task status === | The system will not display tasks older than 365 days. | ||
===Changing task status=== | |||
If you are authorised to change the status of tasks, you will see a “Change” button next to each task status. Click it to change the status of your own items or tasks that you have requested other people to do. | |||
To do this you need to be authorised to do "TASK UPDATE". | |||
The “requestor” and/or responsible person will be alerted by email of any changes in status. The person actually doing the change will not receive any alert. | The “requestor” and/or responsible person will be alerted by email of any changes in status. The person actually doing the change will not receive any alert. | ||
If you change the status of | If you change the status of a task to “Completed” or “Cancelled” then you cannot make any further changes to that item - so be careful. | ||
When a job is “Completed” or “Cancelled” by a user, the task entry for that user is removed from the My Jobs page. | |||
"Suspen" | |||
===Requesting other people to do work=== | |||
If you are authorised to request tasks, you will see a “Request” button next to each existing task. Click it to create tasks for other people to do work on that job as well. | If you are authorised to request tasks, you will see a “Request” button next to each existing task. Click it to create tasks for other people to do work on that job as well. | ||
| Line 135: | Line 322: | ||
Whenever anybody changes the status on tasks that you requested, you will get an email alert so that you can track progress. | Whenever anybody changes the status on tasks that you requested, you will get an email alert so that you can track progress. | ||
User can make a request for tasks which are only allocated to him or where he is the person requested to do the task. If neither is true then user will not be able to make any requests even if he has the authorisations. | |||
Every time a user makes a request, a new entry is created in My Jobs and can be seen when you click on "Show All". The Job executive remains the same but the "Person" field is updated with the user who has been requested to take up the job. | |||
===Authorisation Keys=== | |||
To request tasks from other people in your own department, group or team you need to be authorised to do "TASK CREATE". | To request tasks from other people in your own department, group or team you need to be authorised to do "TASK CREATE". | ||
| Line 144: | Line 337: | ||
In all cases, only people who have access to "My Jobs" can be requested to do tasks - in other words, only people who are authorised to do "TASK ACCESS". | In all cases, only people who have access to "My Jobs" can be requested to do tasks - in other words, only people who are authorised to do "TASK ACCESS". | ||
=== Using the My Jobs screen === | ===Using the My Jobs screen=== | ||
You can click on the link next to a job to open the job to see the brief and other information. | You can click on the link next to a job to open the job to see the brief and other information. | ||
| Line 153: | Line 345: | ||
You can click “Refresh” to get any new work items that have been added since you opened the screen. The list will auto-refresh every 5 minutes. | You can click “Refresh” to get any new work items that have been added since you opened the screen. The list will auto-refresh every 5 minutes. | ||
===Example Scenario=== | |||
#Client Service Users can request tasks from heads of other departments - Creative1, Creative2 and Studio | |||
#Head of the creative and studio departments can request tasks from staff in their own department | |||
To setup NEOSYS Authorisation File for this scenario, see "Setting up NEOSYS Job System". | |||
Initial Phase | |||
#Job created by or for someone in client services (CS). An additional entry appears on CS's "My Jobs". (if CS didnt create the job themselves, NEOSYS emails CS a notification) | |||
Design Phase | |||
#CS requests in NEOSYS a creative head (CRH) to do some design (NEOSYS emails CRH a notification) | |||
#CRH requests in NEOSYS one or more of their staff (CRS) to do some work. (NEOSYS emails CRS a notification) | |||
#CRS indicate in NEOSYS that the task is complete. (NEOSYS emails CRH a notification) | |||
#CRH, when all CRS have completed their tasks, indicates their own task is complete. (NEOSYS emails CS a notification) | |||
Work Phase | |||
#CS gains clients approval for the design. | |||
#CS requests in NEOSYS a studio head (SH) or other production head to do the work. (NEOSYS emails SH a notification) | |||
#SH schedules in NEOSYS studio staff (SS) to work on the job. The tasks appear on SS daily work schedules. | |||
#SH indicates in NEOSYS that the request is complete. (NEOSYS emails CS a notification) | |||
Final Phase | |||
#CS indicates in NEOSYS that their task is complete. (NEOSYS emails FINANCE a notification) | |||
==Using Sub Jobs when there are Multiple Estimates for a single Job== | |||
If you find that you are regularly creating many estimates and invoices for one job then you are probably not working in the best way. Although you CAN put multiple estimates and invoices in one NEOSYS job, generally you should not think of a NEOSYS job as a “holding pen” for many sub-jobs. The system allows much better control if you create a "sub-job" for each phase of the job, in other words for each estimate or invoice to the client. | |||
In the mind of client service staff one “job” can be an ongoing thing with many phases. However what is really needed is that each “phase” of the job is treated as one job in NEOSYS to allow better control. To retain the appearance of continuity while actually treating things separately, you can create sub-jobs in NEOSYS as follows: | |||
Main Job No: 1000 | |||
Sub-Job Nos: 1000-2, 1000-3, 1000-4 etc | |||
As long as the main job number exists then anyone who can create jobs can create sub-jobs. | |||
Timesheets can be entered either on the main job number or any of the sub-jobs as long as they remain open. This allows finer control over time recording. | |||
To force client service staff to follow the “one job/sub-job per estimate” concept, there is an authorisation code in NEOSYS that can prevent them from creating multiple estimates in one job. Finance staff usually remain unrestricted so that they can create credit notes since they are handled as additional estimates in NEOSYS. | |||
Latest revision as of 10:34, 6 August 2024
How to create a job in NEOSYS?
You can view a short video tutorial which explains how to create a job in NEOSYS by clicking on http://youtu.be/FNHhQNDp8bw or visit the neosys youtube channel at http://www.youtube.com/user/neosysdubai/videos for all available tutorial videos.
How to create an estimate in NEOSYS?
You can view a short video tutorial which explains how to create an estimate in NEOSYS by clicking on http://youtu.be/GrNplNQ1-P4 or visit the neosys youtube channel at http://www.youtube.com/user/neosysdubai/videos for all available tutorial videos.
Formatting Estimate Printout
Use a blank 'Item Description' line to separate between different groups of cost items with extra lines of description.
How to create a purchase order in NEOSYS?
You can view a short video tutorial which explains how to create a purchase order in NEOSYS by clicking on http://youtu.be/3NvyZWuTMYg or visit the neosys youtube channel at http://www.youtube.com/user/neosysdubai/videos for all available tutorial videos.
Using templates to standardise work
This is REALLY powerful concept if you have both a) a real need for it and b) the discipline to implement it.
You can develop “template jobs”, “template orders” and “template estimates” to increase the general quality of users work by prompting for standard information and reducing data entry. Once you have designed some templates, then instead of users creating jobs, estimates and orders from scratch they can use the standard NEOSYS “copy from” option.
Creating Templates
Create templates in the same place as normal Jobs, Estimates and Orders. If you have multiple types of business then you should create multiple templates, one for each type of business.
It is advisable to create the templates with codes (instead of the usual numbers) so that users can learn the common template codes.
For example a very simple template job with a job no. of “GENERAL” could have a brief as follows:
Target Audience:
What does the client want?
What is the client budget?
Size:
Specification:
The templates should all be entered with a special executive name - for example “Templates” or your choice of something suitable. Then users can search for all templates created by executive “Templates”.
Finding and Searching Templates
It is easy for users to search through a library of templates by asking to view all documents belonging to executive “Templates” or whatever you used to create the templates. There are a wide variety of ways in NEOSYS to search and browse existing documents so it is usually easy to find what you want.
Using Templates
Whenever you create a job, estimate or order in NEOSYS select the option “Copy an existing document” .. and enter the code of the template which you want to use. If you are reusing the same templates frequently then you will rapidly get to learn the codes of the main templates or you can search the documents to find them.
Pasting existing data from MSWord or Excel to Estimates or Purchase Orders
If for example the item descriptions or quantities or amounts have already been described in an Excel or Word document, then it is possible to paste that data into the file, saving the user from having to re-enter the data.
In order to achieve this, NEOSYS requires the data to have at least one of the following column titles present (with CAPS):
ITEM DESCRIPTION, ITEM DESCRIPTION2, QUANTITY, UNIT PRICE, AMOUNT, LINE TAX CODE, TYPE CODE
Then simply paste the data into the first item field on any row of the Estimate or Purchase order file in NEOSYS.
NOTE - If the system cannot find any column heading in the data you pasted then it will display an error, listing the possible column titles.
If you misspell a column title, the data for that column will be ignored.
Issuing Invoices
On the estimate/invoice file we can click on ‘Invoice’ tab and view the proforma invoice and subsequently invoice the client.
NOTE – for the changes made in the cost or billing section please click on ‘reopen’ for the changes to reflect.
Issuing Partial Invoices
There are two main ways to accomplish partial invoicing of estimates in NEOSYS.
Method 1 – Partial Invoicing using “Proformas”
Partial Invoicing can be done by issuing a proforma invoice for a percentage of the estimate.
The option to create partial proforma invoices is on the invoice creation screen.
There are potential problems with this approach:
- Some clients are not prepared to make a payment versus a proforma invoice.
- No invoice appears on the client’s account and any payment will show as an unallocated payment until the final full invoice is issued.
There are also an advantage in some cases:
- Unlike real invoicing, you can issue multiple proforma invoices on an estimate without restriction. If the client doesn’t accept the proforma and wants changes, it is very easy to issue revisions.
(Note that all proformas issued are stored and can be reprinted at any time)
Method 2 – Partial Invoicing by Splitting the Estimate
Partial Invoicing can be done by copying or splitting the original estimate into two (or more) estimates.
- Copy the original estimate to a new estimate
- Reduce the amount on the copy estimate (“pre-billing estimate”) to the amount that you wish to pre-bill.
- Reduce the amount on the original estimate (“final installment estimate”) by the amount that you are pre-billing.
(Note that “reducing” an estimate can be done either by simply deleting the parts of the estimate that should not be billed (e.g. when the estimate contains stages), or by appending a deduction line (percent or amount) on the bottom of the estimate)
Splitting the costs
If the costs can be split into stages as well then amend the purchase orders that are not related to the pre-billing and tie them to the original estimate. Remember that any purchase orders which are not specifically tied to any estimates will be accounted as costs on the first estimate to be invoiced. This can result in apparently non-profitable accounting entries per invoice if you are not careful - even though the profitability of the overall job is not affected.
If the costs cannot be split then you need to decide if they should be tied to the first or second invoice.
Issuing Credit Notes
What is a credit note?
A credit note is the opposite of invoice. It is issued by a seller to a purchaser to record the reduction of bill possibly due to a discount, return or cancellation.
How do I issue a credit note in production?
To Issue a credit note in production, create an estimate with a NEGATIVE amount and Invoice the estimate.
What are the different journal entries created by the NEOSYS job system
Listed below are scenarios where journal entries are made by the Production system in NEOSYS finance. Each scenario also specifies which Journal Type to check, to find the respective journal entries. All actions cause generation of journal entries, besides the following cases:
- Creating an estimate on a job - raises no journal entries. (regardless of whether the job has a PO, a PO has been converted to a PI or if there is no PO or PI at all)
- Creating a PO on a job which has no estimate or has an estimate but is not invoiced.
All income and cost accounts affected in the journal entries are determined by the job type/s per line of the estimate and PO or on the job file. If there are no job types set per line on the estimate and PO, then the system picks up the main job type on the job file – however if there is no job type set on the job file then the system will not allow you to save the estimate and PO without setting job types on the lines. You have an option to set different job types per line of the document which thereby indicates that a particular line would affect a particular income or cost A/c (which are configured in the job types file).
NEOSYS does not book purchase orders into finance unless and until the invoice is raised to the client. Purchase orders by themselves have NO effect in finance. Only once an invoice is raised to the client on a job, then its purchase orders (if any PO remain outstanding i.e. without supplier invoices) are registered into finance. Not to do so would mean that the profit and loss statement will unreasonably show only income.
The rule of modern cost accounting is "You shall not post income without simultaneously posting actual OR *best estimate of* cost. To post income at the time of raising invoices to client, and cost at the time of receiving the supplier invoice is an old fashioned procedure.
PO (Purchase Order) to PI (Purchase Invoice) conversion merely means entering the supplier invoice details on the PO (i.e. change the status of the PO to Invoice and enter the supplier invoice number and date in the relevant fields).
In all scenarios we talk about an estimate and PO on the same job even thought it might not be stated everywhere.
What are the journal entries created upon invoicing an estimate?
Look in Journal type: Job Invoices/Credit Notes (INP) {the journal name might be different at some client installations}
Invoicing an estimate could basically involve the following scenarios:
Estimate is invoiced, but there is no PO on the job
In this scenario as there is no estimated cost, the system goes ahead and invoices the client with the corresponding entry affecting the respective income A/c
Client A/c      DR  (amount taken from the estimate)
Income A/c      CR  (amount taken from the estimate)
Estimate is invoiced and there is a PO on the job or the PO has already been converted to a PI
This is one of the most common scenarios and is highly recommended as a practise. It is recommended that even though you might not have the exact cost, an approximate cost must be put on the PO for the purpose of invoicing.
Client A/c     DR  (amount taken from the estimate)
Income A/c     CR  (amount taken from the estimate)

Cost A/c       DR  (amount taken from the PO)
WIP A/c        CR  (amount taken from the PO)
Estimate is invoiced as a credit note (i.e. negative amount estimate)
As NEOSYS does not allow you to modify an invoiced estimate, you will need to create an estimate with a negative amount to account for a reversal of the invoice (full credit note) or prepare a partial credit note. Creating a negative estimate / credit note to the client DOES NOT reverse the PO provision and you will have to go to the PO and mark it as cancelled for the reversal to be created
Income A/c     DR  (amount taken from the estimate)
Client A/c     CR  (amount taken from the estimate)
What are the journal entries created when issuing a PO, cancelling a PO and converting PO to PI?
Look in Journal type: Job Purchase Invoices/Credit Notes (PUR) {the journal name might be different at some client installations}
Even though the PO to PI conversion does not involve a change in the amount, NEOSYS still does a reversal of the earlier amount from the WIP and the Cost A/c and again re-enters the same amount in the Cost A/c – this is to keep an audit trial of estimated cost v/s actual cost received and auditors really love this feature.
PO is issued after the estimate is invoiced
The following entries are generated when a PO is issued after the estimate has been invoiced.
WIP A/c        CR  (amount taken from the PO)
Cost A/c       DR  (amount taken from the PO)
PO is converted to a PI after the estimate is invoiced
This is the most common scenario where you receive the supplier invoice after invoicing the client (in this case we assume that the PO already existed when you invoiced the client and the provision for the cost was made at that time – refer to estimate invoicing scenario (b). This case could involve either the PI being of the same amount as the PO or a different one.
WIP A/c        DR  (initial provision cost reversed)
Cost A/c       CR  (initial provision cost reversed)

Cost A/c       DR  (with the new/actual cost)
Supplier A/c   CR  (with the new/actual cost)
PO is converted to a PI before the estimate is invoiced
As mentioned in estimate invoicing scenario (b), there could be a case where you have to convert the PO to a PI before you invoice an estimate. The following entry would be created in this case.
WIP A/c        DR (amount taken from the PO/PI)
Supplier A/c   CR (amount taken from the PO/PI)
PO is converted to a PI when there is no estimate
It may happen that at the time of recording the supplier invoice there is no estimate on the job which could be due to many reasons – most common of them is that the client has given a verbal go ahead or the job is an FOC one or the job is an internal one and isn’t to be billed to anyone. Below entries are no different from entering a PI in the same circumstance
WIP  A/c      DR (amount taken from the PO/PI)
Supplier A/c   CR (amount taken from the PO/PI)

*** MANUAL ENTRY NEEDS TO BE DONE TO TRANSFER THE AMT FROM WIP A/C TO COST A/C.
Refer to Handling manual entries for jobs with internal cost and supplier invoice but no client invoice
PO is modified after the estimate is invoiced
As already stated in the introduction, creating PO’s or modifying them before you invoice an estimate causes no journal entry. However as soon as an estimate is invoiced, any modifications you do to the PO (even text modifications) causes a journal entry which reverses the earlier created provision (when you invoiced the client) and puts back the new/provision cost back.
WIP A/c        DR  (initial provision cost reversed)
Cost A/c       CR  (initial provision cost reversed)

Cost A/c	DR  (with the new provision cost)
WIP A/c        CR  (with the new provision cost)
PO is cancelled after the estimate is invoiced
Similar to the above point a PO can be cancelled after you invoice an estimate and the system will create a reversal entry to cancel the provision which was made at the time of invoicing the estimate.
WIP A/c        DR  (initial provisioned cost reversed)
Cost A/c       CR  (initial provisioned cost reversed)
After invoicing the client, what are the different entries when the purchase invoice is different from the purchase order
Scenario 1 - What are the entries created when the purchase invoice is slightly more than the purchase order (after invoicing the client)?
Eg. Purchase order was for 5000 AED, but the Purchase invoice was received for 5500 AED:
Scenario 2 - What are the entries created when the purchase invoice is slightly less than the purchase order (after invoicing the client)?
Eg. Purchase order was for 5000 AED, but the Purchase invoice was received for 4500 AED:
Handling manual entries Jobs with internal cost and supplier invoice but no client invoice
For scenarios where a job is completed and closed with internal cost(PO->PI) only and no client invoice is raised, manual entry MUST be done in journal type: Job Purchase Invoices/Credit Notes (PUR) to transfer the amount from Wip A/c to Cost A/C. If not the balance of WIP will continue to reflect as WIP in Balance Sheet but in reality it is cost incurred for the company.
WIP  A/c   CR (amount taken from the PO/PI)
Cost A/c   DR (amount taken from the PO/PI)
After invoicing a client, how does updating a PO or converting a PO to a PI, affect which period entries are automatically generated in?
Updating PO:
There are two pairs of entries that are generated when updating a PO, entries that reverse the previous entries and the new (actual) entries.
The reversing entries are generated in the same period as the entries they are reversing. Whereas the new actual entries are generated in the period, defined by the date the order is reissued. (Can be past, present or future) See below example, where an estimate has already been invoiced, a PO already issued in Period 1/2018 and is being update in the period 2/2018.
Estimate invoice, PO issued in Period 1/2018:
Cost A/c DR   +500
WIP A/c  CR   -500

Updating the PO in Period 2/2018 or when order reissued date:
Cost A/c CR   -500   - (Reversing entry in Period 1/2018)
WIP  A/c DR   +500   - (Reversing entry in Period 1/2018)

Cost A/c DR   +400   - (New actual entry in Period 2/2018)
WIP  A/c CR   -400   - (New actual entry in Period 2/2018)
Converting PO to PI:
On the other hand, when converting a PO to PI, the reversing entries and the new (actual) entries are generated in the same period, defined by the date the supplier invoice was received. See below example, where estimate has already been invoice, a PO issued in 1/2018 and is being converted to a PI in the period 2/2018.
Estimate invoice, PO issued in Period 1/2018:
Cost A/c   DR   +500
WIP  A/c   CR   -500

PO converted to PI, in period 2/2018 or when supplier invoice received:
Cost A/c      CR - 500 - (Reversing entry in Period 2/2018)
WIP  A/c      DR + 500 - (Reversing entry in Period 2/2018)
Supplier A/c  CR - 400 - (New actual in Period 2/2018)
Cost  A/c     DR + 400 - (New actual in Period 2/2018)
Things to remember:
- When an estimate is invoiced, the period in which the automatic Production Invoice journal entries appear will depend on the date you enter in the New Invoice screen, not the existing date/period in the estimate file.
- Similarly, when converting a PO to PI, the period in which the automatic Purchase Invoice journal entries appear will depend on the supplier invoice date you input, not the order date.
Raising purchase orders/invoices to/from SUNDRY SUPPLIERS
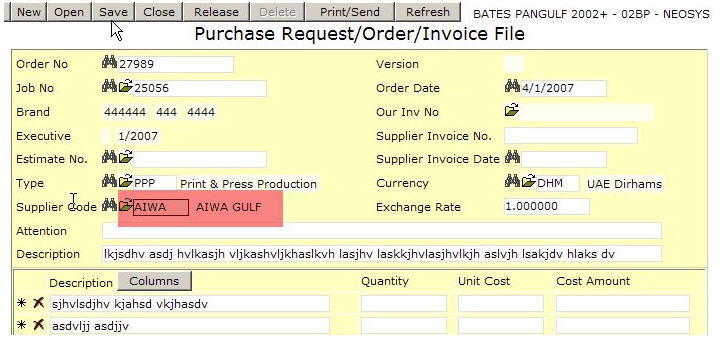
- PO/PI with a normal supplier
- PO/PI with a sundry supplier. An extra box popups up if the supplier name starts with the letters SUNDRY (case insensitive). The operator must type in something.
To do this you need to first create a supplier with name something like "Sundry Suppliers".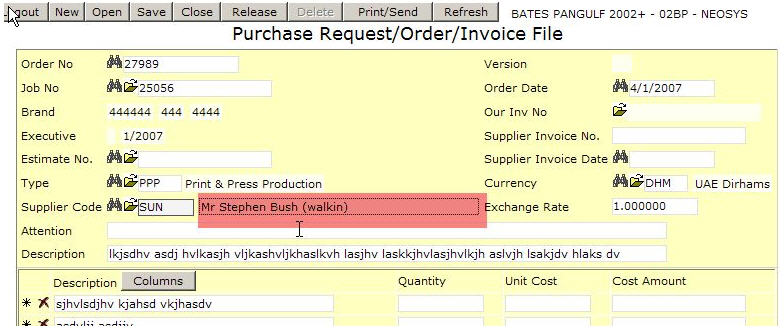
Using NEOSYS VAT/Sales Tax Accounting for Jobs
Configuring VAT/Sales Tax in Finance module
Setting up standard Sales Tax Percentage
If all Jobs should have the same VAT/Sales Tax% then specify it in the Job Configuration File.
The default Tax Code can be entered here as well.
Create an Estimate or Purchase order with VAT/Tax%
If a standard VAT/Sales Tax% is not defined in the Job Configuration File then you must manually add the tax percentage at the bottom of the Estimates and the Purchase Orders for every Job that should have tax.
Estimate:
Purchase Order:
Create the Invoice/Purchase Invoice
Before you do this, Issue a proforma invoice first to check that the tax appears correctly.
Invoice:
Purchase Invoice:
Finance Entries
Automatic entries created in Invoice Journals
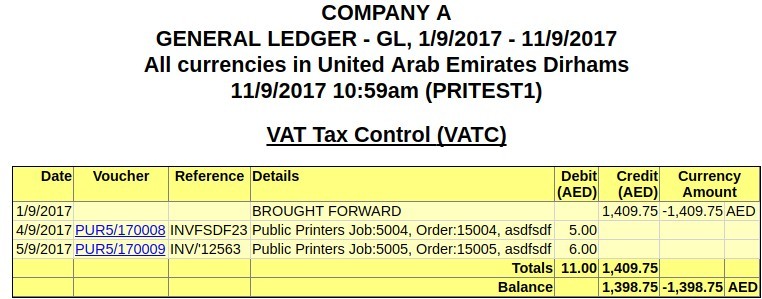
These are Automatic entries created in Invoice Journals when client is invoiced for 120, Production cost is 100 and VAT is 5 %.
Client A/C              Dr.  + 126
Income A/c              Cr.  - 120
VAT Control A/C         Cr.  - 6

Cost A/C                Dr.  + 100
Work in Progress A/C    Cr.  - 100 (Job a/c)
Note: Work in Progress is a provision done as you haven’t received supplier invoice.
Automatic entries created in Purchase Invoice Journals
These are Automatic entries created in Purchase Invoice Journals when Supplier Invoice is recorded in Purchase order i.e. PO to PI conversion.
Cost A/C                Cr.  - 100
Work in Progress A/C    Dr.  + 100 (Job a/c)

Cost A/C                Dr.  + 100
VAT Control A/C         Dr.  + 5
Supplier A/c            Cr.  - 105
For a more detailed note on this topic, refer to Accounting entries created by the Production system
Post the Sales Invoice Journal created
In Finance Journals, check that the tax columns appear, the tax amount is correct, and then post it.
Check that the Sale Tax A/c is correct
It should show an entry for the tax liability incurred by issuing and posting the above sales invoice.
Switching from manual costing to automatic NEOSYS Job Costing
Assuming that jobs are numbered sequentially just start from any particular job number and ensure that all costs that relate to that job number ("new jobs") and beyond are handled through the new automated NEOSYS practice and not through the old manual procedures.
All cost entries that relate to jobs prior to that number ("old jobs") must be continue to be handled in the old way and if any entries are generated by NEOSYS for these old jobs then those entries must be deleted and not posted.
NEOSYS will automatically create job account in a chart with code "WIPxx" where xx is the current year like "WIP08".
You must create the initial chart (e.g. with code "WIP08") yourself and then NEOSYS will create all future year charts for you. When creating the initial chart make it an open item type chart and you will have to put a control A/c. The control A/c for a WIP ledger is normally in the current assets section of the General Ledger. If you do not have a WIP control A/c (or you have a WIP account but it is not a control account and has any journals passed against it) then you will have to create a new account in the GL called something like WIP Control A/c.
If there are too many jobs in one chart then NEOSYS will create "WIP082", "WIP083" etc.
Correct Incorrect Purchase Invoices
Once you convert a Purchase Order to a Purchase Invoice, you may encounter a situation where you have recorded the supplier invoice wrongly. In such a case if you are authorised to make changes a PI, you need to go back to the PO/PI, amend the amount and save it again. This will create a reversal entry, reversing the earlier created journal and puts back the corrected amount.
This procedure could be used for recording credit notes too. However if you are not authorised to amend a PI, then follow the procedure below.
Note: Once a Purchase Order is invoiced NEOSYS does not allow to delete the Order. If you wish to cancel the Purchase order then the Version/Status can be changed to Cancelled.
Recording Supplier Credit Notes
If you are not authorised to amend a PI, then you need to create a new PO with a NEGATIVE amount (to record the credit note the supplier has sent you or the difference for which you mistakenly entered the earlier PI). Once this is done you could either save it or change the status to Invoice, enter the supplier credit note number or reference number and date and save it. Relevant journal entries will be created.
Cancelling or Amending Incorrect Client Invoices
See Cancelling or Amending Incorrect Client Invoices for NEOSYS procedure for cancelling and amending Client invoices.
Steps to cancel an incorrect invoice:
- Firstly, if the job is closed, reopen it using Job File. If you are not authorised to reopen jobs, then get an authorised person to do this. Note that, by default, jobs are closed at the time of issuing an invoice.
- Create another estimate by copying the original wrongly invoiced estimate and change all the amounts to be negative.
- "Invoice" this new estimate in the usual way and you will get a credit note.
- Create another estimate by copying the original wrongly invoiced estimate again and modify the copy and/or invoice it as and when you like.
Cancelling a Job
Steps to Cancel a Job:
- Login to NEOSYS
- Go to Menu -> Jobs -> Jobs -> Job File
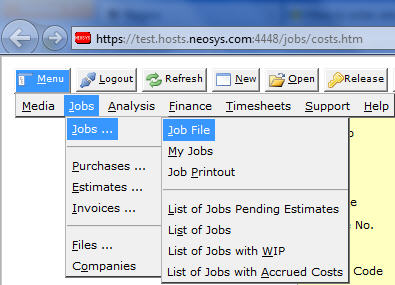
- Enter the job number of the job you wish to cancel
- Open each purchase order of the Job

- Mark it as 'Cancelled'

- Open each estimate of the Job

- Mark it as 'Cancelled'

- Go back to the Job and mark it as 'Closed'

- Save the job
Cancelling all old jobs and estimates
Below procedure can only be done on old (AREV) NEOSYS and will be removed from wiki once the old NEOSYS is no more in use.
In case staff have routinely not been cancelling stale estimates or closing stale jobs, and you want the various NEOSYS "Pending" reports to show only truly pending estimates and jobs, and in order to save cancelling/closing them one by one, you can ask NEOSYS support staff to cancel/close all estimates and jobs up to a certain date. This is done in NEOSYS maintenance mode on the server.
Individual estimates and jobs may be reopened one by one in the normal manner.
Instructions for NEOSYS Support follow:
NEOSYS SUPPORT STAFF MUST GET WRITTEN/EMAIL CONFIRMATION FROM THE CLIENT OF EXACTLY WHAT IS TO BE CLEARED AND UP TO WHAT DATE AND ACCEPTANCE THAT THIS IS IRREVERSIBLE.
The command first selects records for clearing and the 2nd command actually does the job. Do NOT perform the 2nd command except immediately after the 1st command and DO NOT perform the 2nd command unless the 1st command selects 1 or more records.
Make sure you enter the date in the correct format for the database concerned.
WARNING1! This is irreversible so do this in test database first if not familiar with the process and DONT make any typing or other errors!
WARNING2! YOU WILL CANCEL/CLOSE ***ALL*** ESTIMATES/JOBS IF YOU DO NOT GET SOME RECORDS SELECTED BY THE FIRST COMMAND *OR* IF YOU DO ANY OTHER COMMANDS BETWEEN THE FIRST COMMAND AND 2ND COMMAND. DO NOT PROCEED TO THE 2ND COMMAND UNLESS YOU GET SOME RECORDS SELECTED IN THE FIRST COMMAND!
Estimates
SELECT PRODUCTION.INVOICES WITH STATUS 'DRAFT' 'ISSUED' 'APPROVED' AND WITH DATE LE '31/12/2013'
CLEARFIELD PRODUCTION.INVOICES STATUS/CANCELLED
Estimates with status DELIVERED are NOT cancelled in this procedure because they may need attention and not simple cancellation. They are likely to be few and can be manually cancelled or processed as required.
Jobs
SELECT JOBS WITH CLOSED NE 'Y' AND WITH DATE_CREATED LE '31/12/2013'
CLEARFIELD JOBS CLOSED/Y
Tracking job progress using My Jobs
Menu > Jobs > My Jobs is a feature to internally track job progress.
My Jobs contains a list of jobs allocated to or managed by the user, the jobs status, who is currently working on the job etc.
All new jobs are initially added to the job executive or job creator's my jobs list.
From there, the job executive/creator can assign the job's work to other users such as production team heads. Any user with the authorisation, such as department heads, have the ability to reassign the job's work to other staff members (there's no limit).
Users can mark allocated jobs as started or complete. All people are alerted by email whenever they are allocated a new task or when there is a change of status in a task that they requested be done.
My Jobs is only effective when client service create jobs for a single task, instead of creating a single job for multiple jobs.
If a client requires many tasks, e.g. design, events etc., users should create the job with additional sub-jobs for each task. Sub-jobs are simply new jobs with numbers such as JOB1234-1 or JOB1234-2.
The key TASK ACCESS must be added to department before users can view jobs in 'My Jobs'.
Every task is assigned to a NEOSYS user who is considered responsible to either do the task themselves or create additional tasks for other NEOSYS users.
Every task also has a “requestor” who is a NEOSYS user who will be alerted by email whenever the task’s status or other information is changed by the user - for example, to indicate completion.
When the initial task is created automatically for a new job, if the job executive is a valid NEOSYS user, then the task appears on that executive’s list of tasks (on “My Jobs”), otherwise the task is assigned to the job creator. The “requestor” for all initial tasks is automatically configured in the system and is typically someone in finance department so that finance can act on completed jobs.
The status of tasks can be allocated, started, completed, suspended or cancelled.
What shows in My Jobs
You will see:
- All Job that you are responsible to either do or manage
- All Job that you have requested other people to do
Jobs that are “Completed” or “Cancelled” do not show.
Depending on your authorisation level, you might also see other team member’s tasks or all tasks regardless of team.
You will not see tasks for jobs that you are not authorised to access due to restrictions on clients, brands or internal divisions/companies.
The system will not display tasks older than 365 days.
Changing task status
If you are authorised to change the status of tasks, you will see a “Change” button next to each task status. Click it to change the status of your own items or tasks that you have requested other people to do.
To do this you need to be authorised to do "TASK UPDATE".
The “requestor” and/or responsible person will be alerted by email of any changes in status. The person actually doing the change will not receive any alert.
If you change the status of a task to “Completed” or “Cancelled” then you cannot make any further changes to that item - so be careful.
When a job is “Completed” or “Cancelled” by a user, the task entry for that user is removed from the My Jobs page.
"Suspen"
Requesting other people to do work
If you are authorised to request tasks, you will see a “Request” button next to each existing task. Click it to create tasks for other people to do work on that job as well.
Whenever a new task is created, the requested person will get an email to alert them.
Any new task that you request will appear on both the requested person’s My Jobs screen and yours since you are the “requestor”.
Whenever anybody changes the status on tasks that you requested, you will get an email alert so that you can track progress.
User can make a request for tasks which are only allocated to him or where he is the person requested to do the task. If neither is true then user will not be able to make any requests even if he has the authorisations.
Every time a user makes a request, a new entry is created in My Jobs and can be seen when you click on "Show All". The Job executive remains the same but the "Person" field is updated with the user who has been requested to take up the job.
Authorisation Keys
To request tasks from other people in your own department, group or team you need to be authorised to do "TASK CREATE".
To request tasks from heads/managers of other departments (i.e. those who are authorised to do TASK CREATE) you need to be authorised to do "TASK CREATE CROSSDEPT"
If you are authorised to do "TASK CREATE ALL" then you can ask anybody to do tasks.
In all cases, only people who have access to "My Jobs" can be requested to do tasks - in other words, only people who are authorised to do "TASK ACCESS".
Using the My Jobs screen
You can click on the link next to a job to open the job to see the brief and other information.
You can sort the list by any column. Click the “arrows” icon in the column heading.
You can filter the list by double clicking any cell in the table. It will show only rows with the value that you double clicked. Click “Show All” to remove the filter.
You can click “Refresh” to get any new work items that have been added since you opened the screen. The list will auto-refresh every 5 minutes.
Example Scenario
- Client Service Users can request tasks from heads of other departments - Creative1, Creative2 and Studio
- Head of the creative and studio departments can request tasks from staff in their own department
To setup NEOSYS Authorisation File for this scenario, see "Setting up NEOSYS Job System".
Initial Phase
- Job created by or for someone in client services (CS). An additional entry appears on CS's "My Jobs". (if CS didnt create the job themselves, NEOSYS emails CS a notification)
Design Phase
- CS requests in NEOSYS a creative head (CRH) to do some design (NEOSYS emails CRH a notification)
- CRH requests in NEOSYS one or more of their staff (CRS) to do some work. (NEOSYS emails CRS a notification)
- CRS indicate in NEOSYS that the task is complete. (NEOSYS emails CRH a notification)
- CRH, when all CRS have completed their tasks, indicates their own task is complete. (NEOSYS emails CS a notification)
Work Phase
- CS gains clients approval for the design.
- CS requests in NEOSYS a studio head (SH) or other production head to do the work. (NEOSYS emails SH a notification)
- SH schedules in NEOSYS studio staff (SS) to work on the job. The tasks appear on SS daily work schedules.
- SH indicates in NEOSYS that the request is complete. (NEOSYS emails CS a notification)
Final Phase
- CS indicates in NEOSYS that their task is complete. (NEOSYS emails FINANCE a notification)
Using Sub Jobs when there are Multiple Estimates for a single Job
If you find that you are regularly creating many estimates and invoices for one job then you are probably not working in the best way. Although you CAN put multiple estimates and invoices in one NEOSYS job, generally you should not think of a NEOSYS job as a “holding pen” for many sub-jobs. The system allows much better control if you create a "sub-job" for each phase of the job, in other words for each estimate or invoice to the client.
In the mind of client service staff one “job” can be an ongoing thing with many phases. However what is really needed is that each “phase” of the job is treated as one job in NEOSYS to allow better control. To retain the appearance of continuity while actually treating things separately, you can create sub-jobs in NEOSYS as follows:
Main Job No: 1000
Sub-Job Nos: 1000-2, 1000-3, 1000-4 etc
As long as the main job number exists then anyone who can create jobs can create sub-jobs.
Timesheets can be entered either on the main job number or any of the sub-jobs as long as they remain open. This allows finer control over time recording.
To force client service staff to follow the “one job/sub-job per estimate” concept, there is an authorisation code in NEOSYS that can prevent them from creating multiple estimates in one job. Finance staff usually remain unrestricted so that they can create credit notes since they are handled as additional estimates in NEOSYS.
