Configuring Document Footers: Difference between revisions
| (26 intermediate revisions by 5 users not shown) | |||
| Line 1: | Line 1: | ||
== List of macro variables available == | ==Configuring Document Footers== | ||
=== List of macro variables available === | |||
The following codes are available: | The following codes are available: | ||
| Line 6: | Line 8: | ||
*%EMAIL% - of the user | *%EMAIL% - of the user | ||
*%SIGNATURE% - shows the image file uploaded for the users signature if any | *%SIGNATURE% - shows the image file uploaded for the users signature if any | ||
*%USERCODE% - of the user | *%USERCODE% - of the user who created the document | ||
*%AGENCY% - the "client mark" usually an abbreviated version of the NEOSYS licenced company name. Not client configurable. Refer [[Setting up and Configuring NEOSYS Generally#Configuring Client Security mark|Configuring Client Security mark]]. The client security mark shouldn't be used as company name as %AGENCY% may be present in many other configurations. | |||
*%AGENCY% - the "client mark" usually an abbreviated version of the NEOSYS licenced company name. Not client configurable | *%COMPANY% - company name taken from the Company File. While configuring footer for invoices of a company, use %COMPANY% instead of %AGENCY%, since %AGENCY% is the client security mark which is common to all or most companies in an installation. | ||
*%COMPANY% - company name taken from the Company File. | |||
*%COMPANYCODE% - from the Company File. Useful for configuring logo per company/division (e.g. src=%COMPANYCODE%logo.jpg) | *%COMPANYCODE% - from the Company File. Useful for configuring logo per company/division (e.g. src=%COMPANYCODE%logo.jpg) | ||
*%DATE% - normally the date the document was actually created (user's local date) | *%DATE% - normally the date the document was actually created (user's local date) | ||
*%TIME% - similar to date | *%TIME% - similar to date | ||
*% | *%STATION% - usually IP number. | ||
The following obsolete codes are also supported for backward compatibility but should be replaced by the newer forms above where-ever possible. | The following obsolete codes are also supported for backward compatibility but should be replaced by the newer forms above where-ever possible. | ||
| Line 22: | Line 23: | ||
*%AGENCY | *%AGENCY | ||
Below screenshots show an example of how the available macros can be used in the invoice footer in System Configuration File and how they appear on the invoice output. | |||
[[File:footer1.jpg]] | |||
[[File:footer2.jpg]] | |||
=== Location of JPEG Images for Company Stamp/Signature === | === Configuring Document Footers with a Company Stamp/Signature (JPEG image) === | ||
==== Location of JPEG Images for Company Stamp/Signature ==== | |||
Make sure the JPEG image is located in the neosys/data/xxx folder (where "xxx" is the database code) | Make sure the JPEG image is located in the neosys/data/xxx folder (where "xxx" is the database code) | ||
=== Single Company Installation === | ==== Single Company Installation ==== | ||
==== Invoice footer ==== | ===== Invoice footer ===== | ||
In the Media / Job Configuration File, Scroll down to the Invoice Footer field under the Invoicing section and add the script | In the Media / Job Configuration File, Scroll down to the Invoice Footer field under the Invoicing section and add the script | ||
| Line 39: | Line 46: | ||
'''Note:''' While reprinting invoices, footers remain as they were when the invoice was created. | '''Note:''' While reprinting invoices, footers remain as they were when the invoice was created. | ||
==== Booking Orders ==== | ===== Booking Orders ===== | ||
In the "Media Types File", add a new line in the "Order Footer" and add the script | In the "Media Types File", add a new line in the "Order Footer" and add the script | ||
| Line 46: | Line 53: | ||
=== Multiple Company Installation === | ==== Multiple Company Installation ==== | ||
==== Invoice footer ==== | ===== Invoice footer ===== | ||
In the Media / Job Configuration File, Scroll down to the Invoice Footer field under the Invoicing section and add the script | In the Media / Job Configuration File, Scroll down to the Invoice Footer field under the Invoicing section and add the script | ||
| Line 54: | Line 61: | ||
and "imagename%COMPANYCODE%" will be converted to "imagenameXYZ" where "XYZ" stands for the company code in capitals. | and "imagename%COMPANYCODE%" will be converted to "imagenameXYZ" where "XYZ" stands for the company code in capitals. | ||
==== Booking Orders ==== | ===== Booking Orders ===== | ||
In the "Media Types File", add a new line in the "Order Footer" and add the script | In the "Media Types File", add a new line in the "Order Footer" and add the script | ||
| Line 60: | Line 67: | ||
and "imagename%COMPANYCODE%" will be converted to "imagenameXYZ" where "XYZ" stands for the company code in capitals. | and "imagename%COMPANYCODE%" will be converted to "imagenameXYZ" where "XYZ" stands for the company code in capitals. | ||
== Configuring Personal Signatures (JPEG image) to appear on Document Footers == | === Configuring Personal Signatures (JPEG image) to appear on Document Footers === | ||
Users can configure their personal signatures on the USER FILE by uploading a JPEG image of the | Users can configure their personal signatures on the USER FILE by uploading a JPEG image of their signature. | ||
Such signatures will be inserted below any "%USERNAME%" or "%USER" code configured in document footings unless %SIGNATURE%, %NOSIGNATURE% or another image is configured in the footing. This feature can be suppressed and controlled in the System Configuration File. | |||
See [[System_Configuration_File#Style Signature setting in System Configuration File]] | |||
[[File:user1.jpg]] | [[File:user1.jpg]] | ||
| Line 72: | Line 84: | ||
#To replace the uploaded image with a new one, you may simply click <b>"Upload"</b> and upload a new image which would overwrite the previous one. | #To replace the uploaded image with a new one, you may simply click <b>"Upload"</b> and upload a new image which would overwrite the previous one. | ||
==== General Guidelines for uploading Signature Image Files ==== | |||
To ensure that the signature appears correctly on NEOSYS documents, the following guidelines must be followed: | |||
#Signature image files should be scanned at 96 dpi for proper alignment on documents | |||
#Avoid margins / white spaces around the image i.e. the free blank space around the signature should be cropped out using MS Paint or similar software | |||
#Signatures do not have to be top quality like logos so if you can get an acceptable quality by any means then you could go ahead. e.g if the Client sends it as a pdf file, take its screenshot and save as JPEG file making sure it does not hamper the quality of the image. | |||
==== Procedure for cropping signature image files in Microsoft Paint ==== | |||
#Open the Signature image file in Paint. <br>( ''Right click on the image file'' -> ''Open with'' -> ''Paint'' ) <br><br> [[image:mspaint-1.jpg]] <br><br> | |||
#Click on the Select Button and select the "Rectangular Selection" option <br><br> [[image:mspaint-2.jpg]] <br><br> | |||
#Using the mouse pointer, select only the signature part of the image avoiding unnecessary white spaces and click on CROP <br><br> [[image:mspaint-3.jpg]] <br><br> | |||
#Now, click on Resize -> Pixels and enter the appropriate dimensions and click on OK <br><br> [[image:mspaint-3b.jpg]] <br><br> | |||
#Save the image (Control + S) | |||
#Exit Paint application | |||
#Open/View the image. It should be cropped now : <br>[[image:mspaint-final.jpg|frame|left|Cropped Signature Image File]] <br><br> | |||
Revision as of 11:38, 4 March 2018
List of macro variables available
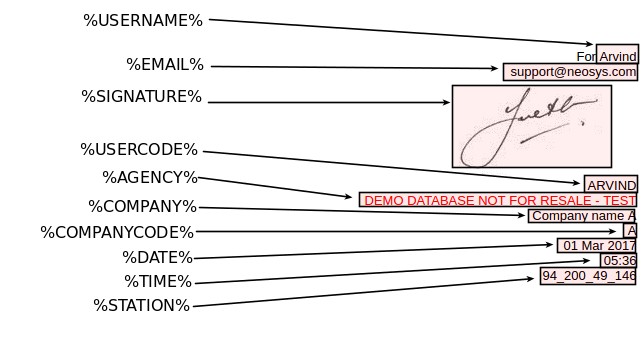
The following codes are available:
- %USERNAME% - of the user who created the document
- %EMAIL% - of the user
- %SIGNATURE% - shows the image file uploaded for the users signature if any
- %USERCODE% - of the user who created the document
- %AGENCY% - the "client mark" usually an abbreviated version of the NEOSYS licenced company name. Not client configurable. Refer Configuring Client Security mark. The client security mark shouldn't be used as company name as %AGENCY% may be present in many other configurations.
- %COMPANY% - company name taken from the Company File. While configuring footer for invoices of a company, use %COMPANY% instead of %AGENCY%, since %AGENCY% is the client security mark which is common to all or most companies in an installation.
- %COMPANYCODE% - from the Company File. Useful for configuring logo per company/division (e.g. src=%COMPANYCODE%logo.jpg)
- %DATE% - normally the date the document was actually created (user's local date)
- %TIME% - similar to date
- %STATION% - usually IP number.
The following obsolete codes are also supported for backward compatibility but should be replaced by the newer forms above where-ever possible.
- %USER
- %USERNAME
- %AGENCY
Below screenshots show an example of how the available macros can be used in the invoice footer in System Configuration File and how they appear on the invoice output.
Location of JPEG Images for Company Stamp/Signature
Make sure the JPEG image is located in the neosys/data/xxx folder (where "xxx" is the database code)
Single Company Installation
In the Media / Job Configuration File, Scroll down to the Invoice Footer field under the Invoicing section and add the script
<img src = imagename.jpg></img>
where "imagename.jpg" is the name of the JPEG image.
Note: While reprinting invoices, footers remain as they were when the invoice was created.
Booking Orders
In the "Media Types File", add a new line in the "Order Footer" and add the script
<img src = imagename.jpg></img>
where "imagename.jpg" is the name of the JPEG image.
Multiple Company Installation
In the Media / Job Configuration File, Scroll down to the Invoice Footer field under the Invoicing section and add the script
<img src = imagename%COMPANYCODE%.jpg></img>
and "imagename%COMPANYCODE%" will be converted to "imagenameXYZ" where "XYZ" stands for the company code in capitals.
Booking Orders
In the "Media Types File", add a new line in the "Order Footer" and add the script
<img src = imagename%COMPANYCODE%.jpg></img>
and "imagename%COMPANYCODE%" will be converted to "imagenameXYZ" where "XYZ" stands for the company code in capitals.
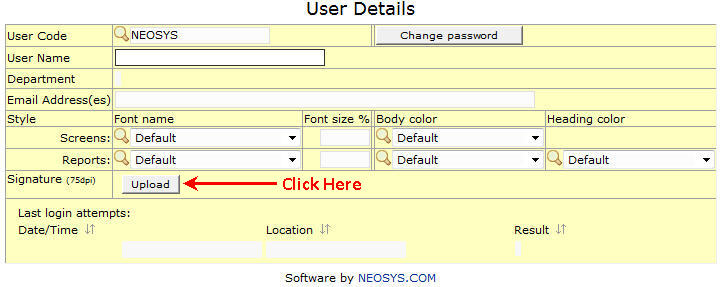
Users can configure their personal signatures on the USER FILE by uploading a JPEG image of their signature.
Such signatures will be inserted below any "%USERNAME%" or "%USER" code configured in document footings unless %SIGNATURE%, %NOSIGNATURE% or another image is configured in the footing. This feature can be suppressed and controlled in the System Configuration File.
See System_Configuration_File#Style Signature setting in System Configuration File
- Browse for the required file and click on upload:

- Once the desired file is uploaded successfully, a file upload summary would be displayed as follows :
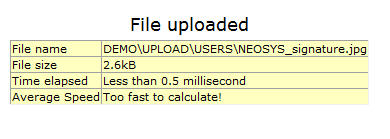
- Once you close the file upload summary, you would see a preview of the uploaded JPEG image.
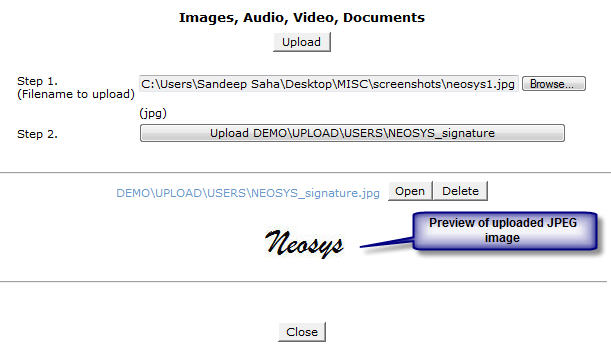
- If you would like to delete the uploaded image, click the "Delete" button to do so.
- To replace the uploaded image with a new one, you may simply click "Upload" and upload a new image which would overwrite the previous one.
General Guidelines for uploading Signature Image Files
To ensure that the signature appears correctly on NEOSYS documents, the following guidelines must be followed:
- Signature image files should be scanned at 96 dpi for proper alignment on documents
- Avoid margins / white spaces around the image i.e. the free blank space around the signature should be cropped out using MS Paint or similar software
- Signatures do not have to be top quality like logos so if you can get an acceptable quality by any means then you could go ahead. e.g if the Client sends it as a pdf file, take its screenshot and save as JPEG file making sure it does not hamper the quality of the image.
Procedure for cropping signature image files in Microsoft Paint
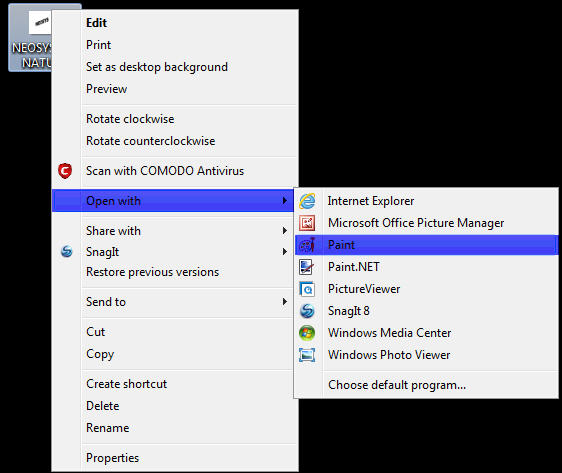
- Open the Signature image file in Paint.
( Right click on the image file -> Open with -> Paint )
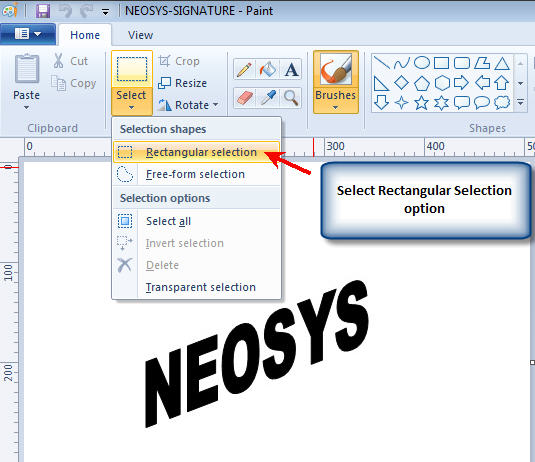
- Click on the Select Button and select the "Rectangular Selection" option
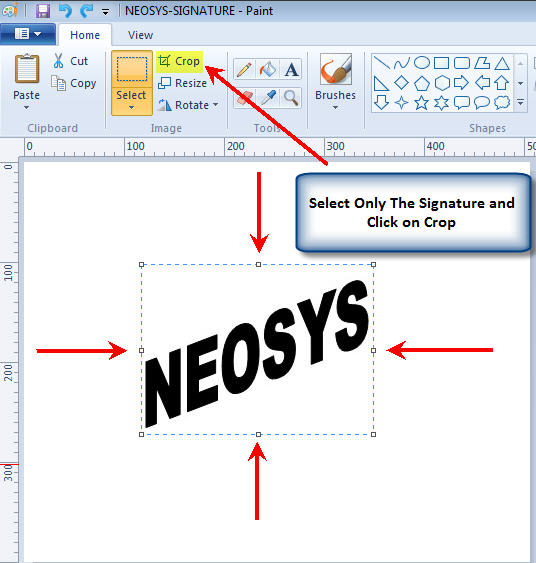
- Using the mouse pointer, select only the signature part of the image avoiding unnecessary white spaces and click on CROP
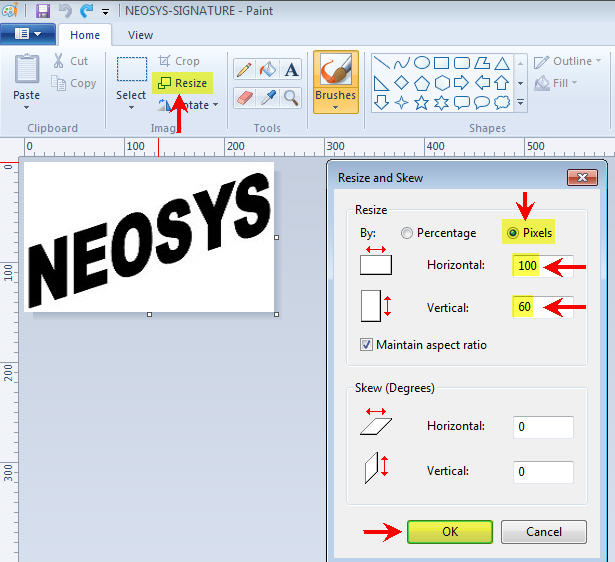
- Now, click on Resize -> Pixels and enter the appropriate dimensions and click on OK
- Save the image (Control + S)
- Exit Paint application
- Open/View the image. It should be cropped now :

Cropped Signature Image File

