Using NEOSYS Media System: Difference between revisions
| Line 568: | Line 568: | ||
== | == Using NEOSYS VAT/Sales Tax Accounting for Media == | ||
=== Setting up standard Sales Tax Percentage === | |||
If all schedules should have the same VAT/Sales Tax% then specific it in the media Configuration File. | |||
The VAT/Tax code can be changed here too but is not optional and cannot be overridden per schedule. | |||
[[image:vat1.jpg]] | |||
=== Create a schedule with VAT/Tax% === | |||
If a standard VAT/Sales Tax% is not defined in the media Configuration File then you must `manually add the tax percentage at the bottom of every schedule that should have tax. | |||
[[image:vat2.jpg]] | |||
=== Create the invoice === | |||
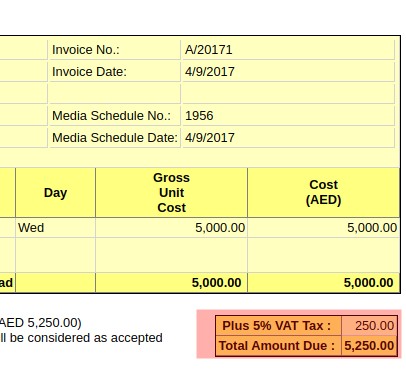
Before you do this, Issue a proforma invoice first to check that the tax appears correctly. | |||
[[image:vat3.jpg]] | |||
=== Post the Sales Invoice Journal created === | |||
In Finance Journals, check that the tax columns appear, the tax amount is correct, and then post it. | |||
[[image:vat4.jpg]] | |||
=== Check that the Sale Tax A/c is correct === | |||
It should show an entry for the tax liability incurred by issuing and posting the above sales invoice. | |||
[[image:vat5.jpg]] | |||
== Accounting entries created by the Media System == | == Accounting entries created by the Media System == | ||
Invoice journal entries are created automatically but are left un-posted under Menu > Finance > Journals > Journal Entries - Media Invoices/Credit Notes (INV). | Invoice journal entries are created automatically but are left un-posted under Menu > Finance > Journals > Journal Entries - Media Invoices/Credit Notes (INV). | ||
Revision as of 13:43, 16 February 2014
How to create a media schedule in NEOSYS?
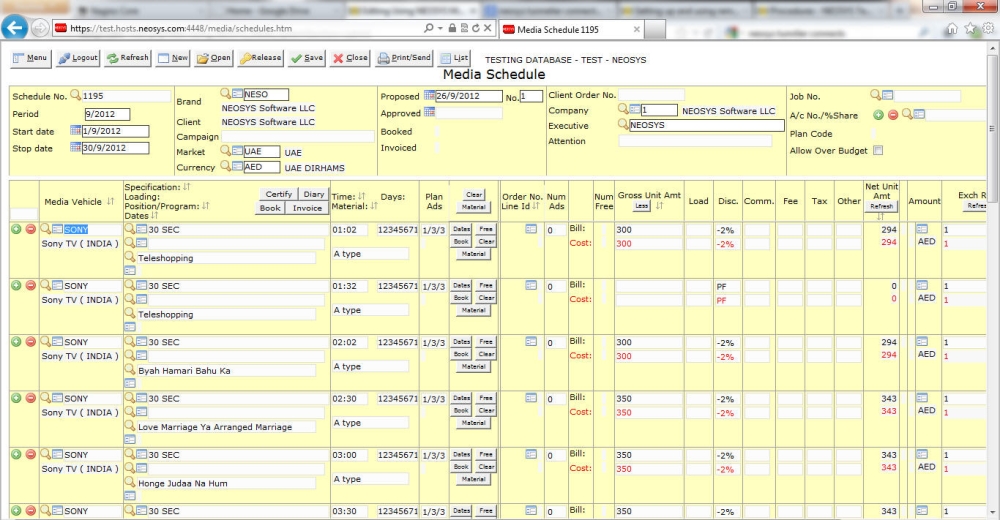
You can view a short video tutorial which explains how to create a media schedule in NEOSYS by clicking on http://youtu.be/iNm4TrUNl8M or visit the neosys youtube channel at http://www.youtube.com/user/neosysdubai/videos for all available tutorial videos.
Cancelling or Amending Incorrect Client Invoices
Using_NEOSYS_Agency_System#Cancelling_or_Amending_Incorrect_Client_Invoices
How to cancel and/or reissue an invoice using a credit note
To cancel an invoice *when you intend it to be reissued*, NEOSYS has a special option to enable you to create a credit note without removing the ads from a schedule. If you want to cancel the ads *permanently* after issuing the invoice then you simply remove the ads from the schedule and request another invoice and this time a credit note will be created to reflect the lost ads.
- In the Schedule File, click on the “Invoice” button to get the New Invoice screen.
- Enter the Credit Note date in the Invoice date field
- In the Invoice type option select “Credit note”
- Click the “Create Proforma” button
- Check that the credit note looks ok.
- If the credit note looks OK, click on Invoice and the credit note will be created.
To reissue an invoice, cancel the original invoice as above then amend the schedule (or the other way around – it doesn’t matter) and issue another invoice using the usual steps.
Principles of Structuring Document Numbers in NEOSYS
Structuring invoice and document numbers is good practice since the documents order correctly when sorted in NEOSYS and even when exported to other systems like Excel – and even when entered into third party systems at suppliers and clients where NEOSYS has no control.
There are a few principles which can help while deciding on the structure:
- Enter things that change least frequently (or not at all) more to the left of the structure.
- Items like sequential numbers must to be separated with / from other parts of the structure (because sequential numbers in NEOSYS generally do not have leading zeros and therefore can have a variable number of digits.
- To make easier to read and type, consider adding the / character between parts of the structure that have constant number of characters like company code and two digit year
For example, if we have company codes like A, B, C, year 2012, number 1000 then a good numbering system will sort correctly in all cases while a poor format will not sort correctly in some cases.
Good Format Examples:
- X/12/1000 - ok
- X12/1000 – also ok, X and 12 are both fixed number of characters so don’t need / to separate
Poor Format Examples:
- X/121000 – sequential number should be separated from year by /
- X121000 – sequential number should be separated from year by /
- 12/X/1000 – year changes more frequently than company code X so it should be X/12
- X/1000/12 – 12 changes less frequently than 1000 so it should be 12/1000
- 1000/12/X – X changes least so it should be on the left. 1000 changes most so it should be on the right
- 12/1000/X – X changes least so it should be on the left
Notes -
- Company prefix can be assigned to NEOSYS companies in the Company File. This is particularly useful if the company codes are digits and can be confused with the sequential numbers.
- Using letters for company codes or company prefix is better for sorting because one can omit the / separator character.
- Sequential numbers in NEOSYS generally have a variable number of digits and do not use leading zeros.
- In some places in NEOSYS when asked to enter document numbers, omit the company code and year and enter only the sequential number, NEOSYS will find the document based on the current company and year or search for the first existing document across all companies. The same applies with entering ranges of numbers. NEOSYS will attempt to add the missing company code and year.
Choosing a plan or schedule numbering method
Before creating a plan or schedule you need to decide whether to number it sequentially or code it manually. You don't have to stick to one method or the other every time and can use a combination of both methods depending on the situation.
The following principles apply to both schedules and plans, however plans are nearly always best suited to the manual coding method. Note that if you are using schedules like plans then they are also best suited to the manual coding method.
Automatic numbering
If you use NEOSYS to process a random stream of orders from clients, for example a lot of newspaper or classified ads, you are forced to use the NEOSYS automatic numbering system. However this means that will later on you will always have to be given the schedule number in order to access it, or you will have to search for it within NEOSYS.
Two ways to get automatic numbers:
- Click the New button
- Enter a single letter in the schedule number field (e.g. "X") and press Enter. You will get a schedule number like X9999 i.e. the next sequence number in the series of whatever letter you chose.
Manual numbering
If you are using NEOSYS for monthly or yearly scheduling for major clients, there is a great way to avoid the bother of always searching for schedule numbers. Just manually create your own schedule numbers according to some consistent logic just as you would when inventing a standard for naming spreadsheet or word processing files.
It is well worth learning this method and not just using the automatic schedule numbering system for everything.
In all cases the schedule number should start with a basic structure like - BRANDCODE+YEAR+MONTH.
(Brand code ideally remains constant, year and month will change as per period. The month is subject to change more frequently and hence placed towards the tail end of the schedule/plan number)
For example, a COKE campaign in December 2010.
COKE1012
Single digit months should be entered like 08 for consistency.
COKE1008
To help you get started with this method remember the pattern like this: (BBB represents the brand code, YY represents the year and MM represents the month)
BBBYYMM (recommended - year first, month second)
Some people prefer to reverse the year and the month as follows. However this can get very confusing if everybody in your company does it their own way is not consistent (does "1110" Nov 2010 or Oct 2011?) so we recommend that you all stick to the "year first" "month second" concept since it allows correct alphabetic sorting if the need arises within or outside NEOSYS.
BBBMMYY (not recommended - month first, year second)
Not infrequently you may have more than one schedule for a particular brand on one month. In this case simply extend the basic schedule number according to some consistent logic. Here are some examples.
COKE1012B
COKE1012C
COKE1012TV
COKE1012RADIO
COKE1012ETC
Once you decide on your schedule number, just type it in the schedule number field and hit the enter key and select the option to create a new schedule (you may also copy an existing one).
Invoicing “Certified Ads Only” after invoicing “All Ads”
The following issue only occurs in old versions of NEOSYS. In newer versions of NEOSYS, invoiced ads which have not been certified will not be credited when requesting an invoice on "certified ads only" basis.
In old versions of NEOSYS, invoicing with the “certified ads only” options means both of the following:
- “issue invoice for any uninvoiced ads that are certified”
- “issue credit note for any invoiced ads that aren’t certified” … this may be unexpected behaviour by the user
In other words, if you invoice “certified ads only” then any ads already invoiced which do not have a certificate (either you already invoiced “All Ads” without certifying, or you removed the certificate number after invoicing “Certified Ads Only”) - will have a credit note issued for them.
This behaviour allows issuing credit notes for specific ads by removing the certificate number without removing the ad from the schedule.
Like issuing normal credit notes this also means that, even if schedules are fully invoiced and do not appear on the List of Schedules Pending Invoicing or List of Ads Pending Invoicing reports, you can get credit notes.
Users need to learn that invoicing “Certified Ads only” after invoicing “All Ads” should be avoided.
Credit Notes
Credit Notes for reduction in billable cost
A credit note is a document which indicates a reduction of the amount that a client has to pay versus invoices issued to date. It can be thought of an arithmetical negative.
There are many varied reasons why this could be required.
- Ads not appearing properly
- Accidental overbilling
- Discounting
- Renegotiation/Disputes
To get a credit note for the required amount follow this procedure:
- Amend the schedule to show the final net position and billing amount to the client. This could involve removing ads or giving additional discounts etc.
- Use NEOSYS New Invoices and request a new "invoice". You will actually get a credit note representing the changes that you have made in step 1.
NB. Do NOT select Invoice Type: "Credit Note" since this is for totally reversing the total invoiced to date.
What if none of the discount and charge columns are vacant?
You can place multiple discounts in one column using / to separate the discounts eg "-5%/-1% discount". An optional additional word/comment must be preceded by a space.
Debit Notes for increase in billable amount
Note that you can also get debit notes (supplementary invoices) in a similar manner to the above if you add ads or increase costs on the schedule.
If you both add and subtract ads and costs then the additional "invoice" issued is either a debit note or credit note depending if the net effect increases or decreases the amount payable by the client.
Credit Note for reissuing "amended" invoices
Sometimes you wish to completely reissue an invoice which has been incorrectly raised. This can happen both when the erroneous invoice has been sent to the client and beforehand.
Good accounting procedure requires that once an invoice has been issued then it cannot simple be "cancelled" and forgotten as if it never existed. It must first be reversed by issuance of a "credit note" which is a kind of invoice with a negative amount. The logic is that there should not be two slightly documents floating around with the SAME INVOICE NUMBER as this can lead to accidental or deliverate confusion.
So, if an invoice has been issued wrongly and you wish to provide a corrected version then follow this procedure:
- Reversal the original invoice using NEOSYS "New Invoices" with Invoice Type option "Credit Note".
- Amend the schedule to what you want it to be
- Get a new invoice
Note: It doesnt matter what order steps 1. and 2. are done. Even after you modify a schedule, NEOSYS remembers exactly what was invoiced and reverse what was invoiced, not what is on the schedule at the time of requesting the credit note.
It doesnt matter how you amend a schedule, NEOSYS always keeps an internal copy of the schedule "as it was invoiced".
Issuing separate invoices or credit notes for selected discounts and charges
NEOSYS can optionally provide clients with a supplementary invoices/credit notes for certain discounts and charges. Without this option, all discounts and charges would have to show on a single invoice.
On media plans and schedules append the letter "X" (or "x") to the discount or charge(s) that are not to show on the initial invoice and should appear on a separate invoice/credit note.
For example, enter a discount as -5%X if it is to be shown on a separate credit note.
When creating invoices to clients, an option is provided on the invoice creation form to allow raising of either a) the initial invoice only, or b) the final invoice/credit note only or c) both at the same time.
You cannot raise the final invoice/credit note unless the initial invoice is actually raised. Note that this means that you cannot get proforma invoices for the "Both" option.
Booking without showing all discounts and charges from the supplier
NEOSYS can optionally issue media booking orders with certain discounts and charges omitted.
This allows the final net cost of media to be recorded in NEOSYS while not forcing the final net cost to be shown on booking orders.
On media plans and schedules append the letter "X" (or "x") to the discount or charge(s) that are not to show on the booking order.
For example, enter a discount as -5%X if it is not to be shown on the booking order.
Concepts and Calculation under Discounts and other charges
What is net amount?
Net Amount in the following discussion refers to the interim resultant amount after all the additions and deductions are made up to the point in question - ignoring any additions and deductions in columns to the right. It is therefore a varying amount (not shown on the screen or printout) and depends on where you are in the steps of progressive calculation towards the final Net Amount which is shown in the Net Unit Amount column on screen and printouts. If we say "10%N" (or just "10%" since N is always implied) then we mean 10% on the Net Amount as defined above. By comparison, "10%n" means 10% calculated on “one before net”, in other words, 10% of the intermediate net amount calculated *before* the last addition/deduction.
Calculation in discount/charges columns
| Code | Explanation | Format |
|---|---|---|
| g | It means "one after gross". If "g" is appended it means the value is xx% of the value in one column after the gross column | xx%g |
| G | It means "on gross".If "G" is appended it means the value is xx% on the gross amount | xx%G |
| n | It means "one before net". If "n" is appended it means the value is xx% of the value in one column before the net column | xx%n |
| N | It means "on net". If "N" is appended it means the value is xx% of the net amount | xx%N |
Below are few examples of the usage of these codes. Check the calculations highlighted in green in particular, to understand the difference when using these codes. By default calculations in a column are carried out on the net value available from the previous column to the left. If the immediate previous column is empty, then the net amount from the next column available to the left is considered for calculation.
The codes listed above can be used in any column under discounts and charges to override the default calculation.
Note that sometimes different codes effectively mean the same thing. For example N, G, g or n in the first addition/deduction column all mean the same thing since there is nothing to work on but the Gross Unit Amount.
Significance of “g”
In the example below we use “g” to calculate fee on Gross + "one after gross" which in this case is Loading. If loading were absent, then the value present in the next available column to the right of gross column is used as the "one after gross". By default each column calculation is carried out on the net value. If "g" were absent, then fee would be calculated on the net. In this particular example we append "g" to fee and loading is present, hence fee is calculated on Gross + Loading.
Below is the screenshot of the example.
Calculation of Bill with the use of “g” is as follows:
| Bill | Gross | Loading | Discount | Commission | Fee | Total | |
|---|---|---|---|---|---|---|---|
| Value (AED) | 100 | +12 | -11.2 | -20.16 | +5.6 | 86.24 | |
| Explanation | +12% of 100 | -10% of 112 | -20% of 100.8 | +5% of 112 | 86.24 | ||
| Cumulative | 100 | 112 | 100.8 | 80.64 | 86.24 | 86.24 |
Significance of “G”
In this example, we use “G” to calculate fee on gross. By default, fee would be calculated on the net obtained from the first available column to the left which in this case is the commission column. We specify “G” to override this default calculation. Below is the screenshot of an example.
Calculation of Bill with the use of “G” is as follows:
| Bill | Gross | Loading | Discount | Commission | Fee | Total | |
|---|---|---|---|---|---|---|---|
| Value (AED) | 100 | +12 | -11.2 | -20.16 | +5 | 85.64 | |
| Explanation | +12% of 100 | -10% of 112 | -20% of 100.8 | +5% of 100 | 85.64 | ||
| Cumulative | 100 | 112 | 100.8 | 80.64 | 85.64 | 85.64 |
Significance of “n”
In this example we use “n” to calculate fee on "one before net". In this case Discount is the column which is "one before net" as the net value is obtained from the Commission column. If commission column was empty then Discount would be considered as the "net" column and Loading would be the "one before net".
By default each column calculation is carried out on the net value. If "n" were absent, then fee would be calculated on the net from the commission column. In this particular instance where we append "n" to fee and commission and discount are present, fee is calculated on net available in the discount column.
Below is the screenshot of the example.
Calculation of Bill with the use of “n” is as follows:
| Bill | Gross | Loading | Discount | Commission | Fee | Total | |
|---|---|---|---|---|---|---|---|
| Value (AED) | 100 | +12 | -11.2 | -20.16 | +5.04 | 85.68 | |
| Explanation | +12% of 100 | -10% of 112 | -20% of 100.8 | +5% of 100.8 | 85.68 | ||
| Cumulative | 100 | 112 | 100.8 | 80.64 | 85.68 | 85.68 |
Significance of “N”
We use “N” to specify default calculation which is "on net". Hence appending "N" or blank space has the same effect. In this example, fee is calculated on net after commission is subtracted. Below is the screenshot of an example.
Calculation of Bill with the use of “N” is as follows:
| Bill | Gross | Loading | Discount | Commission | Fee | Total | |
|---|---|---|---|---|---|---|---|
| Value (AED) | 100 | +12 | -11.2 | -20.16 | +4.03 | 84.67 | |
| Explanation | +12% of 100 | -10% of 112 | -20% of 100.8 | +5% of 80.64 | 84.67 | ||
| Cumulative | 100 | 112 | 100.8 | 80.64 | 84.67 | 84.67 |
Commission based costing
It’s the situation when the commission is not returned to the client and no fee is charged. An example is shown below
In this example agency subtracts commission of 5% from the cost and not from the bill as commission is not returned to the client. No fee is charged in this transaction.
Fee based costing
It’s the situation when commission is returned to client and a fee is charged. An example is shown below
In the example agency subtracts commission of 5% from the bill and the cost, and charges the client a 15% fee for this transaction.
Posting media supplier invoices before issuing schedules to the client
Assuming that you are accruing media costs by schedule and not by vehicle or supplier then the contra account of the supplier invoice posting will be the schedule code or, if the schedules codes are pure numbers then SCH9999 where 9999 is the number of the schedule.
Supplier invoices posted before issuing invoices to client are work in progress (assets) but, in NEOSYS common practice, we still post them into the Media Accruals Ledger which could more properly be called Media Accruals/WIP Ledger.
The accrual account for the schedule is created as soon as the schedule is approved and not only when the invoice is issued to the client. Schedule approval happens in practice automatically at the time of the first booking. Therefore unless you book a schedule (or specifically enter the approval date on the schedule file, there will be no accrual account created for you to post the supplier invoice into. This is logical since if you haven't booked or specifically approved a schedule then you should arguably not be able to post supplier invoices for that schedule.
Removing unnecessary items from List of Schedules Pending Invoices
Removing unnecessary items from List of Schedules Pending Invoices
Handling online media
Situation explained
Online Media usually deal in hundred thousand impressions. Eg. 500,000 impressions or 1,000,000 impressions – and the best way to deal with this in NEOSYS is to enter them as a package on the rate card – i.e. 1 rate for 500,000 impressions.
However when handling free to agency / free to client there seems to be a problem and I have outlined an example: Agency cost: 500,000 impressions paid and 500,000 impressions free Client bill: 750,000 impressions paid and 250,000 impressions free
In this case a package can't be made of 500,000 each as then it shows the same for the client.
Solution
This is a costing issue so it should show in the existing costing columns as follows:
Handling long term bookings in Outdoor, Digital or continuous daily bookings in Newspapers
Incase you need to do bookings for a series of days i.e. 10 days or 4 weeks, especially with Outdoor, NEOSYS allows you to enter the same in the specification as follows:
Outdoor hoarding site near Airport,4 weeks
Outdoor hoarding site near Airport,10 days
Outdoor hoarding site near Airport,1 month
Once you do this, enter the starting date of the campaign in the date grid box.
This feature doesn't have an effect on the amounts, but instead NEOSYS calculates the start and stop date based on the date you select in the Date grid.
Processing List of Wrong Ads
Agencies have to cope with the fact that ads places in publications can go wrong and hence NEOSYS has come up with the following feature to followup/generate a report of such wrong ads which need action:
- In the Certification File, generate the required list of ads pending certification, and in the space to enter the Certificate/Voucher/Page number, put the same wrapped in round brackets eg. (XXXX).
- Later on you can take the ordinary List of Ads Pending Certification report and it will include all those with the Certificate/Voucher/Page numbers in brackets just as if there was no number at all and thereafter you can followup on such ads.
Processing wrong Incoming Media Supplier Invoices
If you find that the invoice amount is not correct or any discrepancy, NEOSYS has created a special function to distinguish/followup on such invoices for reporting purposes. To enable this feature follow the procedure below:
- In the Supplier Invoice File, generate the required list of ads pending supplier invoices, and in the space to enter the supplier invoice number, put the same wrapped in round brackets eg. (XXXX).
- Later on you can take the ordinary List of Ads Pending Supplier Invoice report and it will include all those with supplier invoice numbers in brackets just as if there was no supplier invoice number at all.
For more information on handling Incoming Media Supplier Invoices, go to Processing of Incoming Media Supplier Invoices
Handling booking of additional dates on already booked lines
Situation explained
In a schedule which has a line which is already booked (eg. booking order no 10001) and later on you add another date to that line and book the same (eg. booking order no 10002) and thereafter you cancel or amend the 1st ad, the cancellation or amendment order mentions the booking order reference number of the 2nd booked ad (i.e. 10002).
Solution explained
NEOSYS is designed to only show the last booking order as it doesn't support handling of multiple dates with multiple orders as ad dates are not linked to the booking order number. In such a situation above, any new dates have to added on to new lines in the same schedule. Incase you do need to add the date to the same line, then it is recommended that you cancel the first ad and rebook both the ads again.
How to book a schedule with one vehicle in different lines with different currencies
Situation explained
Vehicle ABC with currency USD was selected on line 1 of a schedule and thereafter you enter a couple of other lines for other vehicles. Later on you change the currency on the Vehicle File of vehicle ABC to be AED and enter another line in the schedule - i.e. line 4 for vehicle ABC with currency AED. Now, when you go to book this vehicle and click on the book button on the New Booking Order Page, the booking order will show only the 1st line of that vehicle as NEOSYS cannot send a consolidated booking order for the same vehicle with different currencies.
Solution explained
Hence you need to send separate booking orders for the same vehicle as they are in different currencies. So, either you can book vehicle ABC from line 1 first and click on the book button again to book the next one, or if you want to book vehicle ABC from line 4, just put in the line number of the schedule in the option below and click on book.
How to book specific lines in a schedule with multiple lines of that vehicle
Situation explained
Schedule has several lines for the same vehicle. You want to create separate booking orders for each line or a combination of lines.
Solution explained
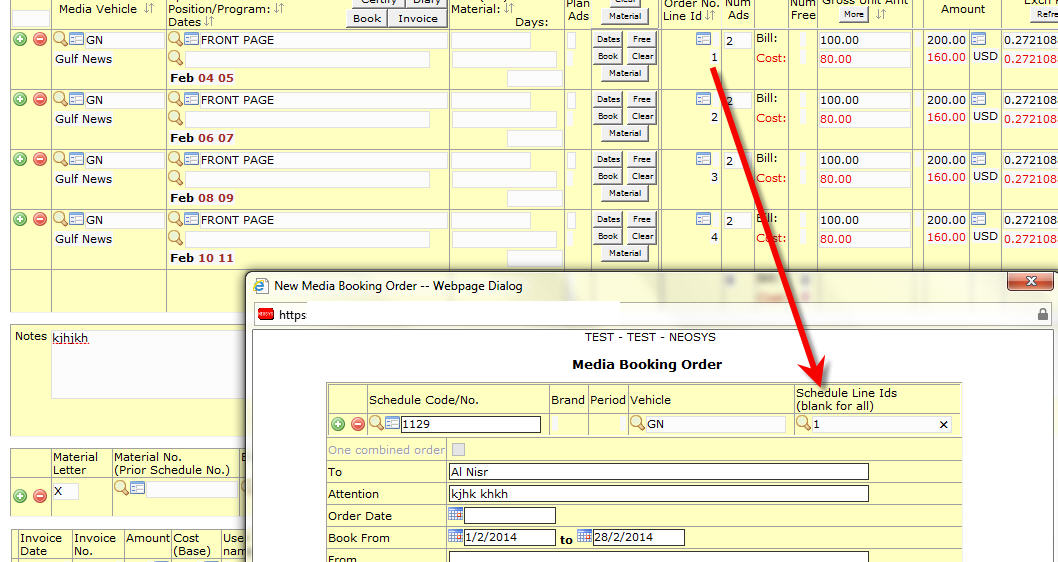
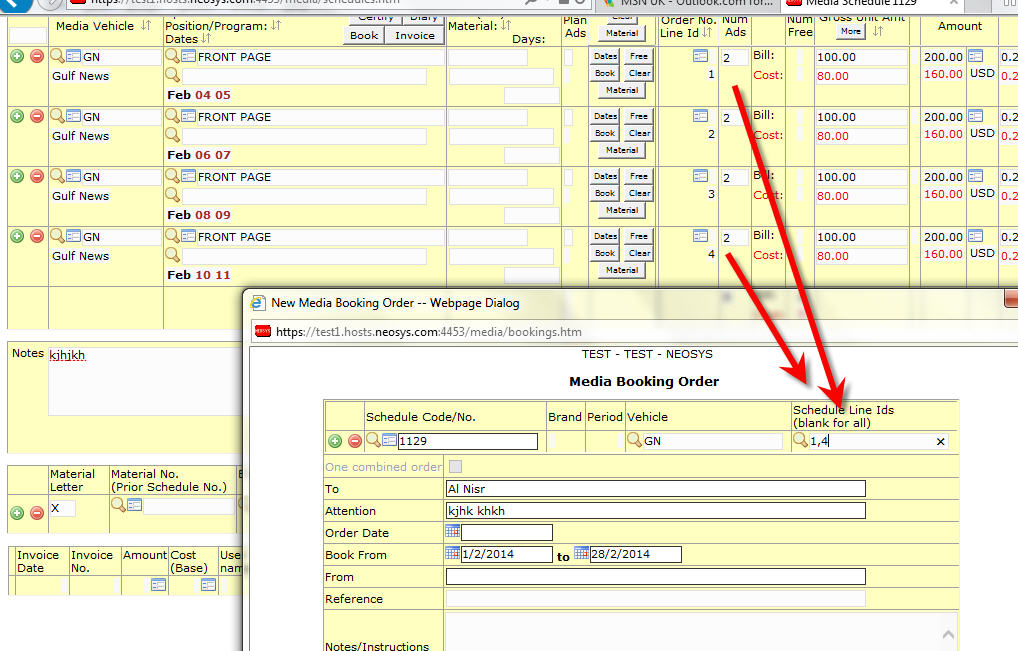
You need to specify the line number while generating the booking order. In case you want only one line, then specify that line number in the Schedule lines Ids field. If you want a combination of lines then specify those line numbers in the Schedule lines Ids field.
To book a single line
To book a combination of lines
How to handle production costs on media rate cards
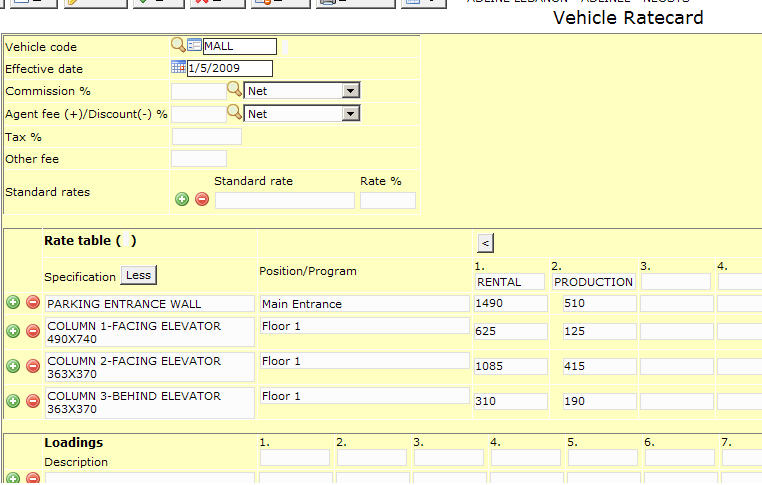
Some media like out of home often has production costs which vary in parallel with the base cost.
One solution in NEOSYS is to place two columns on the rate card. Then on the schedule select the first column while mentally remembering the second amount, then simply type the second amount into the “Loading” or “Other” column. This is likely to be automated in the next version NEOSYS.
If there are any discounts and charges and they apply only to the base cost then placing the production charges in the “Other” column makes it clear to everybody that they do not take part in the discounting.
Getting media executive sales commission statements
NEOSYS can calculate both due and pending commissions as a percentage of the net cost to the client for each ad. The percentage can be determined by the number of days between the invoice and the receipt. Client receipts must be entered into the NEOSYS finance module and allocated against the invoices
The commission structure must be setup beforehand in the Media Configuration File as follows:
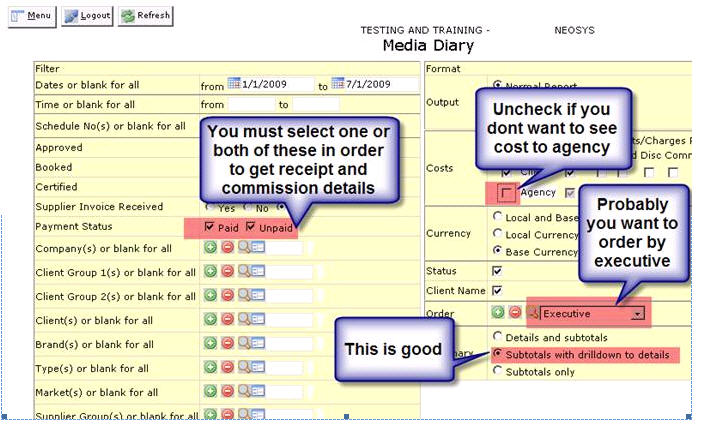
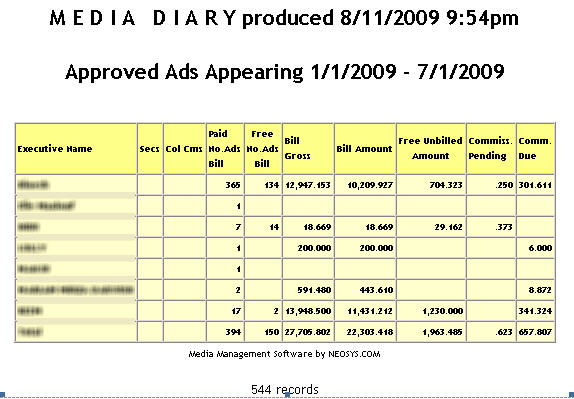
Once the commission structure is setup, use the Media Diary to get commission statements. Make sure that you select one or both of the options “paid” or “unpaid” otherwise you will not get any receipt or commission columns
This will give you a report something like the following which shows the total commission due and pending per executive
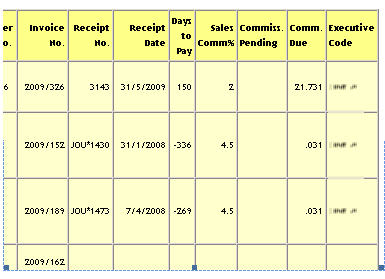
You can click on the summary total lines to see the details including the commission % and amount per ad as follows.
Specifying Gross Unit Bill Amount to Client in Ratecards
Normally the Gross Unit Bill Amount (in other words, the gross unit cost to the client) is taken from whichever column the user selected from the ratecard when creating media plans or schedules.
- You may specify, in the ratecard's Client Rates section, which is the default ratecard column to be used per client and/or per brand but this can be overridden during selection.
- If there is a column titled BILL or CLIENT in the ratecard, and there is no default Ratecard Column specified for the client and/or brand, then that column will be used for the client.
Specifying Gross Unit Cost to Agency in Ratecards
Normally the Gross Unit Cost Amount (in other words, the gross unit cost to the agency) is taken as a copy of the Gross Unit Bill Amount to the Client, however NEOSYS can get a different rate in a number of ways.
- Agency Ratecard Column can be specified per client and/or per brand in the Client Rates section of the ratecard
- Otherwise, if there is a column titled COST or X in one of the columns after (to the right) of the column selected for the client.
- The ratecard used to decide the agency costs may be different from the ratecard for the client. Use the Vehicle Cost File to specify the date of the rate card that the agency uses.
- You can specify a "column offset" in the Vehicle Cost File. For example a cost offset of 10 would mean that if the first ten columns are rates for the client then the second 10 columns would the costs to the agency in parallel. ie if the client rate is taken from column 3 then the agency rate will be taken from column 13.
Restricting Access to Selected Ratecard columns
In the Authorisation File put a task called RATECARD ACCESS “XYZ” where XYZ is the title of the ratecard column eg “COST”. The quotes are required.
Add an appropriate lock to the task and give the key to the authorised users only in the usual way.
Alternatively you can restrict access to the first 10 columns with a task RATECARD ACCESS A (with no quotes). The second 10 columns can be restricted with RATECARD ACCESS B .. and so on up to the current maximum of 40 columns.
Showing the Brand/Product Name on Booking Orders for Sundry and Agency clients
On booking orders for clients which are marked as “Sundry” or “Agency” clients, the brand name (from the NEOSYS Client/Brand File) is presented as the client name and the product name is omitted.
If you still want the product name to show on the booking order enter the brand name on the Client/Brand file with a colon in the form “XYZ Corp:ABC”.
Managing Materials
On the NEOSYS media, schedules menu the List of Materials report can be used to track materials.
When schedules are created, materials are automatically created in the material file. The material code is scheduleno-plus-material code e.g. XXX9999:A. For example, a schedule with code XXX9999 which has three material letters A, B and C within it automatically creates three new materials in the material file with material codes of XXX9999:A, XXX9999:B and XXX9999:C.
Effectively, materials are automatically identified from the schedule data entry from the first schedule number on which they are used.
When materials are reused from one schedule to another, in order to avoid creating new entries in the material file for a new schedule which is actually just reusing the materials of an previous schedule one must enter the prior schedule code into the table of materials on the bottom of the schedule file data entry for the new schedule.
Although material size can be written per line in the main body of the schedule, if you want size to show in the list of materials, it must be re-entered in the table of materials at the bottom of the schedule data entry. This is because although you can indicate a pattern of materials with different sizes within one line of the schedule (A,B,C etc) but there is only one column to enter the size for all of them. So in this case the size cannot be usefully entered in the lines of the schedule and must be entered below per material.
Likewise the brand code can be indicated per material code. This is useful when there are multiple brands on a media schedule since one cannot otherwise indicate multiple brands on a schedule. If the brand code per material is not specified (i.e. left blank) in the material table then the overall schedule brand code is used instead.
Multi-brand plans and schedules
NEOSYS requires that designate a brand for each plan or schedule. If you must execute multiple brands on one plan or schedule then you have to designate a master brand, perhaps a “corporate brand”. You can further indicate the exact brands in various places within the body of the plan/schedule but in particular you can indicate the brand code per material, in the material table at the bottom of the plan/schedule data entry screen. This goes part way to supporting multi-brand plans/schedules. For example the media diary shows the brand per material however the billing analysis reports and most other NEOSYS documents are based on the overall brand of the plan/schedule.
Using NEOSYS VAT/Sales Tax Accounting for Media
Setting up standard Sales Tax Percentage
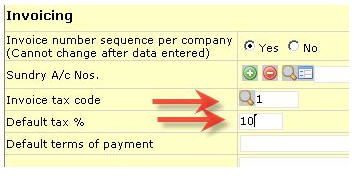
If all schedules should have the same VAT/Sales Tax% then specific it in the media Configuration File.
The VAT/Tax code can be changed here too but is not optional and cannot be overridden per schedule.
Create a schedule with VAT/Tax%
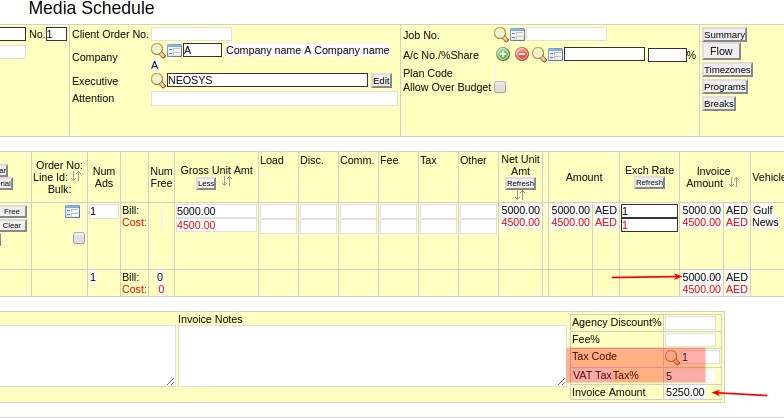
If a standard VAT/Sales Tax% is not defined in the media Configuration File then you must `manually add the tax percentage at the bottom of every schedule that should have tax.
Create the invoice
Before you do this, Issue a proforma invoice first to check that the tax appears correctly.
Post the Sales Invoice Journal created
In Finance Journals, check that the tax columns appear, the tax amount is correct, and then post it.
Check that the Sale Tax A/c is correct
It should show an entry for the tax liability incurred by issuing and posting the above sales invoice.
Accounting entries created by the Media System
Invoice journal entries are created automatically but are left un-posted under Menu > Finance > Journals > Journal Entries - Media Invoices/Credit Notes (INV).
Note: These entries are generated automatically by NEOSYS
Entries when client is invoice for 120 with cost 100
Client A/C             Dr.  + 120
Income A/c             Cr.  - 120

Cost A/C               Dr.  + 100
Media Accrual A/C      Cr.  - 100 (Schedule a/c)
Note: Media accrual is a provision done as you haven’t received supplier invoice.
Entries on received a supplier invoice that media has accepted
Note:But while entering the Media Purchase Invoice (Supplier Invoice) you need to pass a manual entry under Menu > Finance > Journal > Journal Entry - select Media Purchase Invoice, and enter the journal as follows:
Media Accrual A/c      Dr. + 100 (Schedule a/c)
Supplier A/c           Cr. - 100
For a more detailed note on this topic, refer to Processing of Incoming Media Supplier Invoices
Allocating amounts in the accruals a/c against the supplier invoice
At the same time of receiving/posting the supplier invoice
To allocate the accruals against an incoming supplier invoice, you may click on the ALLOC VCHS column in the Media Purchase Invoice journal and from the pop-up list of unallocated items, click on Allocate and save the document - these items will not appear as outstanding in the accrual ledger.
After receiving/posting the supplier invoice
Many a times at the time you receive the supplier invoice you are unable to allocate the same against the outstanding items in the accrual account. Hence after posting the same and/or at a date you can go to Menu > Finance > Vouchers > Vouchers Allocation and enter the accrual account number and click on OK - here from the unallocated supplier invoice amounts, select the one you want to allocate by clicking on Allocate button and thereafter it pops up a list of all accruals which are allocatable. From this list select the ones you want to allocate.
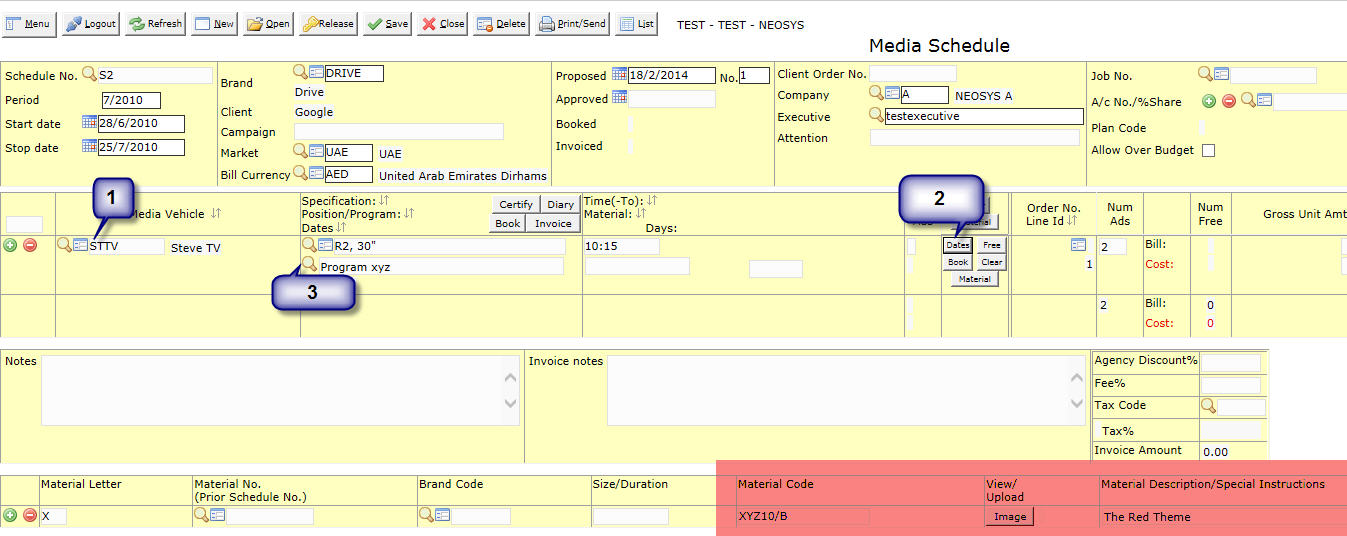
Selling TV spots
Setting up the master files
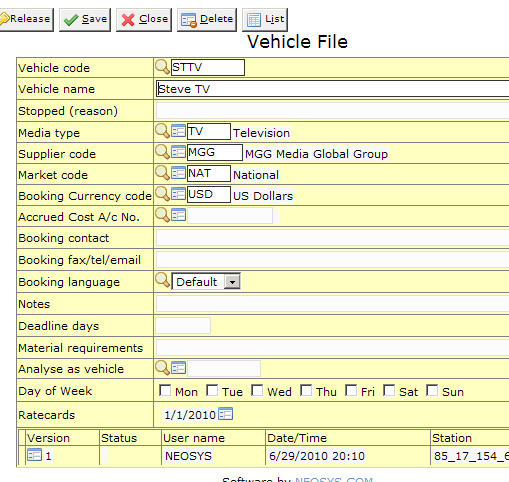
Create a vehicle
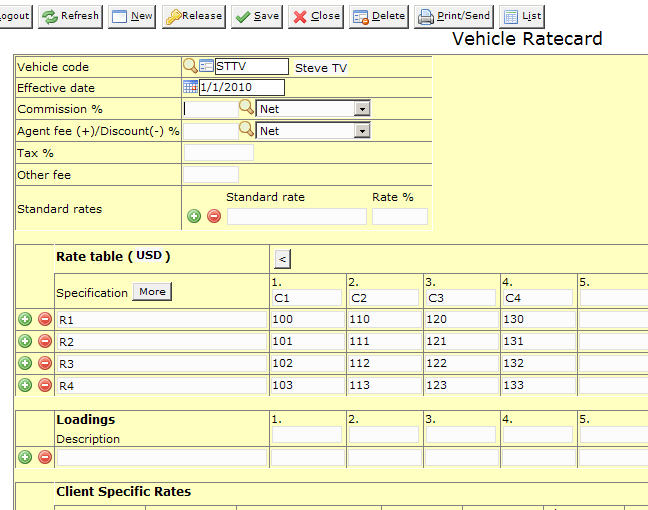
Create a rate card with standard price brackets
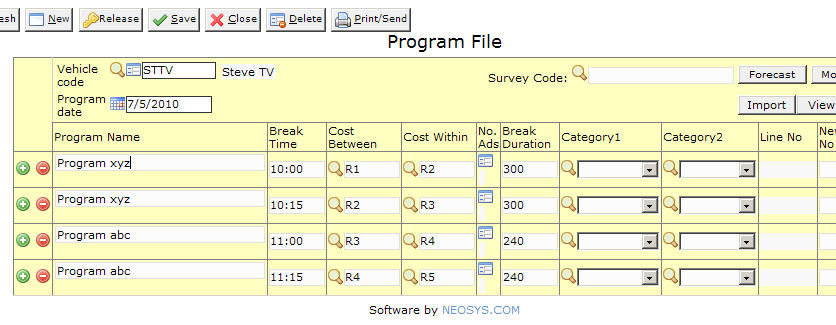
Specify the station programs and break times/durations for every date (there is a way to import as well)
Entering orders from clients
Enter ads roughly into programs (not into breaks yet)
You must follow the 3 step process below. Specification comes automatically.
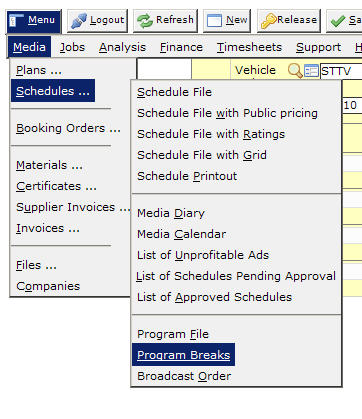
Positioning ads in breaks
Closer to the actual date position all the ads precisely into breaks
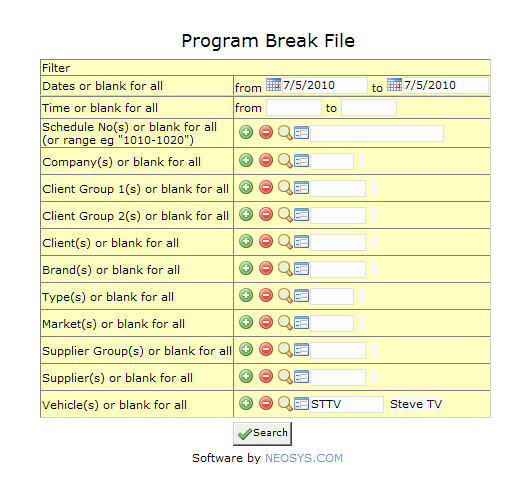
Lets have a look at all ads on July 5th
Select an un-positioned ad
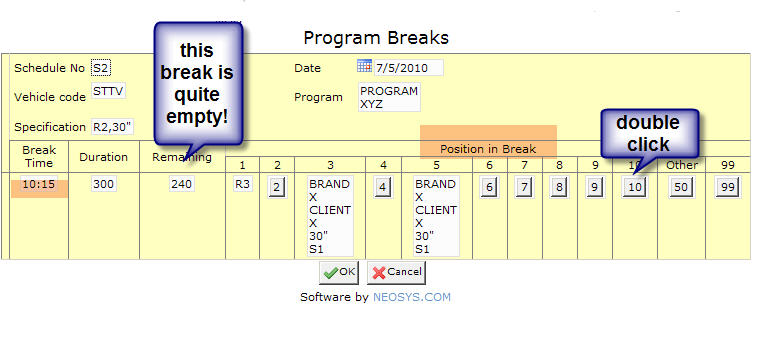
Finally select where in the break this ad should appear compared to other ads.
There is only one break in this program.
Issuing orders to the stations
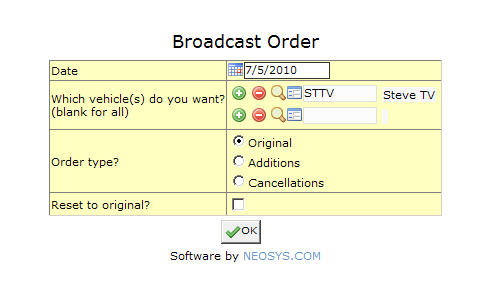
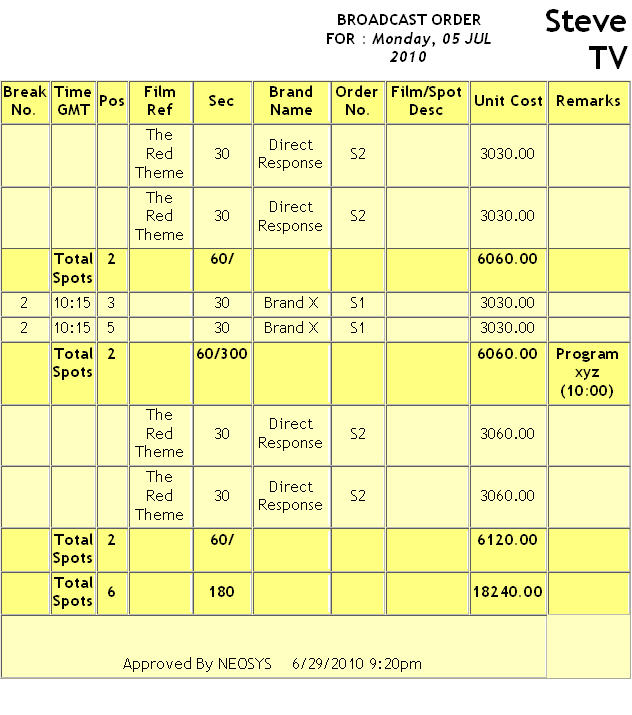
Close to the day of execution issue an order to the station
Exporting to other finance systems
Exporting Invoices in Excel Format
Using NEOSYS Invoices menu, Audit Invoices/List
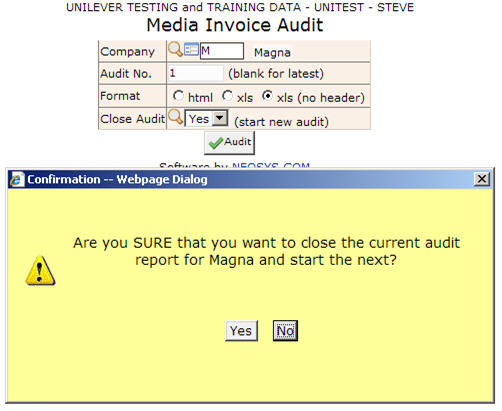
To “export” we run the normal audit procedure but with output format=xls.
You can also get an html version of the invoices but this currently doesn’t show all the third party system alias codes.
Classic concepts from financial audit are used to ensure a complete and unduplicated stream import files and invoices. NEOSYS uses system controlled sequential audit numbering so that you can ensure that you have all the invoices up to a certain point and be confident that there are no duplications. The system still works when invoice numbering is discontinuous for any reason.
Steps:
- (Optional/Repeatable) EXPORT WITHOUT CLOSING
- Followed by visual inspection and maybe a *trial* (not real!) import into other system.
- Any new invoices generated afterwards will be appended to the old batch.
- EXPORT AND CLOSE
- Closing will “finalise” the audit batch ensuring that the same invoices will not be exported again.
- To “re-export” a prior batch, specify the right audit number – for example the one prior to the current audit no.
- If re-exporting, then the current latest other-system client/supplier alias codes will be used
- Import the exported file/audit batch into your other system.
- If any other-system client/supplier alias codes are wrong then fix the codes in NEOSYS and repeat from the previous step
- Repeat from 1.
Notes: To find the current audit number, run the audit report in html format WITHOUT closing.
All invoices are appended to current latest audit batch no. Audit batch no starts from “1” per company if invoices are numbered by company, or per database if not.
If you export and don’t close then any new invoices raise subsequently will be APPENDED to the current latest audit batch no.
If you export and don’t close then you should *not* import that batch into your other system (except perhaps on a trial basis) because the next export will contain the same invoices PLUS any new ones. If you do try to import both the old and new version of the same audit batch number then before you import the new version of it, you must edit out the invoices that you have already imported. If you attempt to import both the old and the new extended version of the same audit batch number without doing any editing then your import will:
- Fail if it is capable of recognizing duplicate voucher numbers, or
- Import duplicates transactions if it cannot.
Once you close, then all new invoices will start being appended to a new batch of invoices with a new audit no.
Copying Plans created in Excel to NEOSYS
Steps to copy plans created in Excel to NEOSYS :
- Create an Excel sheet as shown below
- Ensure that the title name for each column in the excel sheet is as per the field name in the schedule file
- To save time you only need to put one of two words of the column title eg media or vehicle will have the same effect as Media Vehicle )
- Copy ALL the cells from the excel file including the header row
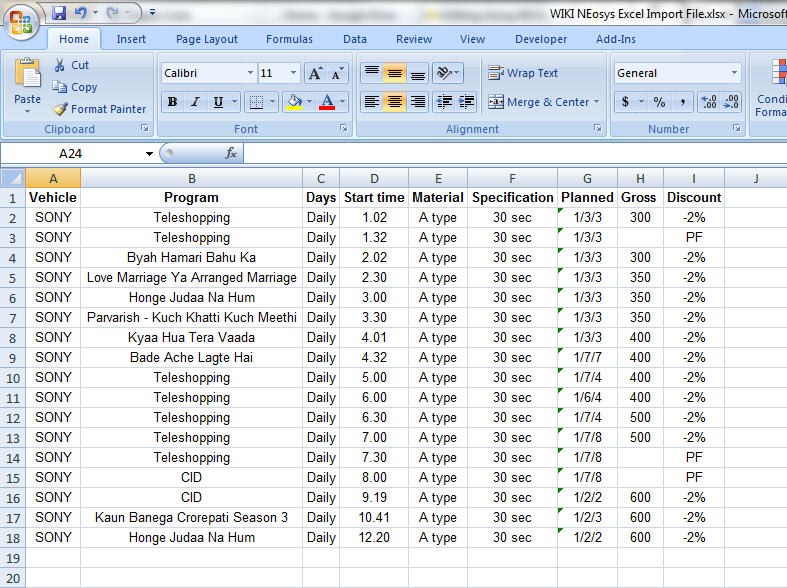
- In NEOSYS, open the required schedule, go to Menu -> Media -> Schedules -> Schedule File
- Enter the schedule details such as schedule no., campaign, company etc

- Click on the media vehicle field and paste the copied cells
How does automatic certification work?
The columns of the import file are matched with scheduled ads as follows:
- date: Must exactly match the scheduled date (if the time is greater than 24:00 then 25:00 on 20/01/2010 does *not* match 01:00 on 21/01/2010, nor does it match 01:00 on 19/01/2010)
- "submedium" : Must be exact Vehicle Name or exact Alias in NEOSYS Vehicle File (case insensitive)
- "brand" : Must be exact Brand Name or exact Alias in NEOSYS Client/Brand File (case Insensitive)
- "duration" : Must match duration on NEOSYS Schedule File from -1 to +3 seconds
- "advertizing time" (*not* "program time") : Must be no more than 30 mins before, or 30 mins after, the scheduled time or time range.
In case there are multiple matching ads in the schedule file for some ad in the import file then only the first scheduled ad found will be certified. The remainder will remain uncertified unless there are also multiple similar ads in the import file. Only if there are an equal number of matching ads in the import file will all the scheduled ads be certified.
In case there is more than one similar ad in the import file for an ad that has been scheduled, then the balance of the imported ads will be loaded into the unmatched ads file.


